I'm preparing to upgrade my Fedora Core 4 system to Fedora Core 6 and have figured out how to install the source dependencies for Cinelerra in Core 6 relatively painlessly in an instance of a VMware virtual machine.
I use yum to install the dependent packages.
I needed to do the installation in a number of separate steps, due to some repository conflicts for ffmpeg-devel sources between the fedora base and livna repos, as well as some trickiness with mjpegtools.
Here are the steps:
1) make sure you have the correct repositories in yum.
2) install the dependencies using the shell script below
- this script includes everything except mjpegtools
3) remove the livna repositories from yum and install mjpegtools (ffmpeg-devel, optional)
4) get the source code
5) compile Cinelerra from source
Step 1: Make sure yum repositories are available
In order to install Cinelerra from source, you will need to have the following repositories in yum:
1) fedora core, extras and updates
2) dries
3) livna
3/31/07 Note: do NOT have the freshrpms repository listed in yum when you do the install.
The Cinelerra CVS source code will not compile against the ffmpeg in Freshrpms. Reference: https://init.linpro.no/pipermail/skolelinux.no/cinelerra/2007-March/010361.html
Here's a nice rpm that installs the livna repositories into yum for you: rpm -ivh http://rpm.livna.org/livna-release-6.rpm
And don't forget the RPM key imports for each repository, such as the dries key: rpm -ivh http://dries.ulyssis.org/rpm/RPM-GPG-KEY.dries.txt
Step 2: Install dependent files
Here is the list of dependencies needed, already in the form of a shell script ready for you to cut-and-paste into your favorite text editor:
yum install \
libquicktime \
gsm-devel \
xvidcore* \
lame \
lame-devel \
libvorbis* \
libogg* \
libtool* \
a52* \
libtheora* \
libpng* \
libjpeg* \
libtiff* \
esound* \
audiofile* \
libraw1394* \
libavc1394* \
freetype* \
fontconfig* \
nasm \
e2fsprogs* \
faad2-dev* \
OpenEXR* \
fftw3* \
libsndfile* \
libiec61883* \
x264 \
x264-d* \
faac* \
libdv*
Don't forget to chmod a+x the file!
Steps 3: Install mjpegtools
Remove the livna repositories from yum and install ffmpeg-devel and mjpegtools:
4/3/07 addition (thanks Roland!)
yum --disablerepo=livna install mjpegtools*
If you wish, you may install ffmpeg-devel. But it is not essential for Cinelerra compilation.
Step 4: Get Cinelerra source code
Getting the source files assumes that you have subversion installed:
yum install subversion
Then checkout the Cinelerra CVS trunk:
svn checkout svn://svn.skolelinux.org/cinelerra/trunk/hvirtual
Step 5: Build from source
Build the source from the hvirtual directory:
./autogen.sh
./configure
make
make install
Here are some scripts that show the different portions of the installation process. You'll see the ffmpeg-libs and -devel conflicts at the bottom of script 1. In script 2, I've removed ffmpeg-devel from the initial install. Script 3 shows the successful install of ffmpeg-devel from the dries and fedora extras repositories. Script 4 shows the successful install of mjpegtools. Script 5/6 show the configure and make/make install processes.
typescript.1
typescript.2no_ffmpeg
typescript.3ffmpeg-devel
typescript.4mjpeg
typescript.5configure
typescript.6makeinstall
enjoy!
ALERT!
ALERT!
Just in case you follow these steps and get the dreaded x264 compile error: 'struct ' has no member named 'b_cbr' error, here are the steps to fix it:
http://crazedmuleproductions.blogspot.com/2007/06/dreaded-compilation-error-x264c139.html
Thursday, March 29, 2007
Fedora Core 6 on x86 Cinelerra dependencies
If this post was useful to you..consider buying me a beer via PayPal!
Even a $1 Draft will keep the Mule happily working..and help pay for equipment upgrades!
Friday, March 16, 2007
grungy, grainy video effect
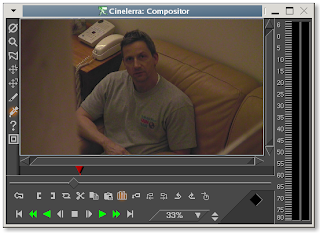
I wanted to degrade a video to black and white and give it a grainy effect. Here's what I started with:
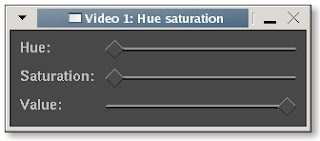
I then used the following settings to extract the color from the image:
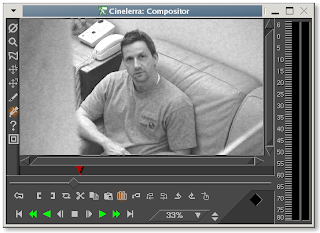
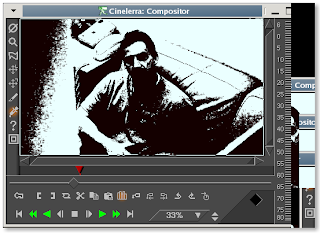
The image then looked like this:
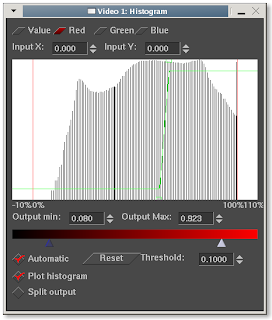
I then applied a histogram effect, tweaking the red/blue/green channels only allowing the higher frequencies:
To give the image a grainy look:
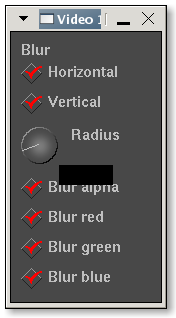
However, the grains looked too sharp, so I applied a blur using a pixel width of 8:
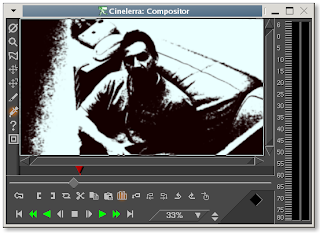
To this result:
Here's a test video (4.7MB):
test video
The next experiment will tweak the audio for additional weirdness.

I then used the following settings to extract the color from the image:

The image then looked like this:

I then applied a histogram effect, tweaking the red/blue/green channels only allowing the higher frequencies:

To give the image a grainy look:

However, the grains looked too sharp, so I applied a blur using a pixel width of 8:

To this result:

Here's a test video (4.7MB):
test video
The next experiment will tweak the audio for additional weirdness.
If this post was useful to you..consider buying me a beer via PayPal!
Even a $1 Draft will keep the Mule happily working..and help pay for equipment upgrades!
Sunday, March 04, 2007
perspective effect used for titles
To begin a recent video, I wanted to simulate the Star Wars introductory title trick, where the titles start close and then fade off into the distance. To do this, I used the Perspective effect. I began with a very simple scrolling title. Note that a Motion Type of "Bottom to Top" is selected, as well as a speed to provide the motion:
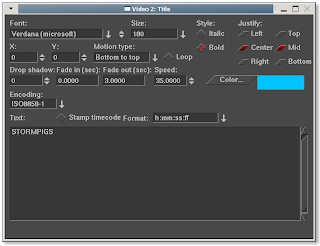
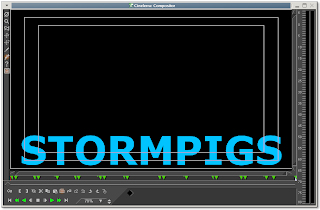
I began the experiment with a very plain title:
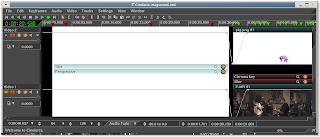
I then applied the Perspective effect to the title:
And clicked on the magnifying glass to start playing around with the parameters of the effect:
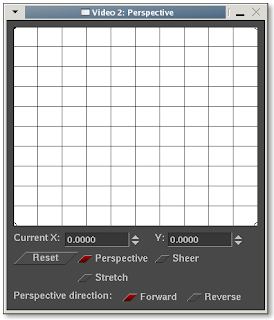
The grid shown represents a flat, two-dimensional space, but grabbing and moving each of the four corners of the grid will create the illusion of three-dimensional space:

Note in the above image that the lower grid corners have been pulled and stretched wider than the dialog box in order for the titles to be really stretched. This enhances the perception of depth, as shown below:
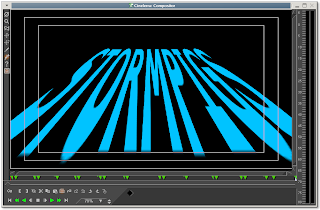
It is extremely effective to apply the perspective effect in combination with some motion. Here is the final result:
perspective_test.mpg
23MB

I began the experiment with a very plain title:

I then applied the Perspective effect to the title:

And clicked on the magnifying glass to start playing around with the parameters of the effect:

The grid shown represents a flat, two-dimensional space, but grabbing and moving each of the four corners of the grid will create the illusion of three-dimensional space:

Note in the above image that the lower grid corners have been pulled and stretched wider than the dialog box in order for the titles to be really stretched. This enhances the perception of depth, as shown below:

It is extremely effective to apply the perspective effect in combination with some motion. Here is the final result:
perspective_test.mpg
23MB
If this post was useful to you..consider buying me a beer via PayPal!
Even a $1 Draft will keep the Mule happily working..and help pay for equipment upgrades!
Subscribe to:
Posts (Atom)

