Following up on my recent posts regarding archiving, here is an excellent summary of optical media and what you can do with it using dvdrtools and cdwrite for Linux:
http://www.freebsd.org/doc/en_US.ISO8859-1/books/handbook/creating-dvds.html
Wednesday, May 30, 2007
good article on Creating and Using Optical Media
If this post was useful to you..consider buying me a beer via PayPal!
Even a $1 Draft will keep the Mule happily working..and help pay for equipment upgrades!
Sunday, May 27, 2007
dar: a solution to archiving video
Like myself, you may have gigs and gigs of video sitting on your hard drive, taking up space that should be used for live projects or new media. And you've filled up your 500GB drive, so that you are constantly having to do piecemeal copies of older material to DVD+R. I have the same problem. But as I get older, I try to be a little wiser and actually solve my problems instead of living with them.
I will make the distinction that you should be using DVD+R for your archives. I have found +Rs to be more reliable for data archival that -Rs.
Here's the problem with doing a straight copy of media files to DVD+R. Look at the directory listing below:
[root@computer ~]# ll /mnt/videos/20050721/
total 20871112
-rwxr-xr-x 1 root root 1469679848 Oct 18 2006 1.m2t-rwxr-xr-x 1 root root 58916 Oct 21 2006 20050721b.xml-rwxr-xr-x 1 root root 3877924864 Oct 22 2006 20050721dvd.mpg-rwxr-xr-x 1 root root 1130843124 Oct 29 2006 20050721.m2t
-rwxr-xr-x 1 root root 45197 Oct 20 2006 20050721.xml
-rwxr-xr-x 1 root root 70478 Oct 21 2006 20060721c.xml
-rwxr-xr-x 1 root root 70431 Oct 24 2006 20060721d.xml
-rwxr-xr-x 1 root root 71543 Oct 24 2006 20060721e.xml
-rwxr-xr-x 1 root root 8549 Oct 25 2006 20060721small.xml
-rwxr-xr-x 1 root root 2065588524 Oct 18 2006 2.m2t
-rwxr-xr-x 1 root root 1755983168 Oct 18 2006 3.m2t
-rwxr-xr-x 1 root root 902360332 Oct 18 2006 4.m2t
-rwxr-xr-x 1 root root 1491412084 Oct 18 2006 5.m2t
-rwxr-xr-x 1 root root 2865367596 Oct 18 2006 6.m2t
-rwxr-xr-x 1 root root 5461152404 Oct 18 2006 7.m2t
Here we see the typical mess of Cinelerra project files, source material (HDV MPEGTS files), and final renders (MPEGs). Now, totaling up the space used for these file, you get about 21GB. Ugh. And given the odd file sizes, you'd end up using about 7 DVDs just to backup what you've got. This is because HDV files are huge, ranging from 1.5GB to 5GB and DVDs only hold about 4.38GB usable space on each. So you're forced to do a statistical combinations balancing act in order to fit as many files on a DVD in the most efficient manner possible. We who live in the land of video production are all living and breathing this headache. What a pain in the ass. But what is the alternative?
The alternative is to find a program that can compress and archive files over multiple DVDs, grouping these files of different sizes and compacting them together. Most importantly, the software should then evenly divide the compressed file archive across multiple DVDs in the most efficient and space conscious manner possible.
Well, lucky for us, the Linux Gods have brought down "dar" from the heavens. Dar (disk archive), available at http://dar.linux.free.fr/, is a command line backup and restore tool that can compress files using the bz2 algorithm, put files into a single archive and divide that archive into manageable chunks destined for backup media of one type or another. For the file listing you see above, dar was able to take it and turn it into this:
[root@computer ~]# ll /mnt/videos/2007-05-27_data.*
-rw-r--r-- 1 root root 4194304000 May 27 2007-05-27_data.1.dar
-rw-r--r-- 1 root root 4194304000 May 27 2007-05-27_data.2.dar
-rw-r--r-- 1 root root 4194304000 May 27 2007-05-27_data.3.dar
-rw-r--r-- 1 root root 4194304000 May 27 2007-05-27_data.4.dar
-rw-r--r-- 1 root root 3912021642 May 27 2007-05-27_data.5.dar
Nice! Easily digestible chunks for a single layer DVD to handle!
Now, the compression that dar acheived was not very much. Total file size went from 2.135GB to about 2.06GB. This is because the MPEGTS files are already compressed, so I'm not going to gain much from bz2. My 3.2Ghz, 2GB, PC3200, RAID0 (stripe set of two IDE drives), Dell 400SC took about three hours and twenty minutes to compress that 21GB. So it's not fast.
Before you get too excited, here are some known limitations of dar:
http://dar.linux.free.fr/doc/Limitations.html
I made sure to give dar a full system test using the steps below.
1) archive the above directory of files
TIME: about three hours and twenty minutes on the system described above.
dar -m 256 -v -y -s 4000M -D -R /mnt/videos/20050721/ -c `date -I`_data
Adding file to archive: /mnt/videos/20050721/20050721e.xml
Adding file to archive: /mnt/videos/20050721/addSecond.sh
..
Update 2008/12/22
If you have 120 minute, 4.7GB DVD+Rs, you can up the number of bytes in each dar to 4400MB or 4,613,734,400 or (4400 x 1024 x 1024):
dar -m 256 -v -y -s 4400M -D -R /mnt/videos/20050721/ -c `date -I`_data
Note: you made need the latest and greatest version of dvd+rw-tools for this large filesize burning to work! I tested this on Fedora 10 and I was able to store and retrieve a 25GB dar archive using this procedure.
Note that you will need to use the "-allow-limited-size" switch to growisofs when you burn these larger than normal files to dvd:
growisofs -Z /dev/dvd -R -J -allow-limited-size filename.dar
end update
In short, the switches I used mean:
Here's the output of that command:
--------------------------------------------
17 inode(s) saved
with 0 hard link(s) recorded
0 inode(s) changed at the moment of the backup
0 inode(s) not saved (no file change)
0 inode(s) failed to save (filesystem error)
0 files(s) ignored (excluded by filters)
0 files(s) recorded as deleted from reference backup
--------------------------------------------
Total number of file considered: 17
--------------------------------------------
The command line switches I used above are well summarized in this HowTo:
http://dar.linux.free.fr/doc/mini-howto/index.html
Also, for you man page readers, here's the nitty gritty:
http://www.die.net/doc/linux/man/man1/dar.1.html
2) validate that the archive is does not contain errors
TIME: about an hour and a half.
dar -t <archive name>
Here is the output of that command:
--------------------------------------------
17 file(s) treated
0 file(s) with error
0 file(s) ignored (excluded by filters)
--------------------------------------------
Total number of file considered: 17
--------------------------------------------
Also, it is helpful to list out the contents of the created dar in order to verify it matches the files you want archived. Here is sample output from another archive I created:
3) write each output file from dar to DVD
TIME: with a 18x burner running at 16x speed to DVD+R, this takes about an hour.
First, check your media:
dvd+rw-mediainfo /dev/dvd
Then burn your archive to disk:
growisofs -Z /dev/dvd -R -J /root/2007-05-27_data.1.dar
..
If you intend to do a lot of archiving, I suggest you purchase a recent model DVD+R recorder. When I first tested dar this past weekend, I had a mess of problems reading the archive files I had burned successfully to DVD. I figured my DVD was three years old and it was time for an upgrade, so I bought the internal version of this drive, the HP DVD940E External 18x Super Multi DVD Writer for $60 with a $30 rebate from Office Depot. The thing performs like a champ!
4) copy the archive from the DVDs to disk
TIME: with an 18x burner, this takes about twenty minutes.
mount /dev/cdrom /mnt/cdrom
cp /mnt/cdrom/* /mnt/videos/
5) validate that the archive files off the DVD do not contain errors
TIME: about an hour and a half.
dar -t <archive name>
While validating my archives off DVD, I encountered one problem:
[root@computer ~]# dar -t /mnt/videos/2007-05-27_data
ERR/6.m2t : compressed data CRC error
--------------------------------------------
17 file(s) treated
1 file(s) with error
0 file(s) ignored (excluded by filters)
--------------------------------------------
Total number of file considered: 17
--------------------------------------------
Bad news. It looks like the data written to one of the DVDs is corrupt. Since I had the originals files and they tested out correct, I re-wrote the archive to new DVDs and did not encounter this problem again. By the way, the test of my 20GB archives took about an hour.
Here is what a successful validation looks like:
[root@computer ~]# dar -t 20081016_data
--------------------------------------------
17 inode(s) treated
0 inode(s) with error
0 inode(s) ignored (excluded by filters)
--------------------------------------------
Total number of inode considered: 17
--------------------------------------------
6) if no errors, restore original files and verify file sizes
TIME: about three hours.
This step is optional, if you've already run "dar -t" to verify the integrity of the archive coming off the DVD. Here is the output:
dar -x 2007-05-27_data
--------------------------------------------
17 file(s) restored
0 file(s) not restored (not saved in archive)
0 file(s) ignored (excluded by filters)
0 file(s) less recent than the one on filesystem
0 file(s) failed to restore (filesystem error)
0 file(s) deleted
--------------------------------------------
Total number of file considered: 17
--------------------------------------------
There was some slowness copying the archives back from DVD (which took about two hours at 4x speed), but that's just the speed of the DVD player. Aside from that 4GB limit, dar live up to its reputation! So I'm pretty happy.
Review
1) archive your files
TIME: about three hours and twenty minutes on the system described above.
dar -m 256 -v -y -s 4000M -D -R /mnt/videos/20050721/ -c `date -I`_data
2) validate that the archive is does not contain errors
TIME: about an hour and a half.
dar -t <archive name>
3) write each output file from dar to DVD
TIME: with a 18x burner running at 16x speed to DVD+R, this takes about an hour.
growisofs -Z /dev/dvd -R -J /root/2007-05-27_data.1.dar
4) copy the archive from the DVDs to disk
TIME: with an 18x burner, this takes about twenty minutes.
cp /mnt/cdrom/* /mnt/videos/
5) validate that the archive files off the DVD do not contain errors
TIME: about an hour and a half.
dar -t <archive name>
OPTIONAL:
6) if no errors, restore original files and verify file sizes
TIME: about three hours.
dar -x 2007-05-27_data
Summary
If you wish to use dar and want to keep your valuable video data in tact for years to come, I strongly suggest you run through steps 1-5 each time you make an archive! Of course, just the basic steps take a total of eight hours for 20GB of data. The optional step brings that total to eleven hours of your time spent.
Of course, you don't have to archive EVERYTHING. Only archive the source videos and maybe the primary intermediates. For example, I archive all my MPEG-TS files from my cam, plus the MPEG2 video and MP3 audio rendered from my project. I DON'T archive the finals: DVD format, iTunes format and MPEG program streams, as I can always reproduce those from the primary intermediates that are rendered from the project.
In the end, you have to ask yourself "How much do I value the work that I've done?"
Going through these steps everytime you make an archive may seem like a pain, but the pain will be worse if your data goes away! You could opt to store your media on a hard drive, but if that hard drive gets near a speaker or large magnet, your data could be lost. If you are going to archive this data for years, it makes more sense to do it on optical formats that are not susceptible to damage by magnetism.
If you do decide to go the dar route and follow these steps, you'll have the peace of mind that your archives are error free.
Hopefully, dar might fit into your backup and recovery schemes. There are a number of other softwares to do something similar. Partimage on the http://www.sysresccd.org comes to mind, though that is used for entire partitions. Also Duplicity is available, but that's strength is in encryption and network backups. To its strength, dar is a proven solution and is very well documented:
http://dar.linux.free.fr/doc/
As I have time, I will post a bit more technical information about the commands used, but the best idea is to research the documentation at the link above, as well as do a simple "dar -h" at the command line for a listing of all the available features.
Update 1/4/2014
The Extraction Process Redux
I've been restoring dar archives from DVDs. Today, I pulled out a couple five DVD dar archives that I originally created four years ago. Each DVD took about six minutes to copy over to my hard drive. I'm happy to say that dar restored the individual video files that I specified without any problems. Here's a sample command:
dar -x 20090430_data -g 20090430.m2v
However, dar did spit out this message:
File ownership will not be restored as dar is not run as root. to avoid this message use -O option [return = YES | Esc = NO]
Continuing...
Error met while opening the last slice: This is an old archive, it can only be opened starting by the first slice. Trying to open the archive using the first slice...
Even with this message, the archived files restored without error.
The commands above mean:
-x = extract
-g = subdirectory to include in the operation
Also, another good switch is -O, to avoid the "root ownership" message seen above. Be careful of the placement of -O..it has to be the first parameter. Like so:
dar -O -x 20090430_data -g 20090430.m2v
After giving the -O parameter in the above command, all you should see is the "Error met while opening the last slice" message.
Update 10/1/2008
The Extraction Process
I pulled out a 6 DVD dar archive that I originally created more than a year ago and I'm happy to say that dar restored the files without any problems. Specifically, I needed to pull one MPEG video from a dar archive of about 25 files. The dar command to extract one specific file was relatively simple:
dar -x -I *.mpg
-x = extract
-I = include following filespec in operation
So my command ended up looking like this:
dar -x /mule/20060831 -I *.mpg
One thing I noticed is that depending on the archive, wildcards (like *.mpg) may work, but not all the time. In which case, you should remove the wildcard from the include specification and just use the exact syntax; eg:
dar -x /mule/20060831 -I file.mpg
That's it!
Have a good day!
The Video Mule
5/30/07 update - After using dar for the past couple of days and releasing about 50GB, I have to say that I am really starting to like this new process. It is a consistent, repeatable and efficient approach to archiving my material that I can kick off before bedtime.
10/1/08 update - Dargui is a nice, simple graphical front end to dar. For some reason, though, the filter did not work properly, so I reverted to command line. Perhaps someone else will have better luck.
References
http://dargui.sourceforge.net/
http://dar.linux.free.fr/doc/mini-howto/dar-differential-backup-mini-howto.en.html
I will make the distinction that you should be using DVD+R for your archives. I have found +Rs to be more reliable for data archival that -Rs.
Here's the problem with doing a straight copy of media files to DVD+R. Look at the directory listing below:
[root@computer ~]# ll /mnt/videos/20050721/
total 20871112
-rwxr-xr-x 1 root root 1469679848 Oct 18 2006 1.m2t-rwxr-xr-x 1 root root 58916 Oct 21 2006 20050721b.xml-rwxr-xr-x 1 root root 3877924864 Oct 22 2006 20050721dvd.mpg-rwxr-xr-x 1 root root 1130843124 Oct 29 2006 20050721.m2t
-rwxr-xr-x 1 root root 45197 Oct 20 2006 20050721.xml
-rwxr-xr-x 1 root root 70478 Oct 21 2006 20060721c.xml
-rwxr-xr-x 1 root root 70431 Oct 24 2006 20060721d.xml
-rwxr-xr-x 1 root root 71543 Oct 24 2006 20060721e.xml
-rwxr-xr-x 1 root root 8549 Oct 25 2006 20060721small.xml
-rwxr-xr-x 1 root root 2065588524 Oct 18 2006 2.m2t
-rwxr-xr-x 1 root root 1755983168 Oct 18 2006 3.m2t
-rwxr-xr-x 1 root root 902360332 Oct 18 2006 4.m2t
-rwxr-xr-x 1 root root 1491412084 Oct 18 2006 5.m2t
-rwxr-xr-x 1 root root 2865367596 Oct 18 2006 6.m2t
-rwxr-xr-x 1 root root 5461152404 Oct 18 2006 7.m2t
Here we see the typical mess of Cinelerra project files, source material (HDV MPEGTS files), and final renders (MPEGs). Now, totaling up the space used for these file, you get about 21GB. Ugh. And given the odd file sizes, you'd end up using about 7 DVDs just to backup what you've got. This is because HDV files are huge, ranging from 1.5GB to 5GB and DVDs only hold about 4.38GB usable space on each. So you're forced to do a statistical combinations balancing act in order to fit as many files on a DVD in the most efficient manner possible. We who live in the land of video production are all living and breathing this headache. What a pain in the ass. But what is the alternative?
The alternative is to find a program that can compress and archive files over multiple DVDs, grouping these files of different sizes and compacting them together. Most importantly, the software should then evenly divide the compressed file archive across multiple DVDs in the most efficient and space conscious manner possible.
Well, lucky for us, the Linux Gods have brought down "dar" from the heavens. Dar (disk archive), available at http://dar.linux.free.fr/, is a command line backup and restore tool that can compress files using the bz2 algorithm, put files into a single archive and divide that archive into manageable chunks destined for backup media of one type or another. For the file listing you see above, dar was able to take it and turn it into this:
[root@computer ~]# ll /mnt/videos/2007-05-27_data.*
-rw-r--r-- 1 root root 4194304000 May 27 2007-05-27_data.1.dar
-rw-r--r-- 1 root root 4194304000 May 27 2007-05-27_data.2.dar
-rw-r--r-- 1 root root 4194304000 May 27 2007-05-27_data.3.dar
-rw-r--r-- 1 root root 4194304000 May 27 2007-05-27_data.4.dar
-rw-r--r-- 1 root root 3912021642 May 27 2007-05-27_data.5.dar
Nice! Easily digestible chunks for a single layer DVD to handle!
Now, the compression that dar acheived was not very much. Total file size went from 2.135GB to about 2.06GB. This is because the MPEGTS files are already compressed, so I'm not going to gain much from bz2. My 3.2Ghz, 2GB, PC3200, RAID0 (stripe set of two IDE drives), Dell 400SC took about three hours and twenty minutes to compress that 21GB. So it's not fast.
Before you get too excited, here are some known limitations of dar:
http://dar.linux.free.fr/doc/Limitations.html
I made sure to give dar a full system test using the steps below.
1) archive the above directory of files
TIME: about three hours and twenty minutes on the system described above.
dar -m 256 -v -y -s 4000M -D -R /mnt/videos/20050721/ -c `date -I`_data
Adding file to archive: /mnt/videos/20050721/20050721e.xml
Adding file to archive: /mnt/videos/20050721/addSecond.sh
..
Update 2008/12/22
If you have 120 minute, 4.7GB DVD+Rs, you can up the number of bytes in each dar to 4400MB or 4,613,734,400 or (4400 x 1024 x 1024):
dar -m 256 -v -y -s 4400M -D -R /mnt/videos/20050721/ -c `date -I`_data
Note: you made need the latest and greatest version of dvd+rw-tools for this large filesize burning to work! I tested this on Fedora 10 and I was able to store and retrieve a 25GB dar archive using this procedure.
Note that you will need to use the "-allow-limited-size" switch to growisofs when you burn these larger than normal files to dvd:
growisofs -Z /dev/dvd -R -J -allow-limited-size filename.dar
end update
In short, the switches I used mean:
-m 256   = don't compress files less than 256 bytes
-v       = verbose output showing what is being archived
-y       = activate bz2 compression
-s 4000M = create archives 4000MB in size.  4000MB is 1024x1024x4000 bytes or 4,194,304,000 bytes.
    By the way, 4GB is actually 2 to the 32 power or 4,294,967,296 bytes.
-D       = store directories excluded by the -P option or absent from the command line path list as empty directories
-R       = specify the root directory for saving or restoring files
-c       = create the archive with the following name, using the current date
Here's the output of that command:
--------------------------------------------
17 inode(s) saved
with 0 hard link(s) recorded
0 inode(s) changed at the moment of the backup
0 inode(s) not saved (no file change)
0 inode(s) failed to save (filesystem error)
0 files(s) ignored (excluded by filters)
0 files(s) recorded as deleted from reference backup
--------------------------------------------
Total number of file considered: 17
--------------------------------------------
The command line switches I used above are well summarized in this HowTo:
http://dar.linux.free.fr/doc/mini-howto/index.html
Also, for you man page readers, here's the nitty gritty:
http://www.die.net/doc/linux/man/man1/dar.1.html
2) validate that the archive is does not contain errors
TIME: about an hour and a half.
dar -t <archive name>
Here is the output of that command:
--------------------------------------------
17 file(s) treated
0 file(s) with error
0 file(s) ignored (excluded by filters)
--------------------------------------------
Total number of file considered: 17
--------------------------------------------
Also, it is helpful to list out the contents of the created dar in order to verify it matches the files you want archived. Here is sample output from another archive I created:
[root@computer ~]# dar -l 20081016_data
[data ][ EA  ][compr] | permission | user  | group | size  |          date                 |    filename
----------------------+------------+-------+-------+-------+-------------------------------+------------
[Saved]       [  90%]   -rw-r--r--   root       root    46335   Tue Oct 21 22:09:02 2008        20081016e.xml
[Saved]       [  46%]   -rwxr-xr-x   root       root    990     Sat Oct 18 16:56:45 2008        addSecond.sh
[Saved]       [   8%]   -rw-r--r--   root       root    5663820164      Sat Oct 18 09:25:36 2008        20081016_6.m2t
[Saved]       [   2%]   -rw-r--r--   root       root    26411454        Sun Oct 26 16:29:52 2008        test.mov
[Saved]       [  91%]   -rw-r--r--   root       root    55587   Mon Oct 27 08:23:02 2008        20081016i.xml
[Saved]       [  79%]   -rw-r--r--   root       root    13680   Sat Oct 18 15:41:23 2008        20081016a.xml
[Saved]       [  47%]   -rwxr-xr-x   root       root    1408    Sat Oct 18 17:50:51 2008        2songlist.sh
[Saved]       [  51%]   -rw-r--r--   root       root    1688    Wed Oct 22 08:19:37 2008        vodcastNew.xml
[Saved]       [  47%]   -rwxr-xr-x   root       root    2411    Sat Oct 18 19:13:01 2008        1encode.sh.bak
[Saved]       [   8%]   -rw-r--r--   root       root    1143234956      Sat Oct 18 09:11:36 2008        20081016_4.m2t
[Saved]       [   5%]   -rw-r--r--   root       root    3805975877      Mon Oct 27 04:49:50 2008        StormPigs20081016.m2v
[Saved]       [     ]   -rwxr-xr-x   root       root    146     Sat Oct 18 17:56:25 2008        5ftp.sh
[Saved]       [  10%]   -rw-r--r--   root       root    804122436       Sat Oct 18 09:02:08 2008        20081016_1.m2t
[Saved]       [   8%]   -rw-r--r--   root       root    2091780308      Sat Oct 18 09:05:45 2008        20081016_2.m2t
[Saved]       [  88%]   -rw-r--r--   root       root    30648   Tue Oct 21 21:07:01 2008        20081016c.xml
[Saved]       [  89%]   -rw-r--r--   root       root    40105   Tue Oct 21 21:32:46 2008        20081016d.xml
[Saved]       [  79%]   -rw-r--r--   root       root    12197   Sat Oct 18 15:13:20 2008        20081016.xml
..
3) write each output file from dar to DVD
TIME: with a 18x burner running at 16x speed to DVD+R, this takes about an hour.
First, check your media:
dvd+rw-mediainfo /dev/dvd
Then burn your archive to disk:
growisofs -Z /dev/dvd -R -J /root/2007-05-27_data.1.dar
..
If you intend to do a lot of archiving, I suggest you purchase a recent model DVD+R recorder. When I first tested dar this past weekend, I had a mess of problems reading the archive files I had burned successfully to DVD. I figured my DVD was three years old and it was time for an upgrade, so I bought the internal version of this drive, the HP DVD940E External 18x Super Multi DVD Writer
4) copy the archive from the DVDs to disk
TIME: with an 18x burner, this takes about twenty minutes.
mount /dev/cdrom /mnt/cdrom
cp /mnt/cdrom/* /mnt/videos/
5) validate that the archive files off the DVD do not contain errors
TIME: about an hour and a half.
dar -t <archive name>
While validating my archives off DVD, I encountered one problem:
[root@computer ~]# dar -t /mnt/videos/2007-05-27_data
ERR
--------------------------------------------
17 file(s) treated
1 file(s) with error
0 file(s) ignored (excluded by filters)
--------------------------------------------
Total number of file considered: 17
--------------------------------------------
Bad news. It looks like the data written to one of the DVDs is corrupt. Since I had the originals files and they tested out correct, I re-wrote the archive to new DVDs and did not encounter this problem again. By the way, the test of my 20GB archives took about an hour.
Here is what a successful validation looks like:
[root@computer ~]# dar -t 20081016_data
--------------------------------------------
17 inode(s) treated
0 inode(s) with error
0 inode(s) ignored (excluded by filters)
--------------------------------------------
Total number of inode considered: 17
--------------------------------------------
6) if no errors, restore original files and verify file sizes
TIME: about three hours.
This step is optional, if you've already run "dar -t" to verify the integrity of the archive coming off the DVD. Here is the output:
dar -x 2007-05-27_data
--------------------------------------------
17 file(s) restored
0 file(s) not restored (not saved in archive)
0 file(s) ignored (excluded by filters)
0 file(s) less recent than the one on filesystem
0 file(s) failed to restore (filesystem error)
0 file(s) deleted
--------------------------------------------
Total number of file considered: 17
--------------------------------------------
There was some slowness copying the archives back from DVD (which took about two hours at 4x speed), but that's just the speed of the DVD player. Aside from that 4GB limit, dar live up to its reputation! So I'm pretty happy.
Review
1) archive your files
TIME: about three hours and twenty minutes on the system described above.
dar -m 256 -v -y -s 4000M -D -R /mnt/videos/20050721/ -c `date -I`_data
2) validate that the archive is does not contain errors
TIME: about an hour and a half.
dar -t <archive name>
3) write each output file from dar to DVD
TIME: with a 18x burner running at 16x speed to DVD+R, this takes about an hour.
growisofs -Z /dev/dvd -R -J /root/2007-05-27_data.1.dar
4) copy the archive from the DVDs to disk
TIME: with an 18x burner, this takes about twenty minutes.
cp /mnt/cdrom/* /mnt/videos/
5) validate that the archive files off the DVD do not contain errors
TIME: about an hour and a half.
dar -t <archive name>
OPTIONAL:
6) if no errors, restore original files and verify file sizes
TIME: about three hours.
dar -x 2007-05-27_data
Summary
If you wish to use dar and want to keep your valuable video data in tact for years to come, I strongly suggest you run through steps 1-5 each time you make an archive! Of course, just the basic steps take a total of eight hours for 20GB of data. The optional step brings that total to eleven hours of your time spent.
Of course, you don't have to archive EVERYTHING. Only archive the source videos and maybe the primary intermediates. For example, I archive all my MPEG-TS files from my cam, plus the MPEG2 video and MP3 audio rendered from my project. I DON'T archive the finals: DVD format, iTunes format and MPEG program streams, as I can always reproduce those from the primary intermediates that are rendered from the project.
In the end, you have to ask yourself "How much do I value the work that I've done?"
Going through these steps everytime you make an archive may seem like a pain, but the pain will be worse if your data goes away! You could opt to store your media on a hard drive, but if that hard drive gets near a speaker or large magnet, your data could be lost. If you are going to archive this data for years, it makes more sense to do it on optical formats that are not susceptible to damage by magnetism.
If you do decide to go the dar route and follow these steps, you'll have the peace of mind that your archives are error free.
Hopefully, dar might fit into your backup and recovery schemes. There are a number of other softwares to do something similar. Partimage on the http://www.sysresccd.org comes to mind, though that is used for entire partitions. Also Duplicity is available, but that's strength is in encryption and network backups. To its strength, dar is a proven solution and is very well documented:
http://dar.linux.free.fr/doc/
As I have time, I will post a bit more technical information about the commands used, but the best idea is to research the documentation at the link above, as well as do a simple "dar -h" at the command line for a listing of all the available features.
Update 1/4/2014
The Extraction Process Redux
I've been restoring dar archives from DVDs. Today, I pulled out a couple five DVD dar archives that I originally created four years ago. Each DVD took about six minutes to copy over to my hard drive. I'm happy to say that dar restored the individual video files that I specified without any problems. Here's a sample command:
dar -x 20090430_data -g 20090430.m2v
However, dar did spit out this message:
File ownership will not be restored as dar is not run as root. to avoid this message use -O option [return = YES | Esc = NO]
Continuing...
Error met while opening the last slice: This is an old archive, it can only be opened starting by the first slice. Trying to open the archive using the first slice...
Even with this message, the archived files restored without error.
The commands above mean:
-x = extract
-g = subdirectory to include in the operation
Also, another good switch is -O, to avoid the "root ownership" message seen above. Be careful of the placement of -O..it has to be the first parameter. Like so:
dar -O -x 20090430_data -g 20090430.m2v
After giving the -O parameter in the above command, all you should see is the "Error met while opening the last slice" message.
Update 10/1/2008
The Extraction Process
I pulled out a 6 DVD dar archive that I originally created more than a year ago and I'm happy to say that dar restored the files without any problems. Specifically, I needed to pull one MPEG video from a dar archive of about 25 files. The dar command to extract one specific file was relatively simple:
dar -x
-x = extract
-I = include following filespec in operation
So my command ended up looking like this:
dar -x /mule/20060831 -I *.mpg
One thing I noticed is that depending on the archive, wildcards (like *.mpg) may work, but not all the time. In which case, you should remove the wildcard from the include specification and just use the exact syntax; eg:
dar -x /mule/20060831 -I file.mpg
That's it!
Have a good day!
The Video Mule
5/30/07 update - After using dar for the past couple of days and releasing about 50GB, I have to say that I am really starting to like this new process. It is a consistent, repeatable and efficient approach to archiving my material that I can kick off before bedtime.
10/1/08 update - Dargui is a nice, simple graphical front end to dar. For some reason, though, the filter did not work properly, so I reverted to command line. Perhaps someone else will have better luck.
References
http://dargui.sourceforge.net/
http://dar.linux.free.fr/doc/mini-howto/dar-differential-backup-mini-howto.en.html
If this post was useful to you..consider buying me a beer via PayPal!
Even a $1 Draft will keep the Mule happily working..and help pay for equipment upgrades!
using dd to create a 4GB file
I'm in the process of learning how to use to dar (disk archive) to archive my videos in files that will span multiple DVDs. First, though, I want to find out exactly how large a file I can have dar create in order to maximize the utilized space on the DVD. I will use growisofs to copy the file to the DVD, so I will tell dd to create a large file of around 4.7GB and see if growisofs can write that file.
Here is the syntax of the dd command to create the file. I will fill the file with NULL characters.
dd if=/dev/zero of=zerofile.tst bs=1k count=4700000
if = input file
of = output file
bs = block size
count = file size in kb
Woops..file is too big for growisofs!
[root@computer ~]# growisofs -Z /dev/hda -R -J /mnt/videos/zerofile.tst
Executing 'mkisofs -R -J /mnt/videos/zerofile.tst builtin_dd of=/dev/hda obs=32k seek=0'
INFO: UTF-8 character encoding detected by locale settings.
Assuming UTF-8 encoded filenames on source filesystem,
use -input-charset to override.
mkisofs: Value too large for defined data type. File /mnt/videos/zerofile.tst is too large - ignoring
Total translation table size: 0
Total rockridge attributes bytes: 169
Total directory bytes: 0
Path table size(bytes): 10
Max brk space used 0
181 extents written (0 MB)
/dev/hda: "Current Write Speed" is 8.2x1352KBps.
builtin_dd: 192*2KB out @ average 0.0x1352KBps
/dev/hda: flushing cache
/dev/hda: closing track
/dev/hda: closing session
I'd better do some research. According to these two articles:
Cheetah Burner FAQ
http://en.wikipedia.org/wiki/ISO_9660
the maximum file size for a data DVD with IS09660 and Joliet extensions is 4.2GB. dar creates files in chunks of megabytes (1024 x 1024 x a value specified in the thousands). So if use a value of 4100 in dar, dar should create archive files that are 4,194,304,000. This is right under the limit of the usable space on a DVD.
Here's the second test I performed using dd:
[root@computer ~]# dd if=/dev/zero of=/mnt/videos/zerofile.tst bs=1k count=4100000
4100000+0 records in
4100000+0 records out
4198400000 bytes (4.3 GB) copied, 50.7164 seconds, 84.8 MB/s
Success! dar was able to correctly write this 4,198,400,000 byte file to disk:
dar -m 256 -y -s 4000M -D -R /mnt/videos/zerofile.tst -c `date -I`_data
--------------------------------------------
1 inode(s) saved
with 0 hard link(s) recorded
0 inode(s) changed at the moment of the backup
0 inode(s) not saved (no file change)
0 inode(s) failed to save (filesystem error)
0 files(s) ignored (excluded by filters)
0 files(s) recorded as deleted from reference backup
--------------------------------------------
Total number of file considered: 1
--------------------------------------------
I did try a third test using a value of 4100MB, but this yielded a total of 4,299,161,600 bytes. This value exceeded the 32-bit current limitation of ISO9660. As I've read, this specification is under review and may be increased in the near future.
Side Note:
Instead of NULL characters, dd can fill a file with random (/dev/random) characters or less random characters (/dev/urandom). According to the Wiki entry, the difference between the two is that urandom is "less cryptographically secure" and takes a shorter amount of time to use because of this insecurity:
http://en.wikipedia.org/wiki/Dd_(Unix)
dd has been around since the mid-70s and is used for creating and archiving files at a very low level. Be careful using this program, because it's synonym is "destroy data" and you can easily wipe out the data on your hard drive with the wrong syntax.
Here's the man page on dd:
http://www.die.net/doc/linux/man/man1/dd.1.html
UPDATE: Here is how I've decided to backup my HDV material using a combination of dar (disk archive) and growisofs:
http://crazedmuleproductions.blogspot.com/2007/05/problem-of-archivingand-solution.html
UPDATE: Here is another way to create a large file using dd. Try making the block size larger and reduce the number (count) of blocks for the test file! The following command creates a file of zeros one gigabyte in length using a block size of 1,000 megabytes (one Gb):
dd if=/dev/zero of=zerofile.tst bs=1000M count=1
1+0 records in
1+0 records out
1048576000 bytes (1.0 GB) copied, 7.812 s, 134 MB/s
If this post was useful to you..consider buying me a beer via PayPal!
Even a $1 Draft will keep the Mule happily working..and help pay for equipment upgrades!
Saturday, May 26, 2007
Cinelerra on FC6 working well and more YouTube-ness
I spent all day yesterday editing and rendering video using the Cinelerra install on my Fedora Core 6 box. I am happy to report that after about 10 hours, 15 projects and two or three times as many renders, Cinelerra did not crash once! Now, the types of activities I performed did not vary that much:
- open hour long DVD resolution video
- select five or ten minute long sections of video
- compensate for audio sync problems using nudge
- render out to YouTube compatible format (ala my previous post)
My previous Cinelerra install on Core 4 had crash problems as well as strange audio synchronization problems. One major difference between the systems is that my FC4 Cinelerra system had OpenGL enabled. My new FC6 system does not have OpenGL enabled. On FC4, I noticed that enabling OpenGL seemed to cause the instabilities mentioned above, though I was never able to prove it. Also, the more unstable projects tended to be projects that I had previously created. So as a test, I am recompiling Cinelerra on FC6 using OpenGL and will perform some edits on both old and newly created projects to see if the OpenGL version of Cinelerra is as stable as the non-OpenGL, X11 XV version on FC6. I am hoping that the latest NVidia drivers for my 7600GS 512MB card in combination with various bug fixes in FC6 will allow me to run Cinelerra on FC6 without crashes.
I have uploaded the results of yesterday's rendering session to my new YouTube account here:
http://www.youtube.com/profile?user=snufflerstormpig
I'm learning more about YouTube. It is a really rich environment for social interaction. Everybody has seen a YouTube video and peoples comments beneath it. But depending on how the content producer has configured the video, people can comment upon it by using a video response. Pretty cool. Also, most people know that you can embed a YouTube video into any web page simply by selecting the Embed code that appears on every page that displays a YouTube video and integrate that code into your web site. It looks like this:
<object width="425" height="350"><param name="movie" value="http://www.youtube.com/v/cW8EL2RgAEg"></param><param name="wmode" value="transparent"></param><embed src="http://www.youtube.com/v/cW8EL2RgAEg" type="application/x-shockwave-flash" wmode="transparent" width="425" height="350"></embed></object>
Some of the more interesting stuff is not as evident. For example, if you are a content producer, you can create a "Channel", basically a home page of your profile like in the above link so that people can see your accumulated work. As a member (content producer or regular viewer), you can create playlists of your favorite videos and share them with your friends. When someone gets one of your playlists, they can play all the videos in that playlist simply by clicking once. Here is a playlist I created from the videos I rendered yesterday:
http://www.youtube.com/view_play_list?p=021BB1E61A3BFD19
Also, people can subscribe to your Channel (Subscribers) or you can make Friends who also like your videos. The difference between the two seems to be that Subscribers are more passive viewers of your content and Friends are content producers themselves, or at least have a more well defined profile created on YouTube. YouTube can automatically alert both of these two different types of people when you've uploaded new videos.
Anyway, granted I am a little late to the YouTube game, but I think a lot of other content producers are too. They should take advantage of this great experiment in social networking and get their hard work up on YouTube to show the rest of the world.
- open hour long DVD resolution video
- select five or ten minute long sections of video
- compensate for audio sync problems using nudge
- render out to YouTube compatible format (ala my previous post)
My previous Cinelerra install on Core 4 had crash problems as well as strange audio synchronization problems. One major difference between the systems is that my FC4 Cinelerra system had OpenGL enabled. My new FC6 system does not have OpenGL enabled. On FC4, I noticed that enabling OpenGL seemed to cause the instabilities mentioned above, though I was never able to prove it. Also, the more unstable projects tended to be projects that I had previously created. So as a test, I am recompiling Cinelerra on FC6 using OpenGL and will perform some edits on both old and newly created projects to see if the OpenGL version of Cinelerra is as stable as the non-OpenGL, X11 XV version on FC6. I am hoping that the latest NVidia drivers for my 7600GS 512MB card
I have uploaded the results of yesterday's rendering session to my new YouTube account here:
http://www.youtube.com/profile?user=snufflerstormpig
I'm learning more about YouTube. It is a really rich environment for social interaction. Everybody has seen a YouTube video and peoples comments beneath it. But depending on how the content producer has configured the video, people can comment upon it by using a video response. Pretty cool. Also, most people know that you can embed a YouTube video into any web page simply by selecting the Embed code that appears on every page that displays a YouTube video and integrate that code into your web site. It looks like this:
<object width="425" height="350"><param name="movie" value="http://www.youtube.com/v/cW8EL2RgAEg"></param><param name="wmode" value="transparent"></param><embed src="http://www.youtube.com/v/cW8EL2RgAEg" type="application/x-shockwave-flash" wmode="transparent" width="425" height="350"></embed></object>
Some of the more interesting stuff is not as evident. For example, if you are a content producer, you can create a "Channel", basically a home page of your profile like in the above link so that people can see your accumulated work. As a member (content producer or regular viewer), you can create playlists of your favorite videos and share them with your friends. When someone gets one of your playlists, they can play all the videos in that playlist simply by clicking once. Here is a playlist I created from the videos I rendered yesterday:
http://www.youtube.com/view_play_list?p=021BB1E61A3BFD19
Also, people can subscribe to your Channel (Subscribers) or you can make Friends who also like your videos. The difference between the two seems to be that Subscribers are more passive viewers of your content and Friends are content producers themselves, or at least have a more well defined profile created on YouTube. YouTube can automatically alert both of these two different types of people when you've uploaded new videos.
Anyway, granted I am a little late to the YouTube game, but I think a lot of other content producers are too. They should take advantage of this great experiment in social networking and get their hard work up on YouTube to show the rest of the world.
If this post was useful to you..consider buying me a beer via PayPal!
Even a $1 Draft will keep the Mule happily working..and help pay for equipment upgrades!
Friday, May 25, 2007
more automation with Cinelerra
Here's a test video I put together utilizing camera and projector automation, a png image and chroma key, courtesy of Cinelerra.
If this post was useful to you..consider buying me a beer via PayPal!
Even a $1 Draft will keep the Mule happily working..and help pay for equipment upgrades!
convert: linux command line image conversion and processing utility
I needed a quick and dirty command line tool to convert a jpg to a png. Lo and behold, I found the image conversion utility called "convert" on my Fedora Core 6 system from the ImageMagick open source tools, http://www.imagemagick.org/. ImageMagick is now part of the graphics programs packaged with the Core 6 distribution.
Anytime I have a simple task that I can automate or just speedily get done, it usually involves a command line tool. I love command line tools for this reason. I won't belabor describing the software because Linux Journal has already done it for me here:
http://www.linux-mag.com/id/2561/
You can do basic things like resize, crop and convert to different formats. Your command can be as simple as this:
convert [sourceImage] [destinationImage]
example:
convert image.jpg image.png
It is that easy. No opening GIMP just to convert. The program can also do sophisticated image processing using effects. Typing "convert" with no arguments after the command name will give you a full list of the capabilities of the software.
To scale an image, try this command:
convert [sourceImage] -scale [WidthxHeight] [destinationImage]
example:
convert image.jpg -scale 1024x768 newimage.jpg
This is a great utility folks.
Good man page here:
http://linux.about.com/od/commands/l/blcmdl1_convert.htm
Enjoy!
If this post was useful to you..consider buying me a beer via PayPal!
Even a $1 Draft will keep the Mule happily working..and help pay for equipment upgrades!
Wednesday, May 23, 2007
audio sync, nudge, avidemux2 and a reminder about archiving
I spent most of the night trying to debug an audio synchronization problem in Cinelerra. The video was trailing the audio by a little bit. So I used the Nudge feature to slide the audio .5 seconds behind to the right.
A word about nudge:
If the audio is running behind the video, use POSITIVE values for nudge.
If the video is running behind the audio, use NEGATIVE values for nudge.
Another way to put it:
If your audio is lagging and is behind the video (more to the RIGHT on the timeline than the video), push it FORWARD using positive values.
If your audio is running too fast and is ahead of the video (more to the LEFT on the timeline than the video), push it BACKWARD using negative values.
2/17/2008
Since nudge is good for fixing an entire track, one way to fix synchronization problems that occur on only part of a track is to use the Delay Video video effect or the Delay Audio audio effect:
:)
This syncronization problem was after another discovery that Cinelerra on the Fedora Core 6 box I just built is not letting me drag and drop video. So I couldn't manually slide my video around. I'm not sure why this is not working for this particular project, as the Record button is enabled and my editing Preferences seem correct. The funny thing is that it does not happen when I create a new project. My gut feeling is that this version of Cinelerra I am using is SLIGHTLY newer than the one on my main box. So the XML is probably screwed up in some way. Ugh. Tiring.
But not tired enough to write a reminder to everybody that if they want the MOST PORTABLE video files, keep them below 4GB. That way they will fit on a DVD for archiving or transferring, fit on a FAT32 file system and be welcomed on any modern file system. Any larger, and it becomes a nightmare to transfer or archive. As I edit in HDV, file sizes get huge pretty quickly. But keep 'em below 4GB kids! It'll save you much pain in the long run.
Your friend in the battle to trim files down to size is AVIDEMUX2, a wonderful little program I've mentioned before that chops up large video files in no time flat. On my system, a Dell 400SC, 3.2Ghz, 2GB RAM, multiple drives, it took about four minutes total to chop up a 5GB HDV file into two 2.5 chunks. Not bad! One thing I do is to make sure that when you are saving out your file, use Copy for both the Audio and Video tracks and then save to your final format. The Copy feature will save out a new file to the exact same specs as your source file. Very nice feature!
A word about nudge:
If the audio is running behind the video, use POSITIVE values for nudge.
If the video is running behind the audio, use NEGATIVE values for nudge.
Another way to put it:
If your audio is lagging and is behind the video (more to the RIGHT on the timeline than the video), push it FORWARD using positive values.
If your audio is running too fast and is ahead of the video (more to the LEFT on the timeline than the video), push it BACKWARD using negative values.
2/17/2008
Since nudge is good for fixing an entire track, one way to fix synchronization problems that occur on only part of a track is to use the Delay Video video effect or the Delay Audio audio effect:
- The Delay Video track works when audio lags behind the video.
- The Delay Audio track works when the video lags behind the audio.
:)
This syncronization problem was after another discovery that Cinelerra on the Fedora Core 6 box I just built is not letting me drag and drop video. So I couldn't manually slide my video around. I'm not sure why this is not working for this particular project, as the Record button is enabled and my editing Preferences seem correct. The funny thing is that it does not happen when I create a new project. My gut feeling is that this version of Cinelerra I am using is SLIGHTLY newer than the one on my main box. So the XML is probably screwed up in some way. Ugh. Tiring.
But not tired enough to write a reminder to everybody that if they want the MOST PORTABLE video files, keep them below 4GB. That way they will fit on a DVD for archiving or transferring, fit on a FAT32 file system and be welcomed on any modern file system. Any larger, and it becomes a nightmare to transfer or archive. As I edit in HDV, file sizes get huge pretty quickly. But keep 'em below 4GB kids! It'll save you much pain in the long run.
Your friend in the battle to trim files down to size is AVIDEMUX2, a wonderful little program I've mentioned before that chops up large video files in no time flat. On my system, a Dell 400SC, 3.2Ghz, 2GB RAM, multiple drives, it took about four minutes total to chop up a 5GB HDV file into two 2.5 chunks. Not bad! One thing I do is to make sure that when you are saving out your file, use Copy for both the Audio and Video tracks and then save to your final format. The Copy feature will save out a new file to the exact same specs as your source file. Very nice feature!
If this post was useful to you..consider buying me a beer via PayPal!
Even a $1 Draft will keep the Mule happily working..and help pay for equipment upgrades!
Sunday, May 20, 2007
using labels to split rendered video into multiple files
Now that I have my YouTube account, I can go ahead and load it up with a bunch of music videos from the band of miscreants I occasionally play music with. Now, 2006 was a fairly good year for jamming and we had a few stellar sessions at Smash Studios in NYC. The output of these jams usually results in a big video file distributed to my friends. Using Cinelerra, I edit down these three hour sessions into about an hour long video and then distribute that video to my friends via iTunes.
The distributed videos are lower resolution, usually 320x180 MOV files (MPEG4 audio/MPEG4 video) and get pretty big, around 320MB. If you're interested and you have iTunes, you can see some of these monster downloads at itpc://www.stormpigs.com/vodcast.xml.That's really too much to download for any sane person, so my task today was to break up those large videos into small, individual chunks of only the best material from 2006 that I can then upload to YouTube. And hopefully by the end of this post, I'll have some individual songs worth listening to that I can direct you to. With the caveat that the songs were created live, then and there, no rehearsal.
To get back on track, the task is to break up a Cinelerra project into bite size chunks that can then be uploaded to YouTube. This should be fairly simple.
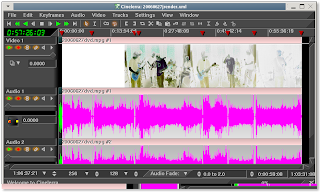
I start with the project that I used to create the one large video. This project has all the audio and video fades and effects that I originally used to create the hour long iTunes video. The good thing about it is that the project has the breaks between video clips delineated clearly. In between the breaks are the actual songs that I'd like to divide up and render out to individual files:
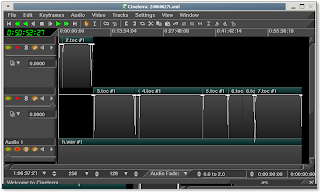
The insertion point will select these breaks very easily, allowing me to set my labels for the render:
This source project is in HDV format. As I've discussed in previous posts, I edit the high resolution source and then output one final as a DVD resolution file, and then convert that DVD to an iTunes-ready format. This does impose some generational loss in quality, but the source material is not that visually stimulating (a bunch of guys in a dark room), so we're not missing much in the two steps down from HDV to iTunes. So now, I have an HDV source project and an output file rendered to DVD. In my previous post (/2007/05/how-to-upload-video-to-youtube.html, I discuss that YouTube allows me to upload up to 100MB or 10 minutes of video. In that post, I also discovered that YouTube recommends this format file:
- MPEG container
- 320x240 resolution
- MP3 audio
- MPEG I/II video
But can also accept files of this format that I can output directly from Cinelerra:
- MOV container (Quicktime for Linux)
- 720x480 resolution
- MPEG4 audio compression (256,000 constant bitrate, stereo)
- MPEG4 video compression (500,000 constant bitrate)
If I break up my project (the recording session) into videos that are less than 100MB each, I will be able to upload the best parts to YouTube. Now, I'm a pretty lazy person in general, so if I don't have to perform an extra step to convert the files from DVD resolution to the preferred 320x240 resolution, I sure as hell won't bother. The test video that I outputted in the last post (specs above) ended up being about a minute and took up about 6.6MB of space at DVD resolution. Theoretically then, I should be OK as long as my songs are less than 10 minutes long (the YouTube limit). Most are, so we should be good to go.
With the constraints understood, I should now have rougly four steps to perform:
1) append my rendered video to a new track in the original source project
2) create labels at the break points between the songs
3) delete the project's original tracks
4) reduce the project size to 720x480
5) render using labels to indicate the start of a new output file
Let's go through these steps.
1) append my rendered video to a new track in the original source project
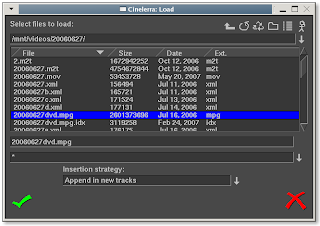
First, I make sure to move the Insertion Point to the beginning of the timeline. This is where I want my video to be placed. I then select "o" to load my DVD resolution video. This was the original output I rendered from this HDV resolution project. I make sure to select "Append in New Tracks" as my insertion strategy:
2) create labels at the break points between the songs
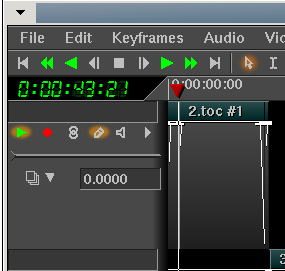
Now that I have the source video showing the breaks between songs and the outputting video in another track, I can then move the insertion point to each break between songs and set a label by pressing the "l" key:
3) delete the project's original tracks
In order to avoid confusion, I go ahead and delete the original project tracks by scrolling over the tracks in the timeline and pressing the "d" key or right-clicking on a particular track and select "Delete Track." Deleting the older HDV tracks makes sure that I don't accidentally end up re-rendering the HDV video and wasting hours of CPU cycles.
4) reduce the project size to 720x480
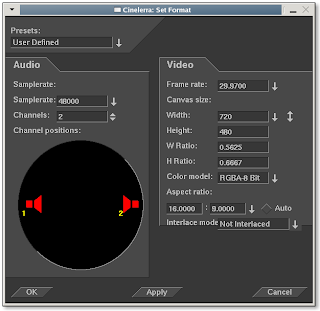
To restate, since my original project was in high definition but my newly appended track is at DVD resolution (720x480), I will need to reduce the size of the output video. So I select Shift-F for the formatting menu and change the project format to 720x480:
5) render using labels to indicate the start of a new output file
To render a project into separate files with different names, all I need to do is go into the rendering menu (Shift-R) and check the little box that says "Create new file at each label:"

What this useful little option does is given the output file name that you choose, Cinelerra will create a new file at each label with the format <filename>.<extension>##
where the hash marks indicate a sequence of numbers incremented from 01 to NN, the number of your last label. In other words, if you have 40 labels in your project and the file you're creating is called test.mov, Cinelerra will output the following files:
test.mov01
test.mov02
test.mov03
..
all the way to..
..
test.mov40
Pretty neat, huh?
Of course, you'd probably want to rename those files to something more explanatory. But you get the idea.
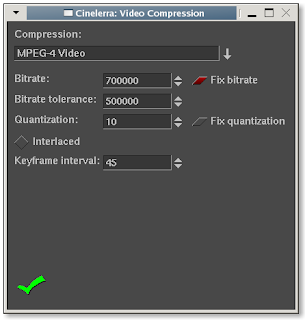
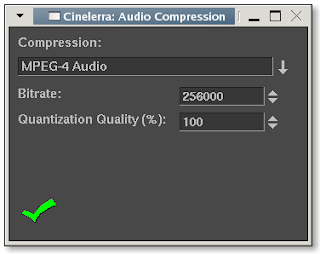
To make sure I output a small enough file to upload to YouTube, I augment the video compression bitrate to 500,000 and the audio compression to 256,000 as shown below:
And because I didn't want the first few minutes of introduction to be output, I selected "Selection" for the rendering scope and clicked OK:
The render process is off and running!
To give you an idea how long this particular video took to render, here are some specs:
Video Length: 1hr 4min
Number of Lables: 7
Resolution: DVD (720x480)
Time to Render: 2hr 10min
Computer: Dell 400SC, 3.2Ghz, 800Mhz FSB, 2GB PC3200RAM, Fedora Core 4 SMP kernel
Post Mortem
Here's a link to a few more I've uploaded since my original post yesterday:
http://www.youtube.com/results?search_query=snufflerstormpig
I hope you enjoyed this discussion of multiple file creation using labels. It is one of the many features of Cinelerra and can be very useful in your editing life.
Be good.
The Crazed Video Mule
The distributed videos are lower resolution, usually 320x180 MOV files (MPEG4 audio/MPEG4 video) and get pretty big, around 320MB. If you're interested and you have iTunes, you can see some of these monster downloads at itpc://www.stormpigs.com/vodcast.xml.That's really too much to download for any sane person, so my task today was to break up those large videos into small, individual chunks of only the best material from 2006 that I can then upload to YouTube. And hopefully by the end of this post, I'll have some individual songs worth listening to that I can direct you to. With the caveat that the songs were created live, then and there, no rehearsal.
To get back on track, the task is to break up a Cinelerra project into bite size chunks that can then be uploaded to YouTube. This should be fairly simple.
I start with the project that I used to create the one large video. This project has all the audio and video fades and effects that I originally used to create the hour long iTunes video. The good thing about it is that the project has the breaks between video clips delineated clearly. In between the breaks are the actual songs that I'd like to divide up and render out to individual files:

The insertion point will select these breaks very easily, allowing me to set my labels for the render:

This source project is in HDV format. As I've discussed in previous posts, I edit the high resolution source and then output one final as a DVD resolution file, and then convert that DVD to an iTunes-ready format. This does impose some generational loss in quality, but the source material is not that visually stimulating (a bunch of guys in a dark room), so we're not missing much in the two steps down from HDV to iTunes. So now, I have an HDV source project and an output file rendered to DVD. In my previous post (/2007/05/how-to-upload-video-to-youtube.html, I discuss that YouTube allows me to upload up to 100MB or 10 minutes of video. In that post, I also discovered that YouTube recommends this format file:
- MPEG container
- 320x240 resolution
- MP3 audio
- MPEG I/II video
But can also accept files of this format that I can output directly from Cinelerra:
- MOV container (Quicktime for Linux)
- 720x480 resolution
- MPEG4 audio compression (256,000 constant bitrate, stereo)
- MPEG4 video compression (500,000 constant bitrate)
If I break up my project (the recording session) into videos that are less than 100MB each, I will be able to upload the best parts to YouTube. Now, I'm a pretty lazy person in general, so if I don't have to perform an extra step to convert the files from DVD resolution to the preferred 320x240 resolution, I sure as hell won't bother. The test video that I outputted in the last post (specs above) ended up being about a minute and took up about 6.6MB of space at DVD resolution. Theoretically then, I should be OK as long as my songs are less than 10 minutes long (the YouTube limit). Most are, so we should be good to go.
With the constraints understood, I should now have rougly four steps to perform:
1) append my rendered video to a new track in the original source project
2) create labels at the break points between the songs
3) delete the project's original tracks
4) reduce the project size to 720x480
5) render using labels to indicate the start of a new output file
Let's go through these steps.
1) append my rendered video to a new track in the original source project
First, I make sure to move the Insertion Point to the beginning of the timeline. This is where I want my video to be placed. I then select "o" to load my DVD resolution video. This was the original output I rendered from this HDV resolution project. I make sure to select "Append in New Tracks" as my insertion strategy:

2) create labels at the break points between the songs
Now that I have the source video showing the breaks between songs and the outputting video in another track, I can then move the insertion point to each break between songs and set a label by pressing the "l" key:
3) delete the project's original tracks
In order to avoid confusion, I go ahead and delete the original project tracks by scrolling over the tracks in the timeline and pressing the "d" key or right-clicking on a particular track and select "Delete Track." Deleting the older HDV tracks makes sure that I don't accidentally end up re-rendering the HDV video and wasting hours of CPU cycles.
4) reduce the project size to 720x480
To restate, since my original project was in high definition but my newly appended track is at DVD resolution (720x480), I will need to reduce the size of the output video. So I select Shift-F for the formatting menu and change the project format to 720x480:

5) render using labels to indicate the start of a new output file
To render a project into separate files with different names, all I need to do is go into the rendering menu (Shift-R) and check the little box that says "Create new file at each label:"

What this useful little option does is given the output file name that you choose, Cinelerra will create a new file at each label with the format <filename>.<extension>##
where the hash marks indicate a sequence of numbers incremented from 01 to NN, the number of your last label. In other words, if you have 40 labels in your project and the file you're creating is called test.mov, Cinelerra will output the following files:
test.mov01
test.mov02
test.mov03
..
all the way to..
..
test.mov40
Pretty neat, huh?
Of course, you'd probably want to rename those files to something more explanatory. But you get the idea.
To make sure I output a small enough file to upload to YouTube, I augment the video compression bitrate to 500,000 and the audio compression to 256,000 as shown below:


And because I didn't want the first few minutes of introduction to be output, I selected "Selection" for the rendering scope and clicked OK:

The render process is off and running!
To give you an idea how long this particular video took to render, here are some specs:
Video Length: 1hr 4min
Number of Lables: 7
Resolution: DVD (720x480)
Time to Render: 2hr 10min
Computer: Dell 400SC, 3.2Ghz, 800Mhz FSB, 2GB PC3200RAM, Fedora Core 4 SMP kernel
Post Mortem
Here's a link to a few more I've uploaded since my original post yesterday:
http://www.youtube.com/results?search_query=snufflerstormpig
I hope you enjoyed this discussion of multiple file creation using labels. It is one of the many features of Cinelerra and can be very useful in your editing life.
Be good.
The Crazed Video Mule
If this post was useful to you..consider buying me a beer via PayPal!
Even a $1 Draft will keep the Mule happily working..and help pay for equipment upgrades!
how to upload a video to YouTube
I'm sure this is ground well covered by many already, but I thought I'd frame this discussion of how to upload a video to YouTube with a couple notes for Cinelerra users. I finally got around to uploading a test video on YouTube, and the process is pretty simple:
1) create an account on YouTube (http://www.youtube.com/signup)
2) confirm your account by clicking on the link that will be sent to the email address you specify
3) title, describe, tag and categorize your video to be uploaded
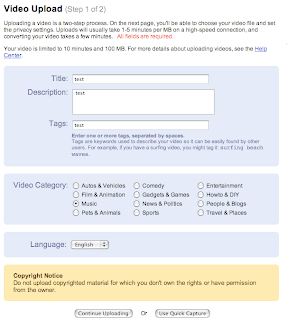
4) choose the file and make it public or private
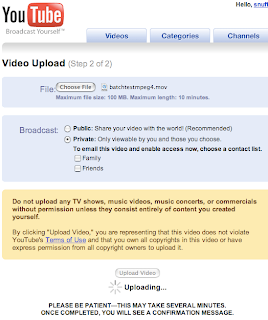
5) click Upload

The list of file types YouTube accepts are .WMV, .AVI, .MOV and .MPG. Though they do specify that the recommended, least problematic file type and specification is:
- MPEG container format
- MPEG 1 or 2 video compression
- 320x240 resolution
- MP3 audio
This first video I uploaded did not conform to the above MPEG specifications. The video I uploaded had the following format:
- QT for Linux (MOV) container format
- 720x480
- MPEG4 video compression
- MPEG4 audio
So it looks like YouTube uploader is pretty forgiving on file types. That will make us Cinelerra users MUCH happier, because we already have enough file format and playability difficulties to worry about! In fact, the second time I uploaded this test video, I had chosen a project format of 1280x720 resolution, rendered that size video and the upload STILL worked. Nice!
The largest video you can upload is 100MB and it cannot be longer than 10 minutes. After you've uploaded the video, it will take a bit of time to be show up and be displayed in your account. This Sunday, it took about 15 minutes for my 59 second, 6.6MB video to be available for viewing. Not bad!
So here's my test video in all its ragged glory:
If this post was useful to you..consider buying me a beer via PayPal!
Even a $1 Draft will keep the Mule happily working..and help pay for equipment upgrades!
Wednesday, May 02, 2007
user agent switcher for older web apps
Perhaps foolishly, I installed the latest version of IE, IE7. I noticed it broke the browser sniffers of some of the older web applications I access. After searching for a plugin for Firefox to simulate any pre-IE7 versions of Internet Explorer, I found this lovely piece of work from the master, Chris Pederick called the User Agent Switcher for Firefox:
http://chrispederick.com/work/useragentswitcher/
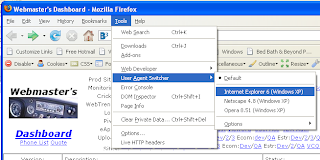
It has saved me on numerous occasions from having to remotely login to another server in order to use an older version of IE.
Thanks Chris! We love ya!
In the opposite vein, I also found a plugin called Mask IE:
http://projectdistributor.net/Projects/Project.aspx?projectId=164
that allows for switching of user agents for IE; however, the .Net framework version that it calls for is obscure (2.0.50727) and I did not want to get into the hassle of tracking down and updating the .Net Framework just for one app.
Update 1/25/2008
For IE7, here's a link I had forgotten about that explains how to tweak your Windows Registry to set your IE user-agent:
http://blogs.msdn.com/ie/archive/2005/04/27/412813.aspx
The reg tweak is here:
http://www.fiddlertool.com/useragent.aspx
This registry update allowed me to view our old WebTrends 6.0 portal. The portal does a browser sniff that precludes the use of any browsers over IE6.0. More importantly, you can easily reverse the registry update.
cheers,
the mule
If this post was useful to you..consider buying me a beer via PayPal!
Even a $1 Draft will keep the Mule happily working..and help pay for equipment upgrades!
Subscribe to:
Posts (Atom)

