http://jakedth.tumblr.com/post/85794790/cinelerra-cv-motion-tracking-tutorial
I realized I never mastered a repeatable method to stabilize shakey video using Cinelerra's motion tracking tool. The Motion effect is very powerful, but also difficult to understand. At least for me. In addition, the manual isn't much help because it is couched in confusing terminology.
The motion tracker can do a lot of different things. However in this post, I am going to keep it simple and only describe how to stabilize shakey video. I made it easy for myself and chose a sample piece of video that bounces around pretty badly:
This movement left and right and up and down is called Translation. Or to a programmer, movement on the Cartesian Coordination System. Before we get into further discussion, familiarize yourself with what the manual says about the motion tracker:
http://heroinewarrior.com/cinelerra/cinelerra.html#MOTION
What You Need to Make It Work
Since the manual's description of motion tracking is cryptic, I'm going to try to clarify the muddy waters. In order to stabilize a section of video, you're going to need a few things:
1) a easily identifiable object in your video that will be used to track motion
2) a box that encircles that object. The following is important: this box needs to be wide and tall enough to encompass the range of motion of the shakey video.
3) a video track (master layer) with the range of motion that needs to be stabilized
4) a video track (target layer) that will be stabilized
I would suggest starting small. Just try stabilization with a clip of video that is short (<10seconds) and needs stabilization throughout.
Step 1: Apply the motion effect to the video track you want to stabilize
Like so:
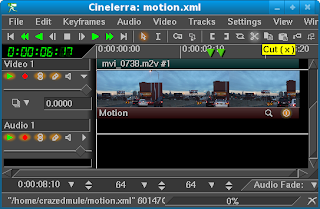
Step 2: Open the Motion tracker effect dialog.
In order to simplify the configuration process for the motion tracker, I've divided the configuration box into the only three sections you'll need to worry about:
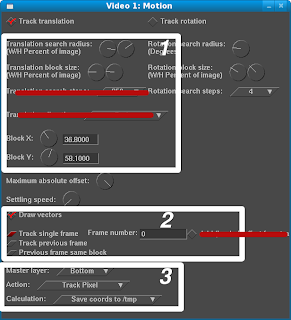
Step 3: Enable Draw Vectors (in Section 2 of the graphic above)
You may leave Track Single Frame selected. Also, Frame Number set to 0 means that the motion tracking of your video will start at the beginning of the timeline.
Step 4: Use Translation Block and Search Radius and Block X/Y to fit a box around an easily identifiable object in your video that will be used to track motion (in Section 1 of the graphic above)
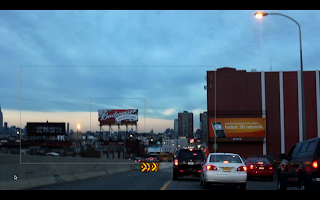
In the above picture, you'll notice there are two boxes around the Budweiser sign. The center box around the Budweiser sign is the Translation Block. You'll make the Translation Block fit neatly around the object you're tracking. The outer box is the Translation Search Radius. For the purpose of this tutorial, we'll make the Translation Block always fit within the Translation Search Radius. Below is a graphic depicting these components:
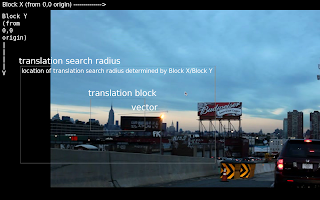
The Translation Search Radius needs to be as large as the range of motion of the video. In other words, the Search Radius needs to be large enough to accommodate all the shaking of your video. If the shaking extends beyond that box, strange things happen, like the motion tracker will start tracking another object in your video. Remember that.
Finally, Block X and Block Y represent the X/Y coordinate location of where you will move your Translation Search Radius.
In sum, you will configure those objects just discussed in the Motion Tracker effect dialog. To review:
1) Encircle the object you want to track with the Translation Block
2) Encompass the entire range of motion of your shakey video inside the Translation Search Radius
3) Use the Block X and Block Y coordinates to move the Translation Search Radius (including the Translation Block) around the screen
It is cumbersome to move the boxes around and X/Y coordinate plane using a round dial. The Translation Block and Search Radius should be drag and drop. The motion tracker interface can definitely be improved upon in this respect.
Step 5: In Section 3 of the Motion config screen, set Action to Track Pixel and set Calculation to Save Coordinates to /tmp
The reason why we do this is that we are going to Track the motion of the video around our selected object (the Translation Block). The coordinates of the movement will be saved in temporary files, which we will later apply to a second track.
You may now either playback the video or render out a test video to see the results of the motion tracking. As the motion effect is very CPU intensive, I would recommend just doing a few seconds of playback or rendering, just to make sure the motion tracker is working properly. I also recommend rendering to a file, as it will be at the same speed as a playback, but will also give you some output that you can replay at will.
Reviewing Vector Paths and Translation Block object
Once you've rendered out a test file, review the vector path to make sure the Motion tracker is always centered on the Translation Block, the object you want to track. I have found that the Motion tracker is easily confused if the object you've chosen to track is a similar color to the background. You'll know it loses track when the arrow on one end of the vector path no longer points to the original object in your translation block.
Also, the Motion tracker will lose track if the Translation Search Radius is not wide enough to capture the entire range of motion of the camera movement. In my Budweiser example, I found that I needed to widen Search Radius to more than half the width of the video so that the Motion tracker would stay on track.
Step 6: In the Motion effect on the original track, deselect Draw Vectors, set Action to Stabilize Pixel and set Calculation to Load Coordinates from /tmp
Step 7: Make a duplicate of your original track
Once you have good motion tracking, you will then be able to apply your saved coordinates to another track or Target Layer. In my Budweiser example, I simply made a duplicate of the track that I generated the coordinates from. One way to make a duplicate of the original track is to:
* in the patch bay of the original track, set both the playback and record to on
* select the entire track (key "a")
* press "c" for copy
* create a new video track (Shift-T)
* in the patch bay of the new track, make sure playback and record are both set to on
* press "v" for paste
This procedure *should* copy the motion effect as well, with the settings from Step 6. If the settings from Step 6 are not in the Motion effect dialog, manually set them.
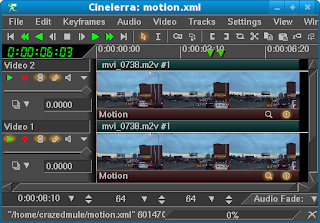
Step 8: Set the original track to not playback.
The Target Layer (duplicated track) should already be set to playback from the last step.
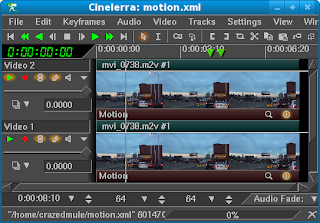
Step 9: Playback or Render the Video
Again, I suggest to render out the video to a file, as playing back or rendering will take the same amount of time.
Step 10: Analyze your results
You'll find that with motion stabilization, your video will tend to bounce around and you'll see black borders appear along with the motion removal. The easiest way to remove them is to experiment with different zoom levels (Z axis levels) using the Projector (NOT the Camera). For my Budweiser video, I found I needed to zoom in 1.6x. Of course, the side effect is that it may ruin whatever cinematic effect you were trying to achieve. So be advised!
Here were my results from earlier today:
1) The original video:
2) Motion vectors being generated to /tmp:
3) Motion stabilized
4) Video zoomed in to crop after stabilization. Note this crops out most of the interesting content of the video:
Advanced Use
I had a second video that bounced around quite a bit:
This time, I followed my own directions from above, but the resulting video came out jittery and jumpy:
Therefore, I increased the sensitivity of the Motion tracker by increasing Translation Search Steps from 256 to 1024:
This still was not sufficient, as I saw a couple jitters and jumps. I increased Translation Search Steps from 1024 to 8196. Be advised that this took about four times as long to render as having Translation Search Steps set to 1024. But it did remove the jitters and jumps!
The final outcome..sweet!
Enjoy!
The Mule

No comments:
Post a Comment