Now that I have my YouTube account, I can go ahead and load it up with a bunch of music videos from the band of miscreants I occasionally play music with. Now, 2006 was a fairly good year for jamming and we had a few stellar sessions at Smash Studios in NYC. The output of these jams usually results in a big video file distributed to my friends. Using Cinelerra, I edit down these three hour sessions into about an hour long video and then distribute that video to my friends via iTunes.
The distributed videos are lower resolution, usually 320x180 MOV files (MPEG4 audio/MPEG4 video) and get pretty big, around 320MB. If you're interested and you have iTunes, you can see some of these monster downloads at
itpc://www.stormpigs.com/vodcast.xml.That's really too much to download for any sane person, so my task today was to break up those large videos into small, individual chunks of only the best material from 2006 that I can then upload to YouTube. And hopefully by the end of this post, I'll have some individual songs worth listening to that I can direct you to. With the caveat that the songs were created live, then and there, no rehearsal.
To get back on track, the task is to break up a Cinelerra project into bite size chunks that can then be uploaded to YouTube. This should be fairly simple.
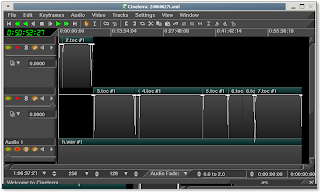
I start with the project that I used to create the one large video. This project has all the audio and video fades and effects that I originally used to create the hour long iTunes video. The good thing about it is that the project has the breaks between video clips delineated clearly. In between the breaks are the actual songs that I'd like to divide up and render out to individual files:
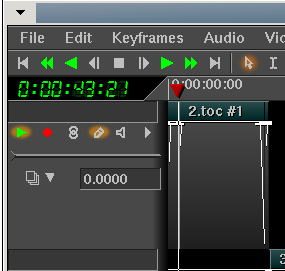
The insertion point will select these breaks very easily, allowing me to set my labels for the render:
This source project is in HDV format. As I've discussed in previous posts, I edit the high resolution source and then output one final as a DVD resolution file, and then convert that DVD to an iTunes-ready format. This does impose some generational loss in quality, but the source material is not that visually stimulating (a bunch of guys in a dark room), so we're not missing much in the two steps down from HDV to iTunes. So now, I have an HDV source project and an output file rendered to DVD. In my previous post (
/2007/05/how-to-upload-video-to-youtube.html, I discuss that YouTube allows me to upload up to 100MB or 10 minutes of video. In that post, I also discovered that YouTube recommends this format file:
- MPEG container
- 320x240 resolution
- MP3 audio
- MPEG I/II video
But can also accept files of this format that I can output directly from Cinelerra:
- MOV container (Quicktime for Linux)
- 720x480 resolution
- MPEG4 audio compression (256,000 constant bitrate, stereo)
- MPEG4 video compression (500,000 constant bitrate)
If I break up my project (the recording session) into videos that are less than 100MB each, I will be able to upload the best parts to YouTube. Now, I'm a pretty lazy person in general, so if I don't have to perform an extra step to convert the files from DVD resolution to the preferred 320x240 resolution, I sure as hell won't bother. The test video that I outputted in the last post (specs above) ended up being about a minute and took up about 6.6MB of space at DVD resolution. Theoretically then, I should be OK as long as my songs are less than 10 minutes long (the YouTube limit). Most are, so we should be good to go.
With the constraints understood, I should now have rougly four steps to perform:
1) append my rendered video to a new track in the original source project
2) create labels at the break points between the songs
3) delete the project's original tracks
4) reduce the project size to 720x480
5) render using labels to indicate the start of a new output file
Let's go through these steps.
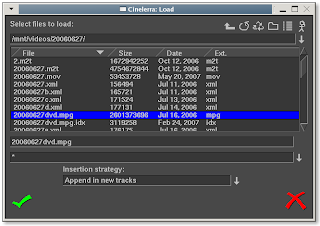
1) append my rendered video to a new track in the original source projectFirst, I make sure to move the Insertion Point to the beginning of the timeline. This is where I want my video to be placed. I then select "o" to load my DVD resolution video. This was the original output I rendered from this HDV resolution project. I make sure to select "Append in New Tracks" as my insertion strategy:
 2) create labels at the break points between the songs
Now that I have the source video showing the breaks between songs and the outputting video in another track, I can then move the insertion point to each break between songs and set a label by pressing the "l" key:
3) delete the project's original tracksIn order to avoid confusion, I go ahead and delete the original project tracks by scrolling over the tracks in the timeline and pressing the "d" key or right-clicking on a particular track and select "Delete Track." Deleting the older HDV tracks makes sure that I don't accidentally end up re-rendering the HDV video and wasting hours of CPU cycles.
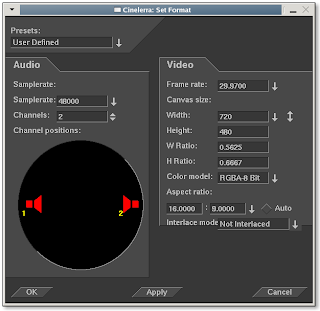
4) reduce the project size to 720x480To restate, since my original project was in high definition but my newly appended track is at DVD resolution (720x480), I will need to reduce the size of the output video. So I select Shift-F for the formatting menu and change the project format to 720x480:
 5) render using labels to indicate the start of a new output file
To render a project into separate files with different names, all I need to do is go into the rendering menu (Shift-R) and check the little box that says "Create new file at each label:"
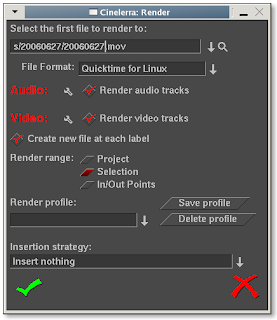
What this useful little option does is given the output file name that you choose, Cinelerra will create a new file at each label with the format <filename>.<extension>##
where the hash marks indicate a sequence of numbers incremented from 01 to NN, the number of your last label. In other words, if you have 40 labels in your project and the file you're creating is called test.mov, Cinelerra will output the following files:
test.mov01
test.mov02
test.mov03
..
all the way to..
..
test.mov40
Pretty neat, huh?
Of course, you'd probably want to rename those files to something more explanatory. But you get the idea.
To make sure I output a small enough file to upload to YouTube, I augment the video compression bitrate to 500,000 and the audio compression to 256,000 as shown below:
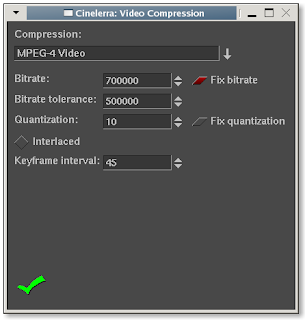
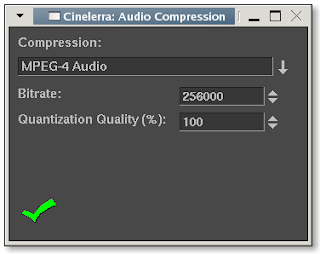
And because I didn't want the first few minutes of introduction to be output, I selected "Selection" for the rendering scope and clicked OK:
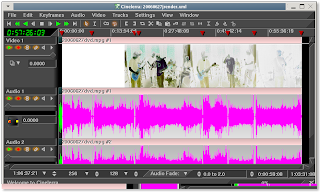
The render process is off and running!
To give you an idea how long this particular video took to render, here are some specs:
Video Length: 1hr 4min
Number of Lables: 7
Resolution: DVD (720x480)
Time to Render: 2hr 10min
Computer: Dell 400SC, 3.2Ghz, 800Mhz FSB, 2GB PC3200RAM, Fedora Core 4 SMP kernel
Post Mortem
Here's a link to a few more I've uploaded since my original post yesterday:
http://www.youtube.com/results?search_query=snufflerstormpigI hope you enjoyed this discussion of multiple file creation using labels. It is one of the many features of Cinelerra and can be very useful in your editing life.
Be good.
The Crazed Video Mule
 in combination with various bug fixes in FC6 will allow me to run Cinelerra on FC6 without crashes.


