I'm glad I took the time to rerun my main encoding script, as it showed a number of errors due to changes between Fedora 7 and Fedora 9. The first four I've encountered are specific to VLC; the last couple are problems with the latest FFMPEG install.
VLC Problems
1) permissions issue
This is not necessarily a problem with a change in Fedora, just a problem with how I've reorganized some of my videos to be owned by a different user. When I ran VLC to convert one of the files, I got this error:
[00000436] access_output_file access out error: cannot open `20081123.m2t' (Permission denied)
[00000434] stream_out_standard stream out error: no suitable sout access module for `file/ts://20081123.m2t'
At least the text of the error was not ambiguous..Permission Denied! :) Once I identified the permissions problem and granted appropriate privileges to the file, this message went away. A good option when running VLC is to run it with the -vvv verbose switch in order to get full debug stream on what is going on.
2) command line VLC doesn't accept quit anymore
VLC used to quit properly when my old script used to look like this:
vlc input.ps --sout '#duplicate{dst=std{access=file,mux=ts,dst="output.m2t"}}' vlc:quit
VLC's authors must now be enforcing command line syntax, as there now needs to be two slashes after the colon in the quit directive. So the following works again:
vlc input.ps --sout '#duplicate{dst=std{access=file,mux=ts,dst="output.m2t"}}' vlc://quit
Update 12/13/2008
3) Can't run VLC as root anymore
When I tried to run VLC from a script as root, I got this error:
VLC is not supposed to be run as root. Sorry.
If you need to use real-time priorities and/or privileged TCP ports
you can use vlc-wrapper (make sure it is Set-UID root first and
cannot be run by non-trusted users first).
For security reasons, it is probably better that VLC enforces this. I addressed the issue in two ways:
1) login as a non-privileged user to run VLC
2) if I need to run VLC as root, I will use the "su" command to run the command using a different user's privileges. Using my non-privileged "mule" user, the syntax of the command is something like the below. I am using command line VLC, which is started by "cvlc":
su mule -c "cvlc input.ps --sout '#duplicate{dst=std{access=file,mux=ts,dst=output.mp4}}' vlc://quit"
In either case, I made sure that all my files are owned by or at least accessible by the user that runs VLC.
end update
4) Some obscure dbus error
[00000415] inhibit interface error: Failed to connect to the D-Bus session daemon: Did not receive a reply. Possible causes include: the remote application did not send a reply, the message bus security policy blocked the reply, the reply timeout expired, or the network connection was broken.
Looking up this error in Google points to a number of threads regarding the reinstall of dbus message bus. However, this error doesn't inhibit my ability to convert video, so I'm not going to do anything about this error right now.
5) a bunch of other GUI related errors
[00000415] main interface error: no suitable interface module [00000001] main libvlc error: interface "inhibit,none" initialization failed
[00000001] main libvlc: Running vlc with the default interface. Use 'cvlc' to use vlc without interface.
No protocol specified
[00000421] qt4 interface error: Could not connect to X server
No protocol specified
[00000421] skins2 interface error: Cannot open display
[00000421] skins2 interface error: cannot initialize OSFactory
Even with these errors, VLC does start, though in remote control mode only. You can quit out of this mode by typing "quit" after the line that reads:
Remote control interface initialized. Type `help' for help.
Since I am running VLC as part of a command script, I changed the script to use the command-line version of VLC, CVLC as below:
cvlc input.ps --sout '#duplicate{dst=std{access=file,mux=ts,dst="output.m2t"}}' vlc://quit
Note that the quit directive is still "vlc://quit". Eventually, I do want to run VLC's GUI mode, so I will have to return to fixing this error.
FFMPEG Problems: library naming
Running this FFMPEG command on my shiny new Fedora 9 system:
ffmpeg -i input.mpg -threads 8 -f mov -vcodec mpeg4 -qscale 3 -s 320x180 -r 29.97 -aspect 16:9 -acodec aac -ac 2 -ar 48000 -ab 448k output.mov
Gave me this error:
Unknown encoder 'aac'
Researching on Google led me to this thread, which stated that the proper syntax is to now using the name of the library, libfaac:
http://bbs.archlinux.org/viewtopic.php?id=46958.
The version of FFMPEG that I had been using with Fedora 7 was SVN version 9975. With Fedora 9, that is revised to SVN version 12135. During the interim between the two versions, command syntax now requires full library names.
So using the proper library name 'libfaac' fixed the issue and allowed ffmpeg to continue:
ffmpeg -i input.mpg -threads 8 -f mov -vcodec mpeg4 -qscale 3 -s 320x180 -r 29.97 -aspect 16:9 -acodec libfaac -ac 2 -ar 48000 -ab 448k output.mov
The same error occurred with my command to encode a file to h264 format:
ffmpeg -y -i input.mpg -v 1 -threads 8 -vcodec h264 -b 250k -bt 175k -refs 1 -loop 1 -deblockalpha 0 -deblockbeta 0 -parti4x4 1 -partp8x8 1 -me full -subq 6 -me_range 21 -chroma 1 -slice 2 -bf 0 -level 30 -g 300 -keyint_min 30 -sc_threshold 40 -rc_eq 'blurCplx^(1-qComp)' -qcomp 0.7 -qmax 51 -qdiff 4 -i_qfactor 0.71428572 -maxrate 450k -bufsize 2M -cmp 1 -s 720x480 -acodec libfaac -ab 160k -ar 48000 -ac 2 -f mp4 -pass 2 -threads 8 output.mp4
I received this error:
Unknown encoder 'h264'
The solution was to simply replace 'h264' with 'libx264' in the command line:
Silliness!
the mule
Sunday, November 23, 2008
minor problems from new Fedora 9
If this post was useful to you..consider buying me a beer via PayPal!
Even a $1 Draft will keep the Mule happily working..and help pay for equipment upgrades!
Saturday, November 22, 2008
video distribution and the blogosphere
After having this blog for a few years now, I've been thinking about the entire chain of events that occur when producing a video. So I mapped out the different components of this production workflow in relation to distribution and marketing via the blogosphere.
The Blogging Ecosystem
In the clickable map below, I've listed the major steps in the production chain, as well as specific subjects within each step. Go ahead and click on anything in the picture and it will take you to a summary of that particular topic or a direct resource on the web. Some of this is old hat for readers, but it was helpful to see it holistically, as an ecosystem of sorts. The flow represents a way to distribute one's video creations (content) over the web and get some eyes looking at that content.
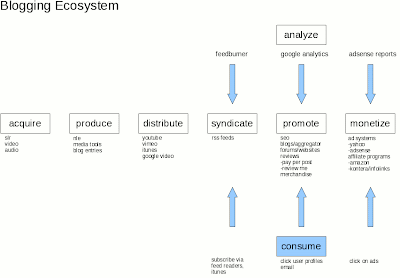
(the graphic is hotlinked, so click on a subject for further investigation)
Summary
In general, the white boxes represent steps that the producer is responsible for; the blue box represent actions taken by the consumers of the content. The main steps are:
-having an idea for a video and storyboarding (not shown)
-acquiring source content (video/audio/imagery)
-bringing the idea to life via a production workflow
-distributing that video via the web
-syndicating the content via rss feed
-having individuals consume that feed
-monitoring and analyzing the consumption
-promoting and marketing of content
-perhaps making some money one day
Detail
If you click on any part of the graph, you'll be able to dig down further into the resources I've provided. As it will require some explaining, I'll probably do a follow up video to this graphic.
Enjoy!
The Blogging Ecosystem
In the clickable map below, I've listed the major steps in the production chain, as well as specific subjects within each step. Go ahead and click on anything in the picture and it will take you to a summary of that particular topic or a direct resource on the web. Some of this is old hat for readers, but it was helpful to see it holistically, as an ecosystem of sorts. The flow represents a way to distribute one's video creations (content) over the web and get some eyes looking at that content.
(the graphic is hotlinked, so click on a subject for further investigation)
Summary
In general, the white boxes represent steps that the producer is responsible for; the blue box represent actions taken by the consumers of the content. The main steps are:
-having an idea for a video and storyboarding (not shown)
-acquiring source content (video/audio/imagery)
-bringing the idea to life via a production workflow
-distributing that video via the web
-syndicating the content via rss feed
-having individuals consume that feed
-monitoring and analyzing the consumption
-promoting and marketing of content
-perhaps making some money one day
Detail
If you click on any part of the graph, you'll be able to dig down further into the resources I've provided. As it will require some explaining, I'll probably do a follow up video to this graphic.
Enjoy!
If this post was useful to you..consider buying me a beer via PayPal!
Even a $1 Draft will keep the Mule happily working..and help pay for equipment upgrades!
Friday, November 21, 2008
burning blu-ray discs on Linux
If I actually get a camera that can do 1080p, I'm going to have to have some means of distribution.
Update 2009/01/11
Gosh darnit, I DID get a new cam! Hooray!
*** end update ***
Blu ray seems the best bet. For testing, I'd opt to use the Blu ray rewriteable format, BD-RE.
From a few hours of research, these facts appear:
1) It IS possible to write blu ray data discs via the dvd+rw-tools. See Technical discussion and Burning links below
2) The burning of blu ray video discs to be played in consumer players may be possible in the dvd+rw-tools, but should be definetly possible in the Nero 3 product for Linux (around $25). This bears testing.
*** Update 2010/11/04 ***
Dark Shakiri has created the world's first free blu-ray encoder:
http://x264dev.multimedia.cx/archives/328
From the comments, I hear tell that it actually WORKS too!
*** end update ***
Final Thoughts
Prices are still high: $300-$400 for an internal burner and roughly $10 per disc. Testing these options out will be essential.
the mule
Update 2011/02/27
AVS HD 709 - Blu-ray & MP4 Calibration
*** end update ***
Update 2011/01/04
http://www.x264bluray.com/
Allowed Resolutions/Framerates
*** end update ***
Blu Ray US site
http://www.blu-raydisc.com/bluray_site.htm
Technical discussion of dvd+rw-tools methodology
http://fy.chalmers.se/~appro/linux/DVD+RW/
Burning BD-RE disks with dvd+rw-tools
http://forums.aliensoup.com/showthread.php?t=24180
Untested open source blu ray authoring tools *
http://linux.softpedia.com/get/Multimedia/Video/Blu-ray-video-authoring-tools-28112.shtml
* UDF generator, does not generate ISO9660 structures
Update 1/23/2009
Looks like these tools compile under 32-bit systems, but not 64-bit systems. A user (E Chalaron) got this to work under 32-bit Ubuntu Feisty. Thanks E!
*** end update ***
Nero 3 Linux product
http://club.cdfreaks.com/f104/blu-ray-burning-hw-support-236218/
http://www.burnworld.com/software/cdrburning/linux.htm
http://www.nero.com/enu/linux3.html?NeroSID=75c7543438b27626c11913f2ed0c329e
Recent prices
http://club.cdfreaks.com/f142/blu-ray-blank-media-player-recorder-prices-japan-254787/
Hardware
http://www.addonics.com/support/application_notes/app_hd.asp
LG BE06LU11 Blu-ray
LG GGW-H10N Blu-ray/HD-DVD
LG GBW-H10N Blu-ray
Panasonic SW-5582 Blu-ray
Playing BluRay/HDDVD under Ubuntu
https://help.ubuntu.com/community/RestrictedFormats/BluRayAndHDDVD
Other Options
Perhaps run HD DVD Fab under Wine
http://ubuntuforums.org/showthread.php?t=763837
Google, dammit
http://www.google.com/search?num=100&hl=en&rls=com.microsoft%3Aen-us&q=burn+blu+ray+video+in+linux
Other BluRay references
http://sourceforge.net/projects/blurayauthor/
If this post was useful to you..consider buying me a beer via PayPal!
Even a $1 Draft will keep the Mule happily working..and help pay for equipment upgrades!
Monday, November 17, 2008
Fedora 9 x86-64, Cinelerra dependencies
I'm happy to report that the installation of Fedora 9 x86-64 went very smoothly tonight. I yanked down a DVD install from here via torrent. I then burnt an ISO dvd of Fedora 9 using my own instructions here. From the perspective of a Cinelerra advocate, the biggest change from Fedora 7 is that Fedora 9 is more reliant on the ATrpms repository for Cinelerra source code dependencies.
Update 2009/02/15
Since writing this article, I've had very strange crashes and hangs from Cinelerra on Fedora 9. So I've moved on to using Fedora 10 x86-64. The general steps listed below to install Cinelerra still apply, but here's a post that summarizes the steps on how to build Cinelerra from source on Fedora 10, x86-64
*** end update ***
Advice on the Use of Repositories
As a general note, use as few repositories as possible for the various Cinelerra dependencies. Mixing many repos will result in a compile that doesn't work or worse, poor performance or odd behavior in Cinelerra resulting from slightly incompatible libraries. I've lived both and the latter is far worse because you'll spend hours or days pulling your hair out when, in the end, you've got some natty problem that only occurs between this library or that library. Ugh! I get the shivers just thinking about it!
Building Cinelerra from Source?
If you're using Cinelerra on Fedora 9 and want to build Cinelerra from source, here's what you need to do. There will be only three repos needed:
1) Fedora
2) ATrpms
3) Freshrpms (only for mjpegtools)
12/17/2008 NOTE on my strikethrough above
It was brought to my attention that RPM Fusion is the new repository of the repositories for Fedora (a note about Fedora and ATrpms). As I experimented more with my Fedora 9 build, I found an issue with Cinelerra hanging that I will describe in a later post. I fixed the problem by removing the ATrpms dependencies and adding RPMFusion as the only additional Fedora repository.
To reiterate, going forward, I am only using RPM Fusion in addition to Fedora's own repo.
The text below has been updated to reflect this new reality.
end NOTE
There will be only two repos needed:
1) Fedora
2) RPM Fusion
Here are the steps
1) install base Fedora 9 by selecting Office/Productivity and Development tools
2) The set of Cinelerra dependencies will come mainly from the RPM Fusion repository, so add the Fusion repo from here:
http://rpmfusion.org/Configuration
3) In addition to the Fedora repo, you'll now have RPMFusion added as a repository. Use the following script to install core programs for the Cinelerra build. Don't forget to chmod a+x your script!
yum install gsm-devel \
libvorbis* \
libogg* \
libtool* \
libtheora* \
libpng* \
libjpeg* \
libtiff* \
esound* \
audiofile* \
libraw1394* \
libavc1394* \
freetype* \
fontconfig* \
nasm \
e2fsprogs* \
OpenEXR* \
fftw \
fftw-devel \
libsndfile* \
libiec61883* \
libdv* \
libquicktime \
ffmpeg \
xvidcore* \
lame \
lame-devel \
a52* \
faad2* \
x264* \
mjpegtools \
faac*
4) As the Cinelerra CVS source code is no longer available via subversion, install git:
yum install git
Here's a good intro to git
Another good git reference
http://www-cs-students.stanford.edu/~blynn/gitmagic/ch02.html
Here are a couple useful git commands:
To find an earlier version of source code:
git whatchanged --since="20 weeks ago"
To checkout an earlier version of source code:
git checkout [revision number]
example:
git checkout d91e062cadb8a5a7b8c35e9092234948d6918767
5) Grab the Cinelerra CVS source:
git clone git://git.cinelerra.org/j6t/cinelerra.git cinelerra_source
6) Run autogen.sh
[mule@ogre cinelerra_source]# ./autogen.sh
User defined paths to the preferred autoconf and automake versions.
Read the script if you would like to modify them.
AUTOMAKE=automake
ACLOCAL=aclocal
AUTOCONF=autoconf
AUTOHEADER=autoheader
..
7) Run configure
[mule@ogre cinelerra_source]# ./configure
checking build system type... x86_64-unknown-linux-gnu
checking host system type... x86_64-unknown-linux-gnu
checking target system type... x86_64-unknown-linux-gnu
checking for a BSD-compatible install... /usr/bin/install -c
checking whether build environment is sane... yes
checking for a thread-safe mkdir -p... /bin/mkdir -p
checking for gawk... gawk
..
8) Hopefully, configure ran properly and shows that you have all the prerequisites for a build from source:
Summary of mandatory components:
libogg found
libvorbis found
libvorbisenc found
libvorbisfile found
libtheora found
OpenEXR found
libdv found
libpng found
libjpeg libraries found
libjpeg headers found
libtiff libraries found
libtiff headers found
FreeType 2 found
libx264 libraries found
libx264 headers found
libuuid libraries found
libuuid headers found
mjpegtools found
libfftw3 libraries found
libfftw3 headers found
liba52 libraries found
liba52 headers found
libmp3lame libraries found
libmp3lame headers found
libsndfile libraries found
libsndfile headers found
libfaac libraries found
libfaac headers found
libfaad libraries found
libfaad headers found
Summary of optional components:
ESD subsystem found
ESD (Enlightenment Sound Daemon) is enabled
ALSA subsystem found
ALSA is enabled
libraw1394 found
libiec61883 found
libavc1394 libraries found
libavc1394 headers found
librom1394 libraries found
librom1394 headers found
Firewire is enabled
OpenGL 2.0 libraries found
Hardware acceleration using OpenGL 2.0 is enabled
Now type
make
to start compilation.
9) Run "make"
10) Hopefully, there were no errors on make, so run "make install"
11) As the topper, don't forget to install some media players and extra encoding tools!:
yum install avidemux mencoder mplayer transcode audacious vnc
Good luck!
The Mule
Update 2008/11/23
I verified that importing live HDV video from my cam via test-mpeg2 still works. This is done with the following command:
test-mpeg2 -r [node] [file]
end update
If this post was useful to you..consider buying me a beer via PayPal!
Even a $1 Draft will keep the Mule happily working..and help pay for equipment upgrades!
Sunday, November 16, 2008
playing Tokyo Reality in 1080p
The guys at Akihabara News got their hands on a Canon EOS 5D Mark II and produced some beautiful (though shakey) video while running and gunning around Tokyo:
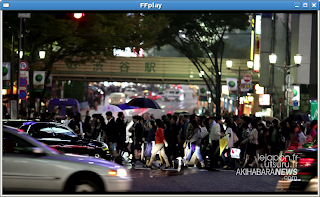
The video is on Vimeo, but the guys kindly also made the 1080p source available here. I downloaded the gigantic 1.8GB Torrent from here. That is 1.8GB for six minutes and ten seconds of video. Wow!
Linux Playback
I wanted to see which media players could handle such a large file. Here were my results on my Fedora 7 x86-64 system:
- dual quad core, 1.6Ghz
- 2GB
- NVidia 8800GT dual head system with twin Dell FP1905 monitors
mplayer played the file cleanly if the application window was stretched to a max of about 1400 pixels wide. Any wider, and mplayer would stutter.
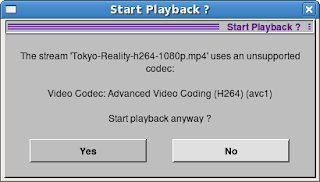
xine couldn't play the file as it seems I do not have the correct codec installed. I got the dreaded "file uses an unsupported codec" error:
ffplay played it with slight audio stutters and the following error:
[mpeg4aac @ 0x3947e23ca0]faac: frame decoding failed: Gain control not yet implemented
I will have to investigate this.
Update 2008/11/23
Reviewing Google for this error, most of the suggestions for fixing the problem state that you should have the latest version of faad2/faac. According to the developer at www.audiocoding.com, I do:
faac x86_64 1.26-3.fc9 installed 182 k
faac-devel x86_64 1.26-3.fc9 installed 49 k
faad2 x86_64 1:2.6.1-10.fc9 installed 344 k
faad2-devel x86_64 1:2.6.1-10.fc9 installed 414 k
So, I'm at a loss why these messages are occurring.
end update
I converted Tokyo Reality using mjpeg as the video compression method:
ffmpeg -i Tokyo-Reality-h264-1080p.mp4 -b 3000k -vcodec mjpeg -ab 256k -ar 44100 -acodec mpeg4aac -coder 1 -flags +loop -cmp +chroma -partitions +parti4x4+partp8x8+partb8x8 -me hex -subq 5 -me_range 16 -g 250 -keyint_min 25 -sc_threshold 40 -i_qfactor 0.71 tokyo.mp4
On my Dell SC1430, 1.6Ghz with eight cores, the conversion took about the same time as the file was long, about 6 minutes, 10 seconds. The size of the original was 1.8GB; the size of the conversion was 1.6GB. Not much difference there.
Update 2008/11/22
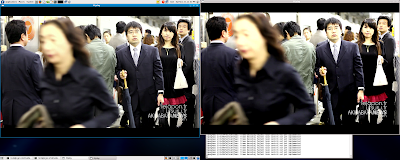
I compared the output of the original to the output of the MJPEG conversion. On the left of the below screengrab is the original from Akihabara. On the right is my conversion. You'll notice that the converted image on the right is slightly more saturated than the one on the left. I'll have to play with the conversion parameters to get the colors a little more like the original.
end update
When I replayed this video, within about four minutes, I exhausted 2GB of RAM and 4GB of swap. Holy crap! The normal Cinelerra editing functions (cutting/pasting) did not exacerbate this memory issue. Only the replay function seemed to suck up all my memory:
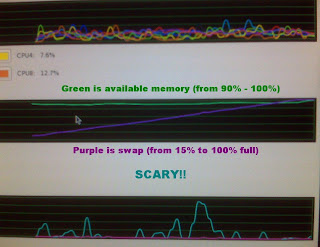
The replay was a little choppy at the beginning, but ran at 30fps. However, as RAM filled up, playback performance dropped to 12fps, as RAM was exhausted and swap was being utilized. Once swap was exhausted, the entire box locked up! Scary!!
Update 2008/11/17
I had been planning on upgrading my system to Fedora 9 and the above memory leak was enough for me to say "fuck it" and just do the upgrade. Upgrades are increasingly complex as I've added four RAID drives to my setup. Well, just when you think it is going to be a nightmare, along comes Fedora and actually made the process pretty seemless. Within two hours, I had Fedora 9 installed, all my Cinelerra source dependencies installed, Cinelerra compiled and up and running. Of course, this is from a guy who has been doing this for how many years now? But still..two hours..I hardly believe it myself.
The icing on the cake is that my memory leak is no longer present! The below chart show CPU utilization and memory while the video plays:
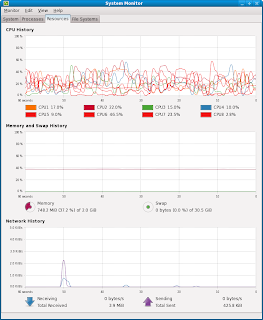
So far, the system is much more responsive than the old Fedora 7, 64-bit. I guess I had some old/outdated/corrupted libraries in there. Now playback of Tokyo Reality in Cinelerra is more consistent, albeit at a slower 19fps.
end update
MacBook Pro Playback
I next copied the file to my 2GB, dual core Intel 2.2Ghz MacBook Pro 17". I attached my 42inch display to the second head on the MacBook's video card. The file played in QuickTime. It played without errors when I manually enlarged the Quicktime window to fill the screen; however, QuickTime stuttered when the video was maximized to Full Screen using the 42" monitor as the output display.
Finally, I tried to play the file on my MediaGate to absolutely no avail.
So, it looks like the only reliable players are mplayer on Fedora 7 and QuickTime on my MacBook Pro.
I think I need to upgrade my Fedora 7 system to a newer OS. Hopefully, a more recent OS and supporting encoders/decoders will do a better job of playing these large files back.
The Mule

The video is on Vimeo, but the guys kindly also made the 1080p source available here. I downloaded the gigantic 1.8GB Torrent from here. That is 1.8GB for six minutes and ten seconds of video. Wow!
Linux Playback
I wanted to see which media players could handle such a large file. Here were my results on my Fedora 7 x86-64 system:
- dual quad core, 1.6Ghz
- 2GB
- NVidia 8800GT dual head system with twin Dell FP1905 monitors
mplayer played the file cleanly if the application window was stretched to a max of about 1400 pixels wide. Any wider, and mplayer would stutter.
xine couldn't play the file as it seems I do not have the correct codec installed. I got the dreaded "file uses an unsupported codec" error:

ffplay played it with slight audio stutters and the following error:
[mpeg4aac @ 0x3947e23ca0]faac: frame decoding failed: Gain control not yet implemented
I will have to investigate this.
Update 2008/11/23
Reviewing Google for this error, most of the suggestions for fixing the problem state that you should have the latest version of faad2/faac. According to the developer at www.audiocoding.com, I do:
faac x86_64 1.26-3.fc9 installed 182 k
faac-devel x86_64 1.26-3.fc9 installed 49 k
faad2 x86_64 1:2.6.1-10.fc9 installed 344 k
faad2-devel x86_64 1:2.6.1-10.fc9 installed 414 k
So, I'm at a loss why these messages are occurring.
end update
I converted Tokyo Reality using mjpeg as the video compression method:
ffmpeg -i Tokyo-Reality-h264-1080p.mp4 -b 3000k -vcodec mjpeg -ab 256k -ar 44100 -acodec mpeg4aac -coder 1 -flags +loop -cmp +chroma -partitions +parti4x4+partp8x8+partb8x8 -me hex -subq 5 -me_range 16 -g 250 -keyint_min 25 -sc_threshold 40 -i_qfactor 0.71 tokyo.mp4
On my Dell SC1430, 1.6Ghz with eight cores, the conversion took about the same time as the file was long, about 6 minutes, 10 seconds. The size of the original was 1.8GB; the size of the conversion was 1.6GB. Not much difference there.
Update 2008/11/22
I compared the output of the original to the output of the MJPEG conversion. On the left of the below screengrab is the original from Akihabara. On the right is my conversion. You'll notice that the converted image on the right is slightly more saturated than the one on the left. I'll have to play with the conversion parameters to get the colors a little more like the original.

end update
When I replayed this video, within about four minutes, I exhausted 2GB of RAM and 4GB of swap. Holy crap! The normal Cinelerra editing functions (cutting/pasting) did not exacerbate this memory issue. Only the replay function seemed to suck up all my memory:

The replay was a little choppy at the beginning, but ran at 30fps. However, as RAM filled up, playback performance dropped to 12fps, as RAM was exhausted and swap was being utilized. Once swap was exhausted, the entire box locked up! Scary!!
Update 2008/11/17
I had been planning on upgrading my system to Fedora 9 and the above memory leak was enough for me to say "fuck it" and just do the upgrade. Upgrades are increasingly complex as I've added four RAID drives to my setup. Well, just when you think it is going to be a nightmare, along comes Fedora and actually made the process pretty seemless. Within two hours, I had Fedora 9 installed, all my Cinelerra source dependencies installed, Cinelerra compiled and up and running. Of course, this is from a guy who has been doing this for how many years now? But still..two hours..I hardly believe it myself.
The icing on the cake is that my memory leak is no longer present! The below chart show CPU utilization and memory while the video plays:

So far, the system is much more responsive than the old Fedora 7, 64-bit. I guess I had some old/outdated/corrupted libraries in there. Now playback of Tokyo Reality in Cinelerra is more consistent, albeit at a slower 19fps.
end update
MacBook Pro Playback
I next copied the file to my 2GB, dual core Intel 2.2Ghz MacBook Pro 17". I attached my 42inch display to the second head on the MacBook's video card. The file played in QuickTime. It played without errors when I manually enlarged the Quicktime window to fill the screen; however, QuickTime stuttered when the video was maximized to Full Screen using the 42" monitor as the output display.
Finally, I tried to play the file on my MediaGate to absolutely no avail.
So, it looks like the only reliable players are mplayer on Fedora 7 and QuickTime on my MacBook Pro.
I think I need to upgrade my Fedora 7 system to a newer OS. Hopefully, a more recent OS and supporting encoders/decoders will do a better job of playing these large files back.
The Mule
If this post was useful to you..consider buying me a beer via PayPal!
Even a $1 Draft will keep the Mule happily working..and help pay for equipment upgrades!
using partimage with RAID
Background
As I am planning on a purchase of a 1080p cam, I will need my system to be up on the latest and greatest kernal and software to get the highest performance from Cinelerra. In that light, I'd like to backup my current Fedora 7 boot and root filesystems, just in case something goes wrong with the Fedora 9 install.
Partimage and My System
I will use partimage to backup these filesystems. Partimage will need to see source and destination filesystems. My first task is to figure out what I have. I built this system over a year ago and don't remember all the specifics of which physical drive has x or y filesystems. I could go back into my notes to find out how I partitioned my system, but that would be cheating. So let's see what the filesystem tells me.
The first thing I do is look at the output of df:
[mule@ogre ~]# df -m
Filesystem 1M-blocks Used Available Use% Mounted on
/dev/md0 457295 6720 426972 2% /
/dev/md2 469453 417004 28602 94% /mnt/videos
/dev/sda1 99 19 76 20% /boot
tmpfs 1007 0 1007 0% /dev/shm
I have two RAID devices, one mounted as my root partition (/dev/md0) and one mounted as my video storage (/dev/md2). Next, I see that /dev/sda1 is my boot partition. Finally, there is a filesystem defined for shared memory, though I am not concerned about saving the contents of that as it is RAM.
How It Works
Partimage backs up filesystems that are not mounted. But partimage is started from a bootable rescue disk, like Knoppix or SysRescCd. The twist here is that I am using RAID partitions. Thus, when I boot with one of these CDs, I will need to assemble my RAID drives in order to have a source to backup (my root filesystem) and a destination to write to (my /mnt/videos filesystem). Partimage will not use a mounted filesystem as a source, but I will need to mount the destination.
Assembling My RAID Drives
I have forgotten the configuration of my RAID drives, so I look at /etc/mdadm.conf to figure out what partitions and UUIDs make up my two RAID sets:
[mule@ogre ~]# cat /etc/mdadm.conf
# mdadm.conf written out by anaconda
DEVICE partitions
MAILADDR root
ARRAY /dev/md0 level=raid0 num-devices=2 uuid=c0d4b597:c33b3014:ab694cee:76920165
ARRAY /dev/md2 level=raid1 num-devices=2 UUID=1705b387:1c71d83e:364b60b4:fb0cc192
This tells me that my root partition (/dev/md0) is a stripe set (RAID0) and that the storage for my important stuff, all my videos in /mnt/video is mirrored (RAID1) in case of a failure. I'm glad I built the system this way, as I like the performance benefits of a stripe set for my root partition, but I would consider it tragic if I lost all my work. Therefore, I've mirrored the video drive on two drives in case of a failure.
Video Display Problem with Linux and NVidia Card
For some reason I have not figured out, I cannot see virtual consoles once I exit Gnome. This is due to some incompatibility between the NVidia 8800GT card and my Dell SC1430. This also effects the display when I boot with either Knoppix or SysRescCD. Using these tools, the screen goes black and I can't see any terminal sessions or virtual consoles. Therefore, in order to use the boot cd, I removed the NVidia card and booted using Dell's ATI ES1000 onboard video.
Booting with Knoppix
Once Knoppix is fully booted, I need to assemble my two RAID partitions. You can use either use the UUID or the super-minor number of each RAID set to do this. I chose the super-minor, as it was simpler.
Assemble the Source RAID set
Here I am assembling the source drive, my root filesystem:
root@Knoppix:/ramdisk/home/knoppix# modprobe md
root@Knoppix:/ramdisk/home/knoppix# mdadm --assemble -m 0 /dev/md0
Mount the Destination Partition
Since I want to store the backup image on the same mirrored drive set that holds my videos, I'll mount that partition as the destination for the partimage. Of course, I first have to create the mount point:
mkdir /mnt/videos
mount -t ext3 /dev/md2 /mnt/videos
Run Partimage to Backup Root Partition
I'll need three things to run partimage:
-an assembled RAID set of the source, my root/boot partitions, unmounted
-an assembled RAID set of the destination, mounted
-a compression method
Here's the partimage process:
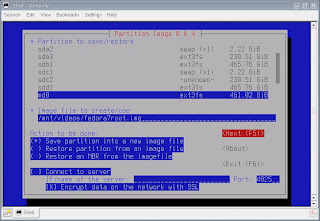
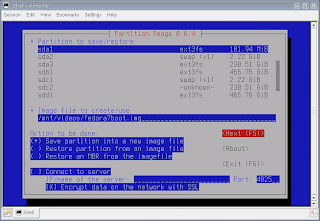
1) Select the partition to save and give the backup a destination and name. Note that the "Save partition into an image file" is selected as the default behavior:
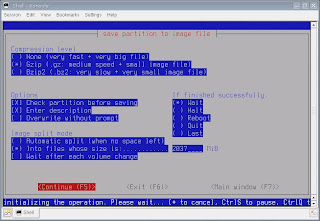
2) Select a compression method:
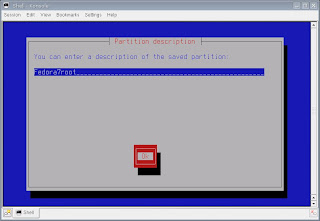
3) Give the backup image a description (optional):
4) Partimage takes a few minutes to gather information about large (500GB+ drives), but then displays basic information about the partition to be backed up:

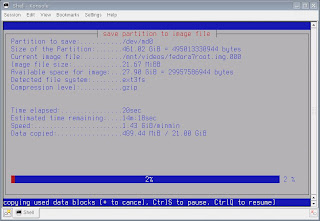
5) Partimage starts the imaging process. I had about 6GB to backup:
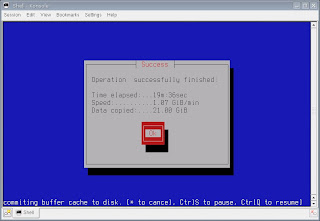
6) Partimage took about 20 minutes to create the backup image:
Backup complete. The restore process is similar, but instead of backing up an image file as in Step 1 above, you'll choose the "Restore Partition from an image file" option.
Run Partimage for Boot Partition
Since my boot partition is small 128MB, creating a backup image shouldn't take very long. My boot partition is /dev/sda1
Now I should be ready to an upgrade to Fedora 9. One hurdle I already see: the Fedora 9 installation doesn't recognize pre-existing RAID sets. Yarg. Looks like I might have to blow away the existing stripe set that is home to my root partition. Let you know how that goes.
Update 11/17/2008
The Fedora 9 x86-64 install went well. Here are some of the natty details:
http://crazedmuleproductions.blogspot.com/2008/11/fedora-9-x86-64-install.html
end update
Good day,
The Mule
References
mdadm man page
As I am planning on a purchase of a 1080p cam, I will need my system to be up on the latest and greatest kernal and software to get the highest performance from Cinelerra. In that light, I'd like to backup my current Fedora 7 boot and root filesystems, just in case something goes wrong with the Fedora 9 install.
Partimage and My System
I will use partimage to backup these filesystems. Partimage will need to see source and destination filesystems. My first task is to figure out what I have. I built this system over a year ago and don't remember all the specifics of which physical drive has x or y filesystems. I could go back into my notes to find out how I partitioned my system, but that would be cheating. So let's see what the filesystem tells me.
The first thing I do is look at the output of df:
[mule@ogre ~]# df -m
Filesystem 1M-blocks Used Available Use% Mounted on
/dev/md0 457295 6720 426972 2% /
/dev/md2 469453 417004 28602 94% /mnt/videos
/dev/sda1 99 19 76 20% /boot
tmpfs 1007 0 1007 0% /dev/shm
I have two RAID devices, one mounted as my root partition (/dev/md0) and one mounted as my video storage (/dev/md2). Next, I see that /dev/sda1 is my boot partition. Finally, there is a filesystem defined for shared memory, though I am not concerned about saving the contents of that as it is RAM.
How It Works
Partimage backs up filesystems that are not mounted. But partimage is started from a bootable rescue disk, like Knoppix or SysRescCd. The twist here is that I am using RAID partitions. Thus, when I boot with one of these CDs, I will need to assemble my RAID drives in order to have a source to backup (my root filesystem) and a destination to write to (my /mnt/videos filesystem). Partimage will not use a mounted filesystem as a source, but I will need to mount the destination.
Assembling My RAID Drives
I have forgotten the configuration of my RAID drives, so I look at /etc/mdadm.conf to figure out what partitions and UUIDs make up my two RAID sets:
[mule@ogre ~]# cat /etc/mdadm.conf
# mdadm.conf written out by anaconda
DEVICE partitions
MAILADDR root
ARRAY /dev/md0 level=raid0 num-devices=2 uuid=c0d4b597:c33b3014:ab694cee:76920165
ARRAY /dev/md2 level=raid1 num-devices=2 UUID=1705b387:1c71d83e:364b60b4:fb0cc192
This tells me that my root partition (/dev/md0) is a stripe set (RAID0) and that the storage for my important stuff, all my videos in /mnt/video is mirrored (RAID1) in case of a failure. I'm glad I built the system this way, as I like the performance benefits of a stripe set for my root partition, but I would consider it tragic if I lost all my work. Therefore, I've mirrored the video drive on two drives in case of a failure.
Video Display Problem with Linux and NVidia Card
For some reason I have not figured out, I cannot see virtual consoles once I exit Gnome. This is due to some incompatibility between the NVidia 8800GT card and my Dell SC1430. This also effects the display when I boot with either Knoppix or SysRescCD. Using these tools, the screen goes black and I can't see any terminal sessions or virtual consoles. Therefore, in order to use the boot cd, I removed the NVidia card and booted using Dell's ATI ES1000 onboard video.
Booting with Knoppix
Once Knoppix is fully booted, I need to assemble my two RAID partitions. You can use either use the UUID or the super-minor number of each RAID set to do this. I chose the super-minor, as it was simpler.
Assemble the Source RAID set
Here I am assembling the source drive, my root filesystem:
root@Knoppix:/ramdisk/home/knoppix# modprobe md
root@Knoppix:/ramdisk/home/knoppix# mdadm --assemble -m 0 /dev/md0
Mount the Destination Partition
Since I want to store the backup image on the same mirrored drive set that holds my videos, I'll mount that partition as the destination for the partimage. Of course, I first have to create the mount point:
mkdir /mnt/videos
mount -t ext3 /dev/md2 /mnt/videos
Run Partimage to Backup Root Partition
I'll need three things to run partimage:
-an assembled RAID set of the source, my root/boot partitions, unmounted
-an assembled RAID set of the destination, mounted
-a compression method
Here's the partimage process:
1) Select the partition to save and give the backup a destination and name. Note that the "Save partition into an image file" is selected as the default behavior:

2) Select a compression method:

3) Give the backup image a description (optional):

4) Partimage takes a few minutes to gather information about large (500GB+ drives), but then displays basic information about the partition to be backed up:

5) Partimage starts the imaging process. I had about 6GB to backup:

6) Partimage took about 20 minutes to create the backup image:

Backup complete. The restore process is similar, but instead of backing up an image file as in Step 1 above, you'll choose the "Restore Partition from an image file" option.
Run Partimage for Boot Partition
Since my boot partition is small 128MB, creating a backup image shouldn't take very long. My boot partition is /dev/sda1

Now I should be ready to an upgrade to Fedora 9. One hurdle I already see: the Fedora 9 installation doesn't recognize pre-existing RAID sets. Yarg. Looks like I might have to blow away the existing stripe set that is home to my root partition. Let you know how that goes.
Update 11/17/2008
The Fedora 9 x86-64 install went well. Here are some of the natty details:
http://crazedmuleproductions.blogspot.com/2008/11/fedora-9-x86-64-install.html
end update
Good day,
The Mule
References
mdadm man page
If this post was useful to you..consider buying me a beer via PayPal!
Even a $1 Draft will keep the Mule happily working..and help pay for equipment upgrades!
Thursday, November 06, 2008
converting 1080p video, part III
Here is another experiment in order to justify my planned expenditure of $4000 on the Canon EOS 5D Mark II. Down the road of doom I plod, unabated in my quest.
If I am to get the new Canon, I will be integrating some of its video along with video from my current 720p cam, the JVC HD10U. Therefore as a test, I threw some test 1080p video from the Canon and output from my JVC together on the timeline in Cinelerra.
Upconvert 720p or Downconvert 1080p?
For the time being, I don't want to upconvert the 720p video. Instead, I reduced the 1080p's resolution (downrezzed) in Cinelerra. This makes more sense from a practical point of view, as rendering 1080p video in its pure, unadulterated state will surely:
1) increase my storage needs
2) increase the time to render final output
In the future, after I have a few bucks lying around to spend on a next generation dual, quad core with terabytes of disk and a bluray writer, I will then start rendering final videos to 1080p format.
Integrating the two videos
Back to the task at hand, I put the mjpeg conversion of the 1080p video from my last 1080p blog entry on the timeline, along with another video I recently finished:
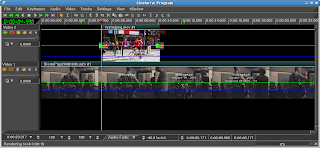
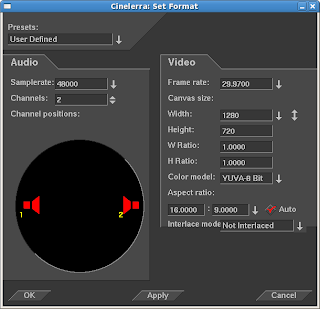
I set my project format to 720P:
This reduced the size of the 1080P track in the Compositor:
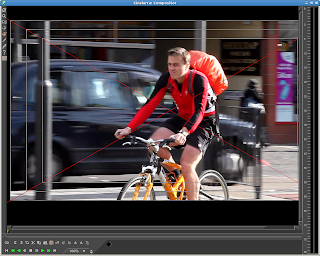
I could see that I only had part of the 1080p video displayed, I used a calculator to find the ratio between 1280 and 1920 pixels:
1280/1920 = .6667
In the Compositor window, I entered this percentage into the Z-Axis of the Projector's "Show Tool Info" screen:

This effectively "zoomed out" on the 1080p video track so that the entire frame is now shown:
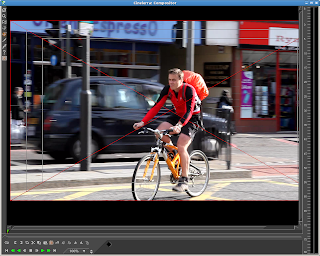
Now, both tracks of the video are for all intents and purposes, 720P. If interested, I've put the downrezzed video (3.2MB) here for you to check out.
Please forgive the lousy quality of the 720p track, but the JVC is really horrible in low light..another reason why I want to get the Canon.
Update 11/9/2008
One thing I neglected to mention is that the frame rate of the 1080p track from the Canon is 30fps, whereas the 720p video track from my JVC is 29.97. In order to accurately merge these two tracks into my 720p project, I will need to apply the Decimate video effect in Cinelerra. Decimate drops frames from a video track. It takes an input frame rate of a higher fps and uses the project's lower frame rate as output. In this case, I want to lower the frame rate of the Canon's track from 30 down to 29.97fps. So the input rate would be 30fps and the output is the frame rate of the project, 29.97 fps.
As noted in the Cinelerra documentation, always place computationally intensive effects AFTER the Decimate effect, as those effects will be rendered at the lower frame rate, thus using less CPU cycles.
Using Decimate, I can now be assured that I will have no synchronization problems when merging 1080p and 720p video.
end update
Tally ho!
the mule
If I am to get the new Canon, I will be integrating some of its video along with video from my current 720p cam, the JVC HD10U. Therefore as a test, I threw some test 1080p video from the Canon and output from my JVC together on the timeline in Cinelerra.
Upconvert 720p or Downconvert 1080p?
For the time being, I don't want to upconvert the 720p video. Instead, I reduced the 1080p's resolution (downrezzed) in Cinelerra. This makes more sense from a practical point of view, as rendering 1080p video in its pure, unadulterated state will surely:
1) increase my storage needs
2) increase the time to render final output
In the future, after I have a few bucks lying around to spend on a next generation dual, quad core with terabytes of disk and a bluray writer, I will then start rendering final videos to 1080p format.
Integrating the two videos
Back to the task at hand, I put the mjpeg conversion of the 1080p video from my last 1080p blog entry on the timeline, along with another video I recently finished:

I set my project format to 720P:

This reduced the size of the 1080P track in the Compositor:

I could see that I only had part of the 1080p video displayed, I used a calculator to find the ratio between 1280 and 1920 pixels:
1280/1920 = .6667
In the Compositor window, I entered this percentage into the Z-Axis of the Projector's "Show Tool Info" screen:

This effectively "zoomed out" on the 1080p video track so that the entire frame is now shown:

Now, both tracks of the video are for all intents and purposes, 720P. If interested, I've put the downrezzed video (3.2MB) here for you to check out.
Please forgive the lousy quality of the 720p track, but the JVC is really horrible in low light..another reason why I want to get the Canon.
Update 11/9/2008
One thing I neglected to mention is that the frame rate of the 1080p track from the Canon is 30fps, whereas the 720p video track from my JVC is 29.97. In order to accurately merge these two tracks into my 720p project, I will need to apply the Decimate video effect in Cinelerra. Decimate drops frames from a video track. It takes an input frame rate of a higher fps and uses the project's lower frame rate as output. In this case, I want to lower the frame rate of the Canon's track from 30 down to 29.97fps. So the input rate would be 30fps and the output is the frame rate of the project, 29.97 fps.
As noted in the Cinelerra documentation, always place computationally intensive effects AFTER the Decimate effect, as those effects will be rendered at the lower frame rate, thus using less CPU cycles.
Using Decimate, I can now be assured that I will have no synchronization problems when merging 1080p and 720p video.
end update
Tally ho!
the mule
If this post was useful to you..consider buying me a beer via PayPal!
Even a $1 Draft will keep the Mule happily working..and help pay for equipment upgrades!
Sunday, November 02, 2008
flash player 9 install in Fedora 7/9/10 64-bit
I inadvertantly removed the flash-plugin from my 64-bit system and figuring out how to reinstall the thing took about two hours, so I thought I'd write the steps down:
Update 2009/02/21
Finally, Adobe has released a 64-bit Flash plugin:
http://labs.adobe.com/technologies/flashplayer10/
And, shocker of shockers, it actually works!
To Install Flash Plugin on x86-64
You'll download the tarball from here:
http://labs.adobe.com/downloads/flashplayer10.html
The only thing in the tarball is libflashplayer.so. To install the 64-bit Flash plugin, simply move libflashplayer.so into your user's .mozilla/plugins directory and restart Firefox.
Even more amazing, the bloody thing works on my Fedora 10, x86-64 virtual machine running in VMware Fusion on my MacBook Pro! Yee haw!
Awesome!
end update
Update 2008/12/19
As my recent build of Fedora 9 may have gotten corrupted by bad ATrpms repo files, I upgraded AGAIN, this time to Fedora 10, x86_64. Here are some nice instructions for the Fedora 10 Flash install:
http://fedoraproject.org/wiki/Flash
I learned a new trick in Firefox to check plugins. Type "about:plugins" in the URL bar.
end update
Update 2008/11/18
I just upgraded to Fedora 9, x86_64. Here are some nice instructions for the Fedora 9 Flash install:
http://fedorasolved.org/browser-solutions/flash
http://macromedia.mplug.org/
end update
As Flash 9 was not built for 64-bit systems, I'll need to install nspluginwrapper to get Flash to work on my Fedora 7, 64-bit box.
1) install nspluginwrapper
yum install nspluginwrapper
Installed Packages
Name : nspluginwrapper
Arch : x86_64
Version: 1.0.0
Release: 1
Size : 124 k
Repo : installed
Summary: A compatibility layer for Netscape 4 plugins
Description:
nspluginwrapper makes it possible to use Netscape 4 compatible plugins
compiled for i386 into Mozilla for another architecture, e.g. x86_64.
This package consists in:
* npviewer: the plugin viewer
* npwrapper.so: the browser-side plugin
* nspluginwrapper: a tool to manage plugins installation and update
2) Download the flash 9 install
wget http://fpdownload.macromedia.com/get/flashplayer/current/install_flash_player_9_linux.tar.gz
3) Unpack the tarball
gunzip install_flash_player_9_linux.tar.gz
tar xvf install_flash_player_9_linux.tar
4) From the install directory created from the extract, copy libflashplayer.so to Mozilla's plugin directory:
cp libflashplayer.so /usr/lib/mozilla/plugins/
5) Use nspluginwrapper to enable the 32-bit flash to work in 64-bit Firefox
nspluginwrapper -i /usr/lib/mozilla/plugins/libflashplayer.so
6) Restart Firefox.
Lovely, now YouTube works again.
that's all folks!
mule
If this post was useful to you..consider buying me a beer via PayPal!
Even a $1 Draft will keep the Mule happily working..and help pay for equipment upgrades!
Subscribe to:
Posts (Atom)

