Tuesday, October 26, 2010

two-pass encoding in Cinelerra

So I was creating a video to showcase my cousin's ambient/electroacoustic music and needed the best output possible. I put together the project with scraps of 1080P video from my Canon 5D that I had lying around.

Normally, I would do my edits and then post an MPEG-TS to Vimeo. However, as Florian had called out recently, I found that portions of the final video were slightly underwhelming in quality. Specifically, some timelapses in the video looked grainy. This was because the MPEG2 render parameters I had been using in the above link were giving me less than best quality. So my solution was to use a two pass encode from Cinelerra via the YUV4MPEG stream capability into an MPEG4.
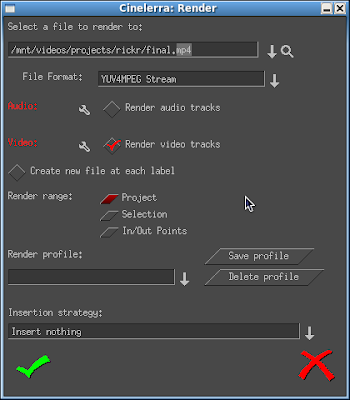
Easier said then done.

There are three steps:
1) export the audio
2) perform the first pass encoding into /dev/null
3) perform the second pass encoding with the audio file into the final file

Export the Audio
As I was having some sync issues, I pushed the audio a little further down the timeline using a negative nudge value.

First Pass Encode
Cinelerra seems to be very sensitive to any garbage in the command line sent to the YUV4MPEG stream. Look at this output:
Render::run 10
trying popen(ffmpeg -threads 8 -y -i - -an -v 1 -vcodec libx264 -aspect 1.7777 -b 9000k -bt 7775k -refs 1 -deblockalpha 0 -deblockbeta 0 -subq 1 -me_range 21 -bf 0 -level 30 -g 300 -keyint_min 30 -sc_threshold 40 -rc_eq 'blurCplx^(1-qComp)' -qcomp 0.7 -qmax 51 -qdiff 4 -i_qfactor 0.71428572 -maxrate 10000k -bufsize 2M -cmp 1 -f mp4 -pass 1 /dev/null� ��� ��� ��� ��� ��� ��� ��� ��� ��� ��� ��� ��� ��� ��� ��� ��� ��� ��� ��� ��� ��� ��� ��� ��� ��� ��� ��� ��� ��� ��� ��� ��� ��� ��� ��� ��� ��� ��� ��� ��� ��� ��� ��� ��� ��� ��� ��� ��� ��� ��� ��� ��� ��� ��� ��� ��� ��� ��� ��� ��� ��� ��� ��� ��� ��� ��� ��� ��� ��� ��� ��� ��� ��� ��� ��� ��� ��� ��� ��� ��� ��� ��� ��� ��� ��� ��� ��� ��� ��� ��� ��� ��� ��� ��� ��� ��� ��� ��� ��� ��� ��� ��� ��� ��� ��� ��� ��� ��� ��� ��� ��� ��� ��� ��� ��� ��� ��� ��� ��� ��� ��� ��� ��� ��� ��� ��� ��� ��� ��� ��� ��� ��� ��� ��� ��� ��� ��� ��� ��� ��� ��� ��� ��� ��� ��� ��� ��� ��� ��� ��� ��� ��� ��� ��� ��� ��� ��� ��� ��� ��� ��� ��� ��� ��� ��� ��� ���)
FFmpeg version 0.6-rpmfusion, Copyright (c) 2000-2010 the FFmpeg developers
built on Sep 23 2010 18:55:52 with gcc 4.4.4 20100630 (Red Hat 4.4.4-10)
configuration: --prefix=/usr --bindir=/usr/bin --datadir=/usr/share/ffmpeg --incdir=/usr/include/ffmpeg --libdir=/usr/lib64 --mandir=/usr/share/man --arch=x86_64 --extra-cflags='-O2 -g -pipe -Wall -Wp,-D_FORTIFY_SOURCE=2 -fexceptions -fstack-protector --param=ssp-buffer-size=4 -m64 -mtune=generic' --extra-version=rpmfusion --enable-bzlib --enable-libdc1394 --enable-libdirac --enable-libfaac --enable-nonfree --enable-libfaad --enable-libgsm --enable-libmp3lame --enable-libopenjpeg --enable-libschroedinger --enable-libspeex --enable-libtheora --enable-libvorbis --enable-libvpx --enable-libx264 --enable-libxvid --enable-x11grab --enable-avfilter --enable-avfilter-lavf --enable-postproc --enable-pthreads --disable-static --enable-shared --enable-gpl --disable-debug --disable-stripping --shlibdir=/usr/lib64 --enable-runtime-cpudetect
libavutil 50.15. 1 / 50.15. 1
libavcodec 52.72. 2 / 52.72. 2
libavformat 52.64. 2 / 52.64. 2
libavdevice 52. 2. 0 / 52. 2. 0
libavfilter 1.19. 0 / 1.19. 0
libswscale 0.11. 0 / 0.11. 0
libpostproc 51. 2. 0 / 51. 2. 0
[yuv4mpegpipe @ 0xf0a5f0]Estimating duration from bitrate, this may be inaccurate
Input #0, yuv4mpegpipe, from 'pipe:':
Duration: N/A, bitrate: N/A
Stream #0.0: Video: rawvideo, yuv420p, 1920x1088, PAR 1:1 DAR 30:17, 30 tbr, 30 tbn, 30 tbc
/dev/null� ��� ��� ��� ��� ��� ��� ��� ��� ��� ��� ��� ��� ��� ��� ��� ��� ��� ��� ��� ��� ��� ��� ��� ��� ��� ��� ��� ��� ��� ��� ��� ��� ��� ��� ��� ��� ��� ��� ��� ��� ��� ��� ��� ��� ��� ��� ��� ��� ��� ��� ��� ��� ��� ��� ��� ��� ��� ��� ��� ��� ��� ��� ��� ��� ��� ��� ��� ��� ��� ��� ��� ��� ��� ��� ��� ��� ��� ��� ��� ��� ��� ��� ��� ��� ��� ��� ��� ��� ��� ��� ��� ��� ��� ��� ��� ��� ��� ��� ��� ��� ��� ��� ��� ��� ��� ��� ��� ��� ��� ��� ��� ��� ��� ��� ��� ��� ��� ��� ��� ��� ��� ��� ��� ��� ��� ��� ��� ��� ��� ��� ��� ��� ��� ��� ��� ��� ��� ��� ��� ��� ��� ��� ��� ��� ��� ��� ��� ��� ��� ��� ��� ��� ��� ��� ��� ��� ��� ��� ��� ��� ��� ��� ��� ��� ��� ��� ���: File name too long
Received sigpipe
Received sigpipe
Render::run: Session finished.
That is just damn ugly. It looks like some crap got pasted into the command string. Even though I couldn't see anything at the end of the line in the YUV4MPEG stream, I hit the delete key a few times. The method cleaned out whatever invisible control characters got into the command.

My first pass encoding string was this:
ffmpeg -threads 8 -y -i - -an -v 1 -vcodec libx264 -aspect 1.7777 -b 9000k -bt 7775k -refs 1 -deblockalpha 0 -deblockbeta 0 -subq 1 -me_range 21 -bf 0 -level 30 -g 300 -keyint_min 30 -sc_threshold 40 -rc_eq 'blurCplx^(1-qComp)' -qcomp 0.7 -qmax 51 -qdiff 4 -i_qfactor 0.71428572 -maxrate 10000k -bufsize 2M -cmp 1 -f mp4 -pass 1 /dev/null
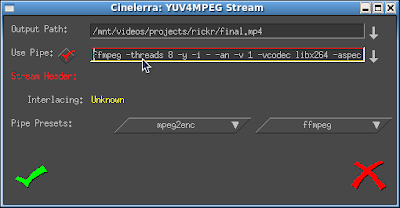
Note that
1) the audio file is not merged at this first pass step.
2) there is no output file in the first pass encode, the output goes directly to /dev/null

Second Pass Encode
The second pass encode string is where I add my audio file and my output. In the second pass encode string below, note the appearance of the audio file path and the % at the end of the YUV4MPEG stream indicating the output file:
ffmpeg -threads 8 -y -i - -i /mnt/videos/projects/rickr/final.mp3 -v 1 -vcodec libx264 -aspect 1.7777 -b 9000k -bt 7775k -refs 1 -deblockalpha 0 -deblockbeta 0 -subq 1 -me_range 21 -bf 0 -level 30 -g 300 -keyint_min 30 -sc_threshold 40 -rc_eq 'blurCplx^(1-qComp)' -qcomp 0.7 -qmax 51 -qdiff 4 -i_qfactor 0.71428572 -maxrate 10000k -bufsize 2M -acodec libfaac -ab 256k -ar 44000 -ac 2 -cmp 1 -f mp4 -pass 2 %


Note that I could have done these commands outside of Cinelerra if I had output the video to some intermediate file format, usually Quicktime for Linux with JPEG or MJPEG compression for best results.

Every project I do leads me to find some bit of minutiae that sticks in my brain. This time, the minutiae is an FFMPEG bug wherein the parameter to make adjustments to the audio sync does not work for MPEG4 files:
https://roundup.ffmpeg.org/issue359

Final Result
All-in-all, I think this pain gave some very nice results. Let me know what you think:

A Little Time Away from crazed mule on Vimeo.


Music By Rick Rascati from his album Cinemusica
http://myspace.com/​rickrmusic
Shot with a Canon 5D (90%), other JVC HD10U

Another one bites the dust. Have a good one, folks.
the mule

Reference
http://howto-pages.org/ffmpeg/

Monday, October 04, 2010

hugin, open source software for panoramas

Hugin..very nice software for panoramas.

I stitched together a few nighttime photos from north carolina with this result:


I'm sure it could be better..have to work on the technique.

My flickr set:
http://www.flickr.com/photos/frases/sets/72157625086498978/show/

Reference
http://hugin.sourceforge.net/
http://lifehacker.com/378490/stitch-photos-into-panoramas-with-free-software

Thursday, September 23, 2010

finding mem leaks with valgrind

I had been playing around with CinMonty for a couple weeks now and noticed a fairly big memory leak when I played back or rendered MPEG-PS or the AVC files from my Canon 5D(actually, H264/PCM audio). It must be stated that though I took some programming in school, I'm no C programmer. Handy with the shell, but not a C programmer. In any case, I found it interesting to try and find a memory leak in Cinelerra Monty using valgrind, a profiler/instrumenter/error detector of C programs.

Starting Valgrind
Valgrind is executed at the command line with the name of the program that valgrind will analyze. You can start valgrind with plenty of options, but I started with a few common arguments:
-check for leaks
-log to a file
-log unlimited errors

The command line looks like this:
[mule@ogre 2010_09_22]$ valgrind --leak-check=full --log-file=memLeakCinMonty.txt --error-limit=no cinelerra
Cinelerra 2.1CV
xiphmont
GIT::a515d4be161fde852b72471f631782debf5d32f5
(C) 2006 Heroine Virtual Ltd.
(C) 2006-2010 The CinelerraCV Community
Internal ffmpeg 0.6+fixes
Compiled on Sat Sep 18 14:04:36 EDT 2010

Cinelerra is free software, covered by the GNU General Public License,
and you are welcome to change it and/or distribute copies of it under

certain conditions. There is absolutely no warranty for Cinelerra.
FFMPEG::init_picture failed


I'm not sure what the init_picture failed error messages are, but they occur when I playback or render MPEG-PS or H264 video. This may have something to do with the memory leak.

When running cinlerra under valgrind, the performance of Cinelerra grinds to a halt. Perhaps that's why Julian Seward (the original designer and author of Valgrind) called it valGRIND. However, performance is not so bad that you can't get usable data out of the program. For instance, valgrind shows me the following interesting section..an overlap in memcpy:
==23140== Thread 36:

==23140== Source and destination overlap in memcpy(0x3ce5e1b0, 0x3ce7e1b0, 526848) ==23140== at 0x4A06A3A: memcpy (mc_replace_strmem.c:497)
==23140== by 0x569092: FileBase::update_pcm_history(long) (filebase.C:105)
==23140== by 0x5872F5: FileFFMPEG::read_samples(double*, long) (fileffmpeg.C:648) ==23140== by 0x56ACAA: File::read_samples(double*, long, long, float*) (file.C:1042) ==23140== by 0x500CAE: AModule::render(double*, long, int, int, int, int) (amodule.C:258)
==23140== by 0x658543: VirtualANode::read_data(double*, long, long, long) (virtualanode.C:161)

==23140== by 0x658820: VirtualANode::render_as_module(double**, double*, long, long, long) (virtualanode.C:238)
==23140== by 0x65897A: VirtualANode::render(double*, long, long, long) (virtualanode.C:178)
==23140== by 0x6576F7: VirtualAConsole::process_buffer(long, long, int, long) (virtualaconsole.C:134)
==23140== by 0x502B06: ARender::process_buffer(long, long) (arender.C:232)
==23140== by 0x502969: ARender::run() (arender.C:325)
==23140== by 0x51B4425: Thread::entrypoint(void*) (thread.C:69)


It's good that valgrind found something. Now to fix it! I've handed this info off to Monty. Hopefully he will be able to replicate my problem and fix it.
:)
the mule

Friday, September 10, 2010

making sure opengl is available

This troubleshooting is listed in this post:
https://init.linpro.no/pipermail/skolelinux.no/cinelerra/2010-January/016493.html

But I thought I'd repost here so that I always have this information at hand:

I have a GeForce 8800GT card installed in my box. I see glxinfo says I have OpenGL:
[sfr...@ogre my_cinelerra]$ glxinfo | head -20
name of display: :0.0
display: :0 screen: 0
direct rendering: Yes
server glx vendor string: NVIDIA Corporation
server glx version string: 1.4


I see glxgears points to the libGL.so.1 in /usr/lib64/nvidia:
[sfr...@ogre my_cinelerra]$ ldd `which glxgears`
linux-vdso.so.1 => (0x00007fff85dff000)
libGL.so.1 => /usr/lib64/nvidia/libGL.so.1 (0x00007f791fa75000)
libm.so.6 => /lib64/libm.so.6 (0x0000003f1bc00000)
libX11.so.6 => /usr/lib64/libX11.so.6 (0x0000003f1e800000)
libpthread.so.0 => /lib64/libpthread.so.0 (0x0000003f1c400000)
libc.so.6 => /lib64/libc.so.6 (0x0000003f1b800000)

libGLcore.so.1 => /usr/lib64/nvidia/libGLcore.so.1 (0x00007f791e5a3000) libnvidia-tls.so.1 => /usr/lib64/nvidia/tls/libnvidia-tls.so.1 (0x00007f791e4a1000)

libXext.so.6 => /usr/lib64/libXext.so.6 (0x0000003f1ec00000)
libdl.so.2 => /lib64/libdl.so.2 (0x0000003f1c000000)
libxcb.so.1 => /usr/lib64/libxcb.so.1 (0x0000003f1e400000)
/lib64/ld-linux-x86-64.so.2 (0x0000003f1b400000)
libXau.so.6 => /usr/lib64/libXau.so.6 (0x0000003f1e000000


I see that the libGL.so.1 in that directory has the appropriate OpenGL hooks:
[sfr...@ogre usr]$ strings -a /usr/lib64/nvidia/libGL.so.1 | grep glDeleteShader
glDeleteShader
[sfr...@ogre usr]$ strings -a /usr/lib64/nvidia/libGL.so.1 | grep glUseProgram
glUseProgram
glUseProgramObjectARB


I've tried manually pointing configure.in to the /usr/lib64/nvidia directory:
AC_CHECK_LIB([GL], [glUseProgram],
[OPENGL_LIBS="-lGL"; libGL=yes],
# On SUSE/OpenSUSE, NVidia places the OpenGL 2.0 capable library in
/usr/X11R6/lib
# but it doesn't place a libGL.so there, so the linker won't pick it up
# we have to use the explicit libGL.so.1 path.
save_LIBS="$LIBS"
for l in /usr/lib64/nvidia /usr/X11R6/lib /usr/X11R6/lib64; do
LIBS="$l/libGL.so.1"
AC_MSG_CHECKING(for glUseProgram in $l/libGL.so.1)
AC_TRY_LINK([],[extern int glUseProgram();
glUseProgram();],
[OPENGL_LIBS="$l/libGL.so.1";
libGL=yes],[libGL=no])
AC_MSG_RESULT([$libGL])
test $libGL = yes && break
done
LIBS="$save_LIBS"


In the end, even though ./configure did not recognize that I had openGL properly installed, I had to explicitly enable opengl on my ./configure line:
./configure --enable-opengl

Who knew?
da mule

Friday, August 06, 2010

building CinCV from source, Ubuntu 32-bit

Normally, I am a Fedora man, but I was helping a friend install Cinelerra on Ubuntu Lucid 10.04 32-bit. I installed Lucid in a VMware virtual machine on VMware Server. Here are some notes that may be helpful for someone. The instructions assume a base installation. The base installation VM file size is about 2.7GB. With my updates, it becomes 4GB.

echo "1: update manually with synaptic package manager"
I don't know the command line for this, just do via GUI

echo "2: install dependencies for source"
sudo apt-get install g++ git-core libtool automake nasm mplayer xorg-dev ffmpeg libasound2-dev libogg-dev libvorbis-dev libtheora-dev libopenexr-dev libdv4-dev libpng12-dev libjpeg62-dev libx264-dev uuid-dev mjpegtools libmjpegtools-dev libfftw3-dev liba52-0.7.4-dev libmp3lame0 libmp3lame-dev libsndfile1-dev libfaac-dev libfaad-dev libesd0-dev libavc1394-dev libraw1394-dev libiec61883-dev libtiff4-dev libxxf86vm-dev libglu1-mesa-dev libogg-dev libvorbis-dev libopenexr-dev libpng12-dev libjpeg62-dev mjpegtools libmp3lame0 libquicktime-dev libqt4-dev libpostproc-dev libavformat-dev libavutil-dev libmad0-dev libhal-dev libdbus-1-dev libgcrypt11-dev libfribidi-dev

echo "3: touch language files not present"
cd $HOME/my_cinelerra/po;touch de.gmo es.gmo eu.gmo fr.gmo it.gmo pt_BR.gmo ru.gmo sl.gmo

echo "4: chmod on stamp-po for make install"
cd $HOME/my_cinelerra/po;sudo chmod 777 stamp-po

echo "5: run ldconfig to get around libquicktimehv error"
sudo ldconfig

echo "6: add kernel parameter for max shared memory"
sudo su; echo "kernel.shmmax=2147483648" >> /etc/sysctl.conf

Compile from source (executed within source code directory):
1) ./autogen.sh
2) ./configure
4) make
5) make install


Compile with Monty's changes
After verifying a successful CinCV compile, you'd want to load up Monty's changes and then do:
1) ./autogen.sh
2) ./configure
3) make clean
4) make
5) make install


da mule

Saturday, July 24, 2010

Canon 5D conversion for xiphmont's git

As Monty has been working hard to make Cinelerra more input friendly with his FFmpeg loader fixes, I've been trying to help out as a QA resource. One of my main concerns has been getting my Canon 5D video into Cinelerra. As documented in the IRC log, my custom Canon conversion (ffmpeg stream -> mpeg2enc (output: .m2v/.m2a) -> mplex (output MPEG-PS) -> ffmpeg (output MPEG-TS) was full of invalid timestamps.

In addition, with some recent security updates to my Fedora system just today, it looks like my previous Canon conversion script had broken. I get the dread error:
**ERROR: [mpeg2enc] display_horizontal_size must be in range 0...16383

So I was doubly screwed. Back to the drawing board..er, mailing list. Following up on mjpegtools' Bernhard Prachinger's advice here, I first try to play a test file using a pipe from ffmpeg, like so:
ffmpeg -i mvi_2655.mov -threads 7 -s 1920x1088 -f yuv4mpegpipe - | yuvplay

The video stream plays back with no visible errors, outside of a warning about the video stream frame rate differing from the container frame rate. Here are the top few lines of the output:
Seems stream 0 codec frame rate differs from container frame rate: 48000.00 (48000/1) -> 23.98 (24000/1001)
Input #0, mov,mp4,m4a,3gp,3g2,mj2, from 'mvi_2655.mov':
Duration: 00:00:06.92, start: 0.000000, bitrate: 45836 kb/s
Stream #0.0(eng): Video: h264, yuv420p, 1920x1088, 44296 kb/s, 23.98 tbr, 24k tbn, 48k tbc
Stream #0.1(eng): Audio: pcm_s16le, 48000 Hz, 2 channels, s16, 1536 kb/s
Metadata
major_brand : qt
minor_version : 537331968
compatible_brands: qt CAEP
Output #0, yuv4mpegpipe, to 'pipe:':
Stream #0.0(eng): Video: rawvideo, yuv420p, 920x108, q=2-31, 200 kb/s, 90k tbn, 23.98 tbc
Stream mapping:
Stream #0.0 -> #0.0
Press [q] to stop encoding

INFO: [yuvplay] Playing frame 0000 - 0:00:00.00
INFO: [yuvplay] Playing frame 0001 - 0:00:00.01
INFO: [yuvplay] Playing frame 0002 - 0:00:00.02
INFO: [yuvplay] Playing frame 0003 - 0:00:00.03
INFO: [yuvplay] Playing frame 0004 - 0:00:00.04
INFO: [yuvplay] Playing frame 0005 - 0:00:00.05
INFO: [yuvplay] Playing frame 0006 - 0:00:00.06
INFO: [yuvplay] Playing frame 0007 - 0:00:00.077 bitrate=752028.9kbits/s


So, streaming from FFmpeg to a y4m stream works. I then take that y4m stream and convert it to an mpeg2video for use in Cinelerra, again using Bernhard's simplified mpeg2enc pipe adjusted for aspect ratio and higher bitrate:
ffmpeg -i mvi_2655.mov -threads 7 -s 1920x1088 -f yuv4mpegpipe - | mpeg2enc --verbose 2 --format 3 --aspect 3 --video-bitrate 24000 --no-constraints --video-buffer 448 -o mvi_2655.m2v

Looking at the output (--verbose 2), there don't seem to be any major errors here:
Seems stream 0 codec frame rate differs from container frame rate: 48000.00 (48000/1) -> 23.98 (24000/1001)
Input #0, mov,mp4,m4a,3gp,3g2,mj2, from 'mvi_2655.mov':
Duration: 00:00:06.92, start: 0.000000, bitrate: 45836 kb/s
Stream #0.0(eng): Video: h264, yuv420p, 1920x1088, 44296 kb/s, 23.98 tbr, 24k tbn, 48k tbc
Stream #0.1(eng): Audio: pcm_s16le, 48000 Hz, 2 channels, s16, 1536 kb/s
Metadata
major_brand : qt
minor_version : 537331968
compatible_brands: qt CAEP
Output #0, yuv4mpegpipe, to 'pipe:':
Stream #0.0(eng): Video: rawvideo, yuv420p, 920x108, q=2-31, 200 kb/s, 90k tbn, 23.98 tbc
Stream mapping:
Stream #0.0 -> #0.0
Press [q] to stop encoding
INFO: [mpeg2enc] Selecting Generic MPEG2 output profile
INFO: [mpeg2enc] Assuming norm NTSC
INFO: [mpeg2enc] Progressive input - selecting progressive encoding.
INFO: [mpeg2enc] Encoding MPEG-2 video to mvi_2655.m2v
INFO: [mpeg2enc] Horizontal size: 920 pel
INFO: [mpeg2enc] Vertical size: 108 pel
INFO: [mpeg2enc] Aspect ratio code: 3 = 16:9 display
INFO: [mpeg2enc] Frame rate code: 1 = 24000.0/1001.0 (NTSC 3:2 pulldown converted FILM)
INFO: [mpeg2enc] Bitrate: 24000 KBit/s
INFO: [mpeg2enc] Quality factor: 8 (Quantisation = 9) (1=best, 31=worst)
INFO: [mpeg2enc] Field order for input: none/progressive
INFO: [mpeg2enc] Sequence unlimited length
INFO: [mpeg2enc] Search radius: 16
INFO: [mpeg2enc] DualPrime: no
INFO: [mpeg2enc] Using one-pass rate controller
INFO: [mpeg2enc] GOP SIZE RANGE 7 TO 15
INFO: [mpeg2enc] Setting colour/gamma parameters to "NTSC"
INFO: [mpeg2enc] Progressive format frames = 1
INFO: [mpeg2enc] Using default unmodified quantization matrices
INFO: [mpeg2enc] SETTING MMX and MMX for QUANTIZER!
--DEBUG: [mpeg2enc] PAR = 7


I then take the output of the audio conversion:
ffmpeg -i mvi_2655.mov -acodec mp2 -ab 384k -ar 48000 -ac 2 test.m2a

Output:
Seems stream 0 codec frame rate differs from container frame rate: 48000.00 (48000/1) -> 23.98 (24000/1001)
Input #0, mov,mp4,m4a,3gp,3g2,mj2, from 'mvi_2655.mov':
Duration: 00:00:06.92, start: 0.000000, bitrate: 45836 kb/s
Stream #0.0(eng): Video: h264, yuv420p, 1920x1088, 44296 kb/s, 23.98 tbr, 24k tbn, 48k tbc
Stream #0.1(eng): Audio: pcm_s16le, 48000 Hz, 2 channels, s16, 1536 kb/s
Metadata
major_brand : qt
minor_version : 537331968
compatible_brands: qt CAEP
Output #0, mp2, to 'mvi_2655.m2a':
Stream #0.0(eng): Audio: mp2, 48000 Hz, 2 channels, s16, 384 kb/s
Stream mapping:
Stream #0.1 -> #0.0
Press [q] to stop encoding
size= 325kB time=6.94 bitrate= 384.0kbits/s
video:0kB audio:325kB global headers:0kB muxing overhead 0.000000%

and mux both the video and audio streams to an MPEG-PS in mplex:
mplex -f 3 -b 2000 mvi_2655.m2a mvi_2655.m2v -o mvi_2655.ps

Output:
INFO: [mplex] mplex version 1.9.0 (2.2.7 $Date: 2006/02/01 22:23:01 $)
INFO: [mplex] File mvi_2655.m2a looks like an MPEG Audio stream.
INFO: [mplex] File mvi_2655.m2v looks like an MPEG Video stream.
INFO: [mplex] Found 1 audio streams and 1 video streams
INFO: [mplex] Selecting generic MPEG2 output profile
INFO: [mplex] Multiplexing video program stream!
INFO: [mplex] Scanning for header info: Audio stream c0 (mvi_2655.m2a)
INFO: [mplex] MPEG AUDIO STREAM: c0
INFO: [mplex] Audio version : 1.0
INFO: [mplex] Layer : 2
INFO: [mplex] CRC checksums : no
INFO: [mplex] Bit rate : 49152 bytes/sec (384 kbit/sec)
INFO: [mplex] Frequency : 48000 Hz
INFO: [mplex] Mode : 0 stereo
INFO: [mplex] Mode extension : 0
INFO: [mplex] Copyright bit : 0 no copyright
INFO: [mplex] Original/Copy : 1 original
INFO: [mplex] Emphasis : 0 none
INFO: [mplex] Scanning for header info: Video stream e0 (mvi_2655.m2v)
INFO: [mplex] VIDEO STREAM: e0
INFO: [mplex] Frame width : 1920
INFO: [mplex] Frame height : 1088
INFO: [mplex] Aspect ratio : 16:9 display
INFO: [mplex] Picture rate : 23.976 frames/sec
INFO: [mplex] Bit rate : 24000000 bits/sec
INFO: [mplex] Vbv buffer size : 229376 bytes
INFO: [mplex] CSPF : 0
INFO: [mplex] SYSTEMS/PROGRAM stream:
INFO: [mplex] rough-guess multiplexed stream data rate : 24894496
INFO: [mplex] Setting best-guess data rate.
INFO: [mplex] Run-in delay = 30030 Video delay = 30030 Audio delay = 33783
INFO: [mplex] New sequence commences...
INFO: [mplex] Audio c0: buf= 0 frame=000000 sector=00000000
INFO: [mplex] Video e0: buf= 0 frame=000000 sector=00000000
INFO: [mplex] Scanned to end AU 165
INFO: [mplex] STREAM e0 completed
INFO: [mplex] STREAM c0 completed
INFO: [mplex] Multiplex completion at SCR=653806.
INFO: [mplex] Audio c0: completed
INFO: [mplex] Video e0: completed
INFO: [mplex] AUDIO_STATISTICS: c0
INFO: [mplex] Audio stream length 332928 bytes.
INFO: [mplex] Syncwords : 289
INFO: [mplex] Frames : 289 padded
INFO: [mplex] Frames : 0 unpadded
INFO: [mplex] BUFFERING min 189 Buf max 1162
INFO: [mplex] VIDEO_STATISTICS: e0
INFO: [mplex] Video Stream length: 13871991 bytes
INFO: [mplex] Sequence headers: 1
INFO: [mplex] Sequence ends : 1
INFO: [mplex] No. Pictures : 166
INFO: [mplex] No. Groups : 12
INFO: [mplex] No. I Frames : 12 avg. size162167 bytes
INFO: [mplex] No. P Frames : 154 avg. size 77441 bytes
INFO: [mplex] No. B Frames : 0 avg. size 0 bytes
INFO: [mplex] Average bit-rate : 16028800 bits/sec
INFO: [mplex] Peak bit-rate : 21470400 bits/sec
INFO: [mplex] BUFFERING min 85 Buf max 1944774
INFO: [mplex] MUX STATUS: no under-runs detected


This gives me a good program stream file that is suitable for editing in Cinelerra using Monty's changes. Update 2010/09/13: Florian Cramer advised me that the video render string does not give the highest quality output. I'm still working on improvements to the string that will render at a higher quality.

Moral of the story: never update your system.
;)
the mule

Reference
http://man-wiki.net/index.php/1:mplex
Minor headache with nvidia drivers after kernel upgrade resolved
Plus another pulseaudio fuck job.."pulseaudio module-alsa-card file not found"
- had to reinstall pulseaudio and then execute "alsamixer -c0" to fix

Friday, July 16, 2010

Green Beret parachutes in to help Cinelerra

Unbelievably, just in the past week, the Cinelerra CV community (http://cvs.cinelerra.org/) has had a heavyweight developer parachute in and start fixing stuff all over the place. The guy is Chris "Monty" Montgomery who developed the Ogg multimedia container and Vorbis audio formats (http://en.wikipedia.org/wiki/Chris_Montgomery). He is a developer currently working for Red Hat.

Monty, You're The Man!
His primary effort has been to yank out the kludgy and incompatible file loader in Cinelerra and replace it using good old FFmpeg. FFmpeg has problems of its own, but a helluva lot less problems than the Cinelerra loader. This is a task that the original developer of Cinelerra, Heroine Warrior (http://www.heroinewarrior.com/), has wisely done with the 4.1 version of Cinelerra. Much props to Father HV, for without him, this blog and Open Source video editing would be very different, if exist at all.

Monty is patching the version of FFmpeg that comes with the Cinelerra CV source code (http://cinelerra.org/getting_cinelerra.php). In Cinelerra CV's source code tree, FFmpeg is found under quicktime/ffmpeg. This means that once you compile Cinelerra from source code and add Monty's code fixes, files like the Canon 5D/7D H264 AVC files (the 1080P files spat out of the Canons') will load natively in Cinelerra.

AVC, oh AVC, Why Are You So Stubborn?
Problem here is that you can't really edit with AVC files because the decoding of them is so bloody CPU intensive. AVC playback in Cinelerra on my dual, quad core Dell SC1430 with 10GB RAM is 3-4fps. This is unacceptable for previewing edits. There is a workaround to this such that if you really wanted to edit AVC, you'd need to have background rendering enabled, make your edits and then wait for the background render to finish. But that bg render takes a long time too. You could speed this up to by creating a ramdisk (http://www.techanswerguy.com/2009/02/creating-ramdisk-in-linux.html) and setting the background render to use that ramdisk. But that's a whole other task.

Transcoding Canon 5D/7D Files, as usual
Thus, we're still left with the task of transcoding Canon 5D/7D files into a more compatible format. There are two solutions:
1) get my varied MPEG-TS conversion magic to work for you (http://crazedmuleproductions.blogspot.com/2009/02/dark-of-winter-has-me-in-its-grasp.html)
2) convert the 5D/7D files using FFmpeg into another format that works since FFmpeg is now Cinelerra's loader (with Monty's additions)

Both require research/work, but I did a quick conversion that I tested in Cinelerra with Monty's code additions:
ffmpeg -i [inputFileFromCanon] -acodec mp2 -ar 48000 -ab 384k -ac 2 -vcodec mpeg2video -qscale 1 [outputFile]

The audio format is mpeg, layer II and the video format is mpeg2video. This loads in Cinelerra and is fast to edit with. Once edited, render out from Cinelerra as usual.

How to Compile Cinelerra for Ubuntu and Fedora users
So Monty's additions require compiling from source. I'll provide some quick links here. For Ubuntu folks, Raffaella Traniello has put a nice post together on how to compile Cinelerra in Ubuntu:
http://www.g-raffa.eu/Cinelerra/HOWTO/compilation.html

For Fedora users, I have a post here:
http://crazedmuleproductions.blogspot.com/2010/02/fedora-12-x86-64-cinelerra-install.html

Get Monty's Additions Working
Once you get the source code compiled, install it (make install) and just test that Cinelerra works at a basic level. Once you've tested that your compile has worked, move onto apply Monty's code additions:
- remove your installed Cinelerra (make uninstall)
- download Monty's additions at http://people.xiph.org/~xiphmont/cinelerra/patches/
- apply each of them to the Cinelerra source code tree one at a time (git apply [patch name])
or join in Monty's git branch:
1) git remote add xiphmont git://git.xiph.org/users/xiphmont/cinelerraCV.git
2) git remote update
- compile Cinelerra, this time with all Monty's additions (make clean;make;make install)

After starting CinCV with Monty's additions, you should see the startup info change:
[mule@ogre my_cinelerra]$ cinelerra
Cinelerra 2.1CVxiphmont
GIT::8c01c13bbb21d30aff2733454a49fbfe641e51ca
(C) 2006 Heroine Virtual Ltd.
(C) 2006-2010 The CinelerraCV Community
Internal ffmpeg 0.6+fixes
Compiled on Fri Jul 16 20:40:38 EDT 2010


As well, you should see that FFmpeg becomes the default loader for videos in you goto the Resources window, right-click on a video and click "Info". You should see FFMPEG there under File Format:


A Few Git Notes..
While I'm at it..

View current git branches
[mule@ogre my_cinelerra]$ git branch
* master

Add Monty's remote branch
[mule@ogre my_cinelerra]$ git remote add xiphmont git://git.xiph.org/users/xiphmont/cinelerraCV.git

Update the local copy of Monty's remote branch
[mule@ogre my_cinelerra]$ git remote update
Fetching origin
Fetching xiphmont
remote: Counting objects: 2754, done.
remote: Compressing objects: 100% (1904/1904), done.
remote: Total 1981 (delta 997), reused 0 (delta 0)
Receiving objects: 100% (1981/1981), 2.77 MiB 1.07 MiB/s, done.
Resolving deltas: 100% (997/997), completed with 711 local objects.
From git://git.xiph.org/users/xiphmont/cinelerraCV
* [new branch] master -> xiphmont/master


Check that Monty's branch has been added
[mule@ogre my_cinelerra]$ git branch
* master
xiphmont

I then was able to switch branches
[mule@ogre my_cinelerra]$ git checkout -b xiphmont xiphmont/master
Branch xiphmont set up to track remote branch master from xiphmont.
Switched to a new branch 'xiphmont'


"git branch" shows that I have switched to Monty's branch
[mule@ogre my_cinelerra]$ git branch
master
* xiphmont

Now I can switch easily between branches (Monty's and CinelerraCV)
[mule@ogre my_cinelerra]$ git checkout master
Switched to branch 'master'


Switching to Monty's branch
[mule@ogre my_cinelerra]$ git checkout xiphmont
Switched to branch 'xiphmont'


Show the current status of the git code repositories
[sfrase@ogre my_cinelerra]$ git status | head -6
# On branch xiphmont
# Untracked files:
# (use "git add ..." to include in what will be committed)
#
# cinelerra-cvs-current.spec
# cinelerra/.deps/
>


View the latest change log
[mule@ogre my_cinelerra]$ git log xiphmont/master | head -6
commit 8c01c13bbb21d30aff2733454a49fbfe641e51ca
Author: Monty
Date: Fri Jul 16 07:30:10 2010 -0400

iAlter/extend versioning to avoid any confusion between this temporarily
forked version and the main CinelerraCV repo

Pull in the latest code updates:
[mule@ogre my_cinelerra]$ git pull


Troubleshooting
I tried to switch branches and got this error
[mule@ogre my_cinelerra]$ git checkout -b xiphmont xiphmont/master
error: You have local changes to 'po/de.po'; cannot switch branches.

I did a hard reset to clear the above error
[mule@ogre my_cinelerra]$ git reset --hard HEAD
HEAD is now at d95887f Pass --libdir given to configure on to ffmpeg configure.

Last resort for repos not working, a destructive clean:
[mule@ogre my_cinelerra]$ git clean -dfx


Update 2010/07/16
Looks like the YUV4MPEG render stream is broken..this simple render pipe outputs a file unreadable in FF
ffmpeg -f yuv4mpegpipe -i - -y -target dvd -f mpeg2video %

I talked to Monty and he will fix..something about colorspace converter.
*** end update ***

Note that you have to compile Cinelerra and do a full reinstall, as the Cinelerra "make" process hard links the installation directory into the cinelerra executable.

So I hope Monty stays with us as long as possible. Thanks man! Hope springs eternal!
the mule

References
http://www.itworld.com/open-source/115063/breaking-open-video-frontier-despite-mpeg-la

Saturday, June 05, 2010

extundelete to the rescue!

So..in usual fashion, I had a minor foul up today. I was overzealous in my desire to reclaim disk space and zapped some primary source vids off of my ext4 partition. Ooops. Thankfully, I found extundelete, a program that scans ext3 and ext4 filesystem journals and recovers files from those journals:
http://extundelete.sourceforge.net/

Process
Here's what I did to recover the files.
1) In order to prevent the deleted files being overwritten, I immediately stopped whatever work I was doing and unmounted the drive that the files were on. In my case:
umount /dev/mapper/vg_ogre-lv_root

2) Well, that's my root drive. So before rebooting to my Fedora 12 Live CD, I checked that Fedora had the extundelete program in its repository. I was in luck!
[root@localhost ~]# yum install extundelete
Loaded plugins: presto, refresh-packagekit
fedora/metalink

20 kB 00:00
fedora
4.2 kB 00:00
fedora/primary_db
9.7 MB 00:10
updates/metalink
16 kB 00:00
updates
4.5 kB 00:00
updates/primary_db
4.3 MB 00:01
Setting up Install Process
Resolving Dependencies
--> Running transaction check
---> Package extundelete.i686 0:0.1.8-2.fc12 set to be updated
--> Finished Dependency Resolution

You can also compile from source at the link above.

3) Since extundelete requires you to access an unmounted filesystem, I rebooted to Fedora 12 Live CD

4) I installed extundelete from the Fedora Updates repository
Transaction Summary
Install 1 Package(s)
Upgrade 0 Package(s)

Total download size: 52 k
Is this ok [y/N]: y
Downloading Packages:
Setting up and reading Presto delta metadata
updates/prestodelta
4.4 kB 00:00
Processing delta metadata
Package(s) data still to download: 52 k
extundelete-0.1.8-2.fc12.i686.
rpm 52 kB 00:00
Running rpm_check_debug
Running Transaction Test
Finished Transaction Test
Transaction Test Succeeded
Running Transaction
Installing : extundelete-0.1.8-2.fc12.i686
1/1

Installed:
extundelete.i686 0:0.1.8-2.fc12

Complete!

5) In order to restore deleted files, you must have a partition mounted that has enough space for the recovered files. I have a second partition (/mnt/backups) that I use to backup my main root partition. So while running under the Live CD, I created a destination directory and mounted /mnt/backups:
[root@localhost /]# mkdir /mnt/backup[root@localhost /]# mount -t ext3 /dev/mapper/vg_ogre-lv_backup /mnt/backup

6) Though you can specify that extundelete undeletes individual files or all files on a filesystem, I ran extundelete with the proper command switches to undelete an entire directory of files.  Note that you should be in the directory that has plenty of space for the restore, as extundelete defaults to restoring what it finds to the present working directory:
[root@localhost backup]# extundelete /dev/mapper/vg_ogre-lv_root --restore-directory "mnt/videos/stormpigs/20100408"

WARNING: Extended attributes are not restored.

Loading group metadata ... 27025 groups loaded.


Loading journal descriptors ... 30695 descriptors loaded.


Writing output to directory RECOVERED_FILES/


Searching for recoverable inodes in directory mnt/videos/stormpigs/20100408 ...

309 recoverable inodes found.

Looking through the directory structure for deleted files ...
Restored inode 2495842 to file RECOVERED_FILES/mnt/videos/
stormpigs/20100408/20100408_2.m2t

Restored inode 2495844 to file RECOVERED_FILES/mnt/videos/
stormpigs/20100408/20100408_3.m2t

Restored inode 57147521 to file RECOVERED_FILES/mnt/videos/
stormpigs/20100408/vadd.txt

Restored inode 57147522 to file RECOVERED_FILES/mnt/videos/
stormpigs/20100408/aadd.txt

Restored inode 57147525 to file RECOVERED_FILES/mnt/videos/
stormpigs/20100408/temp.txt

Restored inode 57147528 to file RECOVERED_FILES/mnt/videos/
stormpigs/20100408/test.xml

Restored inode 57147532 to file RECOVERED_FILES/mnt/videos/
stormpigs/20100408/testLabels.sh

Success..or close enough to it
This is good..I've undeleted all but one of the files I had deleted. So, it looks like before I unmounted my root partition, the inode for "20100408_1.m2t" was overwritten. Oh well, two out of three ain't bad.

Update 2011/10/05
This works nicely with ext4 partitions as well.
*** end update ***

Anyway, this short post should give you some comfort that extundelete actually does what it is supposed to. Thanks number9652!!

Reference
http://extundelete.sourceforge.net/
http://sourceforge.net/mailarchive/forum.php?forum_name=extundelete-users

Monday, April 12, 2010

automating repetitive tasks by scripting Cinelerra, part II

This is a follow up to my earlier article:
/2010/01/automating-repetitive-tasks-by.html

Saving Time
In this entry, I discuss writing a shell script that automatically adds a second video track to your Cinelerra project. This comes in handy for projects that you do repeatedly. For example, a weekly podcast that uses a standard watermark.

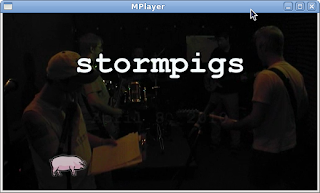
For instance, I produce a monthly podcast for my band. You can see the pig watermark in the screen cap below:


In Cinelerra, the pig watermark is created by adding a second video track to my base Cinelerra project. This second video track includes a jpg stretched to the length of the first video track. Also, there is a chroma key effect applied to the pig track in order for it to be transparent against the background of the jam video.

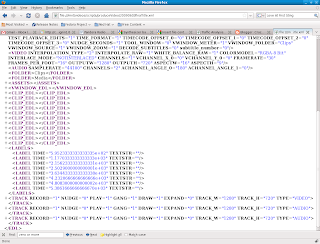
The two items, a graphic of a pig and a video track with the image of the pig and applied effects are represented by XML in the Cinelerra EDL. Remember, the Cinelerra EDL (edit decision list) is the XML file that represents all the edits that you've performed in creating your video masterpiece. It looks like this:


In this blog post, I will show you a shell script that inserts these two chunks of XML into a basic Cinelerra project file. For my script to work properly, note that the base project needs at least one video track and at least one label. I'll get into the reason for that later. The basic project file can also have audio tracks as well.

The Asset, the Asset EDL and the Video Track EDL
One asset and two sections of XML represent the video track of the pig:
1) Here is the graphic of the pig, as a Google Doc.

2) Here is the EDL of the asset (pig2.jpg):

The EDL is also available in a Google Doc.

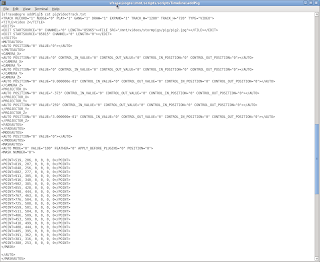
3) Here is the EDL of the video track of the pig:

The full EDL is also available as a Google Doc.

Since I use the pig watermark on each podcast, I reuse the two chunks of XML above for each installment of my monthly podcast. So I've saved both the asset and the video track XML above from an older project to separate files (pigAsset.txt and pigVideoTrack.txt). Using the shell script, I will insert both of these files at the appropriate places in my base Cinelerra project (my latest podcast). To make life simple, my base project has only one track, the video track of the band rehearsal.

Disclaimer
You're probably saying that this seems like a lot of work and you maybe getting confused. Well..it kind of is a pain in the ass, but it will be worth it when you can whip out a shell script and automatically add your watermark to your project! But I digress..

Shell Script Fun
Here is the meat of the script:
PWD=/mnt/scripts/scriptsTimeline/addPig
ASSET=$PWD/pigAsset.txt
TRACK=$PWD/pigVideoTrack.txt
OLDLENGTH=85965
NEWLENGTH=$(videoLength.sh $INPUT)

echo "OLDLENGTH is $OLDLENGTH"
echo "NEWLENGTH is $NEWLENGTH"
echo "INPUT is $INPUT"
echo "OUTPUT is $OUTPUT"

# adds both via a pipe WORKING
sed -e "s/^<\/ASSETS>/<\!-- $REM -->/g" $INPUT | sed -e "/<\!-- $REM -->/r $ASSET" | sed -e "/LABEL TIME/,/^<\/LABELS/{ /<\/LABELS>/r $TRACK
}" | sed -e "s/$OLDLENGTH/$NEWLENGTH/g" > $OUTPUT

The full script is here, again as a Google Doc.

The core of the script revolves around a neat bit of sed (stream editor) trickery that I mentioned in my first scripting article. In this case, the core function of the script does something similar, but still hinges upon the appearance of labels in the EDL ("LABEL TIME") as a positional reference within the EDL to perform the insertion:
sed -e "s/^<\/ASSETS>/<\!-- $REM -->/g" $INPUT | sed -e "/<\!-- $REM -->/r $ASSET" | sed -e "/LABEL TIME/,/^<\/LABELS/{ /<\/LABELS>/r $TRACK
}" | sed -e "s/$OLDLENGTH/$NEWLENGTH/g"


If we break this command apart, we see that it does a few things:
1) it adds the pig as an asset (the $ASSET constant in the second sed command) to a project (the $INPUT constant listed in the first sed command)
sed -e "s/^<\/ASSETS>/<\!-- $REM -->/g" $INPUT | sed -e "/<\!-- $REM -->/r $ASSET" 

2) it adds a video track of said pig (the $TRACK constant) with this part of the command
| sed -e "/LABEL TIME/,/^<\/LABELS/{ /<\/LABELS>/r $TRACK

3) to make the new track the same length as the new track, it calculates the length of the base track and then substitutes that value for the initial length of the pig track.
| sed -e "s/$OLDLENGTH/$NEWLENGTH/g"

Now, I threw a curveball in there with that NEWLENGTH constant. This number is the current length of the video track in your input file and it is calculated via a second, slightly shorter script called "videoLength.sh".

Here is the Google Doc of that script.

Putting It All Together
To test how the script adds a track, download the following components to the same directory:
1) the jpg of the pig, save as pig2.jpg
2) the xml representing the pig, save as pigAsset.txt
3) the xml representing a new video track with effects, save as pigVideoTrack.txt
4) a test Cinelerra project, save as testProject.xml
5) the script, save as addPig.sh
6) the videoLength shell script

Don't forget to make both scripts executable:
chmod a+x addPig.sh
chmod a+x videoLength.sh, save as videoLength.sh

Script usage:
./addPig.sh [inputEDLfile] [outputEDLfile]

ex.
./addPig.sh testProject.xml trackAdded.xml

You may want to load testProject.xml into Cinelerra first to see that it only has one track. The script will create a new EDL file once it is run. Once you run the script, load your output EDL into Cinelerra. You should see the new track with the associated effects. The track should be the same length as testProject's video track.

Most likely, though, you won't see the pig, just because the pig is not in the same asset directory as the EDL specifies. Simply change pigAsset.txt to reference the pig into the proper directory, rerun the script and all should be good!

Summary
These scripts definitely can be improved upon, especially by someone who has better tools than sed to manipulate XML. But it was fun to automate a mundane task in Cinelerra. Now I don't have to manually add that watermark to my project anymore and neither do you!

the mule

Saturday, March 27, 2010

timelapse in Cinelerra

I've been playing around for the past few weeks with DSLR Remote, an iPhone app that allows you to control recent Canon or Nikon cameras remotely. DSLR Remote has an intervalometer, or timer, to allow you to take N number of photographs at T intervals. Once you take a bunch of photos, you can assemble them in Cinelerra to create a video of the change seen over time in the pictures, or timelapse.

Overview
This is my first experimentation with timelapse; specifically, timelapses of clouds and nighttime city scenes. I'm using a Canon 5D Mark II. Timelapse has been a real challenge, as the camera must be setup for proper exposure. I'm generally satisfied with the result, but I think it can be improved upon once I figure out the proper exposure settings.

An Education
I have learned some basics over the eight or so timelapses I've done:
1) don't use Automatic mode or full manual because the exposures vary quite a bit if the aperature (F Stop) or shutter speed change dramatically or conversely, don't change. Use aperature priority mode instead. Also, if the camera is in Auto mode, sometimes it will take time to change its settings. This will change the time interval between shots and make your final timelapse production jump around and jerky.

From the EXIF data in the JPEGs that I took during a morning timelapse, you can see how my shutter speed bounces around as the sun rose over a period of about an hour (FStop and ISO were locked):
[mule@ogre cinelerra]$ ./imageIdentifyFIsoShutter.sh /mnt/videos/projects/timelapse/Remote04639.jpg
exif:ExposureTime: 1/5
exif:FNumber: 11/1
exif:ISOSpeedRatings: 640
[mule@ogre cinelerra]$ ./imageIdentifyFIsoShutter.sh /mnt/videos/projects/timelapse/Remote05639.jpg
exif:ExposureTime: 1/100
exif:FNumber: 11/1
exif:ISOSpeedRatings: 640
[mule@ogre cinelerra]$ ./imageIdentifyFIsoShutter.sh /mnt/videos/projects/timelapse/Remote06239.jpg
exif:ExposureTime: 1/500
exif:FNumber: 11/1
exif:ISOSpeedRatings: 640


This can also blowout highlights and generally wash out the colors in the image, as shown in the latter half of this video:


2) shoot in aperature priority mode with auto ISO on. Auto ISO will account for variations in lighting conditions, like when a cloud passes in front of the sun.

3) make sure any lens stabilization is turned off, as this will make the frame jump around at times. This sounds counterintuitive, yes, but if the camera is on a tripod (as it should be for timelapse photography) a lens stabilizer will try to correct for movement that isn't present and will shift the frame around slightly. I figured this out after about five tries. (Yes, I am a doofus).

4) turn off automatic white balancing as it will effect the exposure from frame to frame

5) if you want to emphasize depth of field during day timelapses, make sure to get a neutral density filter. This will allow you to keep your aperature open wider, thus creating greater depth of field.

6) slower shutter speeds slightly blur movement. For example, daytime time lapse photography of clouds seem smoother with a slower shutter speed. Again, try a neutral density filter to help slow down the shutter speed. Of course, slow shutter speeds are very cool for time lapse traffic shots.

7) make sure your intervalometer is functioning properly. If it doesn't accurately time the snapshots, your final timelapse will look jerky and jump around once stitched together in Cinelerra.

Proper Interval
My camera has a limitation of 999 total shots that can be taken. In my experiments, I found that to acheive a smooth movement of clouds in my timelapses, I should take a picture every two or three seconds. That means if I want to take a picture every two seconds (30 pictures per minute) and I have 999 total shots available, my timelapse will last for a period of 33.3 minutes (999 shots / 30 pictures/minute). Doesn't seem that long, does it? If I chose an interval between shots of three seconds, my timelapse would occur over 49.95 minutes (999 shots / 20 pictures/minute). That seems a little more useful.

Timelapse in Cinelerra
Once I have my 999 images, I then stitch them together in Cinelerra at 60fps, 30fps or 15fps depending on my desired result..fast, medium or slower motion of whatever I was time lapsing. You'll need to do a bit of calculation to figure out at what duration (length) the images will be once imported into Cinelerra. That duration is set in Preferences -> Recording (screen below). I've provided those calculations below:
15 seconds = .0667
30 seconds = .0333
60 seconds = .0167

Be aware that if you import that many JPEGs, and especially if the JPEGs are very large, the import can take a while. My source files were 5616x3744 and took about 15-20 minutes to load.


Here's my acceptable timelapse..not the best..but getting there:


Going forward, the one thing I'd like to acheive is to remove or limit the slight changes in exposure that occur every once in a while so that the timelapse flows smoothly from one frame to another.

another work in progress..
the mule

Canon 5D: Best Modes for Video and Photos

Sunday, February 21, 2010

fsarchiver, good backup for ext4 partitions

Since I had lost my root partition the other day (!), I needed a decent method to backup my new ext4 partitions. Since partimage does not currently support ext4, I found fsarchiver:
http://www.fsarchiver.org/

Overview
I've partitioned my new 4.5TB drives this way:
/boot
/root 3.7TB
/backup 800GB


I formatted the backup filesystem as ext3. This way, I can simply boot with a Fedora Live CD, mount the backup partition and backup my boot and root partitions to the backup. Of course, I'll need to roll that backup off to another storage media. But this strategy helps when I make major updates to my system because I can easily rollback to an earlier version that is stored locally.

Most importantly, restore works!

Detail
Here's what I did the other day to get 'er going.

First, I booted to my Fedora Live CD. It didn't have fsarchiver installed by default, so I did so. You need to become superuser to do this:
[liveuser@localhost ~]$ su
[root@localhost liveuser]# yum install fsarchiver
Loaded plugins: presto, refresh-packagekit
Setting up Install Process
Resolving Dependencies
--> Running transaction check
---> Package fsarchiver.i686 0:0.6.7-1.fc12 set to be updated
--> Finished Dependency Resolution

Dependencies Resolved

=============================================================================================================================================================
Package Arch Version Repository Size
=============================================================================================================================================================
Installing:
fsarchiver i686 0.6.7-1.fc12 updates 93 k

Transaction Summary
=============================================================================================================================================================
Install 1 Package(s)
Upgrade 0 Package(s)

Total download size: 93 k
Is this ok [y/N]: y
Downloading Packages:
Transaction Test Succeeded
Installing : fsarchiver-0.6.7-1.fc12.i686 1/1
Installed:
fsarchiver.i686 0:0.6.7-1.fc12

Complete!


I created my backup directory and mounted it:
[root@localhost liveuser]# mkdir /mnt/backup
[root@localhost liveuser]# mount -t ext3 /dev/mapper/vg_ogre-lv_backup /mnt/backup
[root@localhost liveuser]# ls /mnt/backup
lost+found test.txt


Finally, I ran fsarchiver to do the backup and took advantage of its multithreaded capability:
[root@localhost liveuser]# fsarchiver -j7 -o savefs /mnt/backup/lv_root_backup.fsa /dev/mapper/vg_ogre-lv_root
Statistics for filesystem 0
* files successfully processed:....regfiles=306990, directories=31024, symlinks=16561, hardlinks=4157, specials=28
* files with errors:...............regfiles=0, directories=0, symlinks=0, hardlinks=0, specials=0


You could concatenate these steps into a script:
[mule@ogre ~]$ cat systemBackup.sh
su -
yum install fsarchiver
mkdir /mnt/backup
mount -t ext3 /dev/mapper/vg-ogre/lv_backup /mnt/backup
fsarchiver -j7 -o savefs /mnt/backup/lv_root_backup.fsa /dev/mapper/vg_ogre-lv_root


Voila! In seven hours, I backed up approximately 450GB of data:
[root@localhost liveuser]$ ll /mnt/backup
total 459289180
drwx------. 2 root root 16384 2010-02-10 20:09 lost+found
-rw-r--r--. 1 root root 480252970629 2010-07-21 07:34 lv_root_backup.fsa


Update:
When my RAID set was not being checked, an fsarchive of about 760GB took 3.5 hours. Not bad!
***end update***

Restore
Restore works in a similar way. Since fsarchiver allows you to backup multiple filesystems within one archive, you need to specify which filesystem is getting restored.

In the example below, the "id=0" specifies the index (starting at 0) of the filesystem that is in the archive.  The filesystem to be restored cannot be mounted:
fsarchiver restfs /mnt/backup/lv_root_backup.fsa id=0,dest=/dev/mapper/vg_ogre-lv_root


If you had multiple file  systems stored in the archive "lv_root_backup.fsa", then the id number would increment; eg, "id=1" for the second filesystem stored in the archive.

"dest" is the destination filesystem which is getting restored, in this case "/dev/mapper/vg_ogre-lv_root"


Password Protection for Archives
You can also specify a password to password protect your archive.  On backup and restore, the password switch looks the same:
sudo fsarchiver restfs backup_vg_ogre-lv_root.fsa id=0,dest=/dev/sdb1 -c [password]

Worked for me on many occasions.
the mule

References
http://www.fsarchiver.org/QuickStart

Thursday, February 11, 2010

compiling Cinelerra on Fedora 12, x86-64 from source

Happily, I'm over the hurdle with my server rebuild from Fedora 10 to Fedora 12 and have successfully built Cinelerra from source on my Fedora 12, x86-64 box! Yes!

The install was generally smooth, with the exception of a minor glitch: as aac encoding is proprietary, ffmpeg does not include faac support. Doh! So, you'll need to compile and install ffmpeg with faac support from source as per these excellent instructions from Doran:
http://fozzolog.fozzilinymoo.org/tech/2009/11/recompiling-ffmpeg-for-fedora-12-to-add-faac-support.html

RPM Fusion Yo!
Note that you'll need both the free and non-free repositories from RPM Fusion enabled in yum. Don't use the ATrpms repos if you're going to compile from source. I've had strange system problems when I've used them in combination with the Fusion repos.

So here's the deal..

Summary Steps to Installing Cinelerra from Source
  1. download source code
  2. install dependencies for ffmpeg compile
  3. compile ffmpeg with faac support for fedora 12
  4. install rest of Cinelerra dependencies
  5. compile cinelerra

Detailed Steps to Installing Cinelerra from Source
1. Get the Cinelerra source code
git clone git://git.cinelerra.org/j6t/cinelerra.git my_cinelerra

2. Install dependencies for ffmpeg compile
Feel free to use the following script (don't forget to chmod a+x it!):
yum install dirac-devel faac-devel faad2-libs gsm-* imlib2-devel lame-libs* libdc1394-devel libvdpau-devel openjpeg-devel schroedinger-devel speex-devel texi2html x264-* xvidcore-* yasm

3. Compile ffmpeg with faac support

Highlights
[sodo@computer ~]$ yumdownloader --source ffmpeg

[sodo@computer ~]$ rpm -ivh ffmpeg-0.7.6-1.fc15.src.rpm

[sodo@computer ~]$ vi rpmbuild/SPECS/ffmpeg.spec
[sodo@computer ~]$ rpmbuild -ba ~/rpmbuild/SPECS/ffmpeg.spec --with faac

[sodo@computer ~]$ cd rpmbuild/RPMS/
[sodo@computer RPMS]$ cd x86_64/
[sodo@computer x86_64]$ ls -ltr
total 39164
-rw-rw-r--. 1 sodo sodo  259049 Dec 18 14:56 ffmpeg-0.7.6-1.fc15_fozz.x86_64.rpm
-rw-rw-r--. 1 sodo sodo 3138877 Dec 18 14:56 ffmpeg-libs-0.7.6-1.fc15_fozz.x86_64.rpm
-rw-rw-r--. 1 sodo sodo  166417 Dec 18 14:56 ffmpeg-devel-0.7.6-1.fc15_fozz.x86_64.rpm
-rw-rw-r--. 1 sodo sodo 9860213 Dec 18 14:56 ffmpeg-debuginfo-0.7.6-1.fc15_fozz.x86_64.rpm
[sodo@computer x86_64]$ sudo rpm -Uvh ffmpeg-libs-0.7.6-1.fc15_fozz.x86_64.rpm ffmpeg-0.7.6-1.fc15_fozz.x86_64.rpm ffmpeg-devel-0.7.6-1.fc15_fozz.x86_64.rpm ffmpeg-debuginfo-0.7.6-1.fc15_fozz.x86_64.rpm
[sudo] password for sodo: 
Preparing...                ########################################### [100%]
   1:ffmpeg-libs            ########################################### [ 25%]
   2:ffmpeg                 ########################################### [ 50%]
   3:ffmpeg-devel           ########################################### [ 75%]
   4:ffmpeg-debuginfo       ########################################### [100%]


4. Install rest of Cinelerra dependencies
Feel free to use the following script (don't forget to chmod a+x it!):
yum install gsm-devel libvorbis* libogg* libtool* libtheora* libpng* libjpeg* libtiff* esound* audiofile* libraw1394* libavc1394* freetype* fontconfig* nasm e2fsprogs* OpenEXR* fftw fftw-devel libsndfile* libiec61883* libdv* libquicktime ffmpeg xvidcore* lame lame-devel a52* faad2* x264* mjpegtools* faac* vlc*

5. Compile Cinelerra
If you used the same default directory when you downloaded the source code, cd into that directory and type:
./autogen.sh

This will build your configuration files. Next, to configure Cinelerra with default options, type:
./configure

If you want to customize your configuration, just type "./configure --help". At which point, configure will spill its guts to you about all the Secrets of Cinelerra.

Then, to compile the code, run:
make

If you have multiple processors, you can even run "make -j N" where "N" is the number of processors you have minus one.

Finally, if make was successful or you are just feeling good about yourself, go ahead and install Cinelerra:
make install

Hopefully, this post has gotten you started on your way to using Cinelerra, Linux's "50,000 watt flamethrower of multimedia of editing"

Much thanks to Jack Crossfire, our patron saint of compositing code.

the mule

Reference
Don't forget to read the manual!