Saturday, January 30, 2010

mpeg toc maker

I got tired of having Cinelerra hang while create table of contents files for a list MPEG videos. So I wrote my own script to create the table of contents files for a list of MPEGs in a directory. Once you specify the LIST, the script plops the table of contents files in your users' .bcast directory in ~/.bcast.

I output the file name, start time, end time and elapsed time for the table of contents creation. This output looks like this:

SCRIPTSTART: 20100130_121201
FILE: mvi_0703.m2t START: 20100130_121201 END: 20100130_121204 TIME(s): 3
FILE: mvi_0705.m2t START: 20100130_121204 END: 20100130_121222 TIME(s): 18
FILE: mvi_0706.m2t START: 20100130_121222 END: 20100130_121255 TIME(s): 33
FILE: mvi_0708.m2t START: 20100130_121255 END: 20100130_121325 TIME(s): 30
FILE: mvi_0709.m2t START: 20100130_121325 END: 20100130_121341 TIME(s): 16
FILE: mvi_0710.m2t START: 20100130_121341 END: 20100130_121347 TIME(s): 6
FILE: mvi_0711.m2t START: 20100130_121347 END: 20100130_121401 TIME(s): 14
FILE: mvi_0713.m2t START: 20100130_121401 END: 20100130_121403 TIME(s): 2
FILE: mvi_0714.m2t START: 20100130_121403 END: 20100130_121415 TIME(s): 12
FILE: mvi_0715.m2t START: 20100130_121415 END: 20100130_121415 TIME(s): 0
FILE: mvi_0716.m2t START: 20100130_121416 END: 20100130_121416 TIME(s): 0
FILE: mvi_0717.m2t START: 20100130_121416 END: 20100130_121421 TIME(s): 5
FILE: mvi_0718.m2t START: 20100130_121421 END: 20100130_121442 TIME(s): 21
FILE: mvi_0719.m2t START: 20100130_121442 END: 20100130_121442 TIME(s): 0
FILE: mvi_0720.m2t START: 20100130_121442 END: 20100130_121446 TIME(s): 4
FILE: mvi_0721.m2t START: 20100130_121446 END: 20100130_121449 TIME(s): 3
FILE: mvi_0722.m2t START: 20100130_121449 END: 20100130_121454 TIME(s): 5
FILE: mvi_0724.m2t START: 20100130_121454 END: 20100130_121455 TIME(s): 1
FILE: mvi_0725.m2t START: 20100130_121455 END: 20100130_121507 TIME(s): 12
FILE: mvi_0727.m2t START: 20100130_121507 END: 20100130_121515 TIME(s): 8
FILE: mvi_0728.m2t START: 20100130_121515 END: 20100130_121531 TIME(s): 16
FILE: mvi_0730.m2t START: 20100130_121531 END: 20100130_121534 TIME(s): 3
FILE: mvi_0731.m2t START: 20100130_121534 END: 20100130_121535 TIME(s): 1
SCRIPTEND: 20100130_121535 RUNTIME(s): 213

*** Update 2010/05/28 ***
I added a little logic to the beginning of the script that checks for the presence of a single argument to the script. That argument is the name of a single file to convert. So now, you have two choices:
1) convert a list of mpeg files as specified in the LIST variable or
2) convert a single file via the command line like so:
./tocMaker.sh videoToConvert.m2t
*** end update ***

Here is the script:

#!/bin/bash
#
# tocMaker.sh
# Author: SCF
# Website: http://crazedmuleproductions.blogspot.com
#
# Purpose: This script builds the table of contents files for a list of mpeg files
#
# Input: List of mpeg files as specified in the LIST variable or a single file via command line like so:
# ./tocMaker.sh videoToConvert.m2t
#
# Output: Runs mpeg3toc and puts toc's in your users' .bcast directory
#
DEBUG=
if [ $1 ]
then
LIST=$1
else
LIST="*.m2t"
fi
echo "converting $LIST"
TOTALTIME=0
function dt {
DATE=$(date +"%Y%m%d_%H%M%S")
echo $DATE
}
function st {
SECONDS=$(date +%s)
echo $SECONDS
}
PWD=$(pwd)
DIR=$(echo $PWD | sed 's/\//_/g' | sed 's/^_//g')

SCRIPTSTART=$(dt)
printf "%13s %32s\n" "SCRIPTSTART:" $SCRIPTSTART

for FILE in $(ls -1 $LIST)
do
START=$(dt)
COUNTBEGIN=$(st)
NEWFILE=$(echo $FILE | sed 's/\./_/g')
FULLPATH="${DIR}_${NEWFILE}.toc"
ORIG_PATH="$PWD/$FILE"
if [ $DEBUG ]
then
echo "$FILE was: $FILE, is: $NEWFILE"
echo "FULLPATH is $FULLPATH"
echo "command is mpeg3toc $ORIG_PATH ~/.bcast/$FULLPATH"
fi
mpeg3toc $ORIG_PATH ~/.bcast/$FULLPATH
END=$(dt)
COUNTFINISH=$(st)
ELAPSED=$(expr $COUNTFINISH - $COUNTBEGIN)
printf "%13s %32s %11s %15s %11s %15s %11s %7d\n" "FILE:" $FILE "START:" $START "END:" $END "TIME(s):" $ELAPSED
TOTALTIME=$(expr $ELAPSED + $TOTALTIME)
done
SCRIPTEND=$(dt)
printf "%13s %32s %11s %15d\n" "SCRIPTEND:" $SCRIPTEND "RUNTIME(s):" $TOTALTIME

cheers,
the mule

Wednesday, January 27, 2010

batch render redux

As a follow up to this original post, I thought I'd give a few hints on working with the batch render function in Cinelerra. I've been using the batch render to prepare me for my new Fedora 12, x86-64 system. Specifically, I am using batch render to profile the capacity and speed of my current Fedora 10 system. After I install the new Fedora 12 system, I can then use the Fedora 10 performance baseline to tell me how much faster (or slower) the new system is in relation to the old system.

Selecting a Cinelerra Project
The first thing I did was use a short (~1 min) clip of a project that I had been working on:


I then used this project to output a short clip as the basis for the batch render:


Batch render is accessed by typing Shift-B within Cinelerra:


You can save a batch render list to XML format. This format is similar to the XML of the edit decision list (EDL) that Cinelerra stores when a project is saved. You can then load that XML to use later.

Batch Render Gotchas
I used a previous batch list to render out that short clip to about twenty different file formats. The batch render blew up a few times, so I had to get over a few obstacles:
1) the batch list I had saved months ago was out of date and the directory pointers in the XML were incorrect. I fixed the incorrect pointers by going into the vi text editor and doing a wholesale conversion with a sed construct:
:1,$ s/videos\/oldpath/videos\/newpath/g

1,$ says look for and make replacements on all lines. s means "search for.." The matching expression looks for the string "videos/oldpath" in the file and replaces it with "videos/newpath". g means "do the replacement globally"

2) my project had an improperly formatted Quicktime video track on the timeline. I kept getting Quicktime errors when the batch ran, which would crash Cinelerra. Once I removed that errant track, the batch render worked correctly.

3) once I got the batch running, my disk would fill up quickly as I was rendering to a few uncompressed formats. I deleted some very large, extraneous files and the batch was able to complete.

So you can see that you need to prepare both the base project and your system if you expect your batch render to run properly.

Command Line Batching
Once you get your batch working, another nice feature of batch rendering you can take advantage of is the ability of Cinelerra to do this at a command line. I just kicked off a batch job at the command line and see that it does work on a box with X installed. Nicely, it also give you an ETA:

[sodo@tbear ~]$ cinelerra -r /mnt/videos/cinelerra/batch/batchList.xml
/mnt/videos/cinelerra/batch/renderCompatibility.xml
Cinelerra 2.1CV (C) 2006 Heroine Virtual Ltd.
Compiled on Sat Jan 23 01:32:17 EST 2010

Cinelerra is free software, covered by the GNU General Public License,
and you are welcome to change it and/or distribute copies of it under
certain conditions. There is absolutely no warranty for Cinelerra.
Render::run: /mnt/videos/cinelerra/batch/renderCompatibility.xml
Render::render: starting render farm
[mpeg4 @ 0x7ff313d3ba00]warning: first frame is no keyframe
[mpeg4 @ 0x7ff313d3ba00]concealing 1 DC, 1 AC, 1 MV errors
12% ETA: 0:07:45


Batch Results
So my goal was to profile my current system's capacity by capturing the system's cpu and disk utilization while the files rendered. To really see what is going on though, I thought it might be nice to have a graphical representation of the render as it occurs over time. So I spent some time writing a gnuplot script to plot the system utilization as the files rendered:

A bit of explanation may be required. I captured the output of vmstat to a file. VMstat has CPU load and wait i/o (disk utilization) statistics. While capturing that output, I kicked off the batch render.

In the graphic, you can see that different types of renders have different utilization profiles. For example, the mpeg4 renders were generally lower in CPU utilization (red line), while h264 renders used a lot of CPU. Similarly, the uncompressed formats like rgb/rgba/yuv420planar stress out the disk quite a bit (green line). Please excuse the fact that the filenames aren't perfectly lined up with each file's render profile..this was my first effort at graphing render times.

It will be interesting to see how the new Fedora 12 install affects the CPU. Also, I am planning on installing a new hardware RAID set, so I expect those green lines to go to zero (hopefully)!

ciao,
the mule

Sunday, January 24, 2010

compile time performance improved!

I was compiling Cinelerra today and noticed that CPU usage was very low during the compile..around 10-15% utilized. I have a dual CPU, quad core box. This makes for a total of eight processors. So with all those CPUs, I figured there must be a way to make compiling faster.

Actually, this low CPU use during compiles was something I had noticed the first time I installed Cinelerra. Ashamedly, I've forgotten to investigate this issue in the two years that I've had the box. So today I googled for "make compiler see multiple CPUs" and found the -j switch to "make" the program that does the compiling:
http://blogs.koolwal.net/2009/04/20/tip-compile-your-programs-fasters-with-multiple-processor-machines/

This article also mentions the CONCURRENCY_LEVEL environment variable, but that variable did not work for my box, a Dell SC1430. So I used the -j switch to make instead:
[mule@ogre my_cinelerra]$ make -j7
(CDPATH="${ZSH_VERSION+.}:" && cd . && /bin/sh /home/sfrase/my_cinelerra/missing --run autoheader)
rm -f stamp-h1


Here are my results.

the time it took to compile Cinelerra normally, without -j:
3min 45s
the time it took to compile Cinelerra with the -j8 (for eight cores):
1min 16s

Holy crap! That's a 300% speed improvement!

Glad I finally researched this.
scott

ps - one other note: 7z is a multithreaded version of tar. On Fedora, use 7za
Installing : p7zip-4.65-2.fc12.x86_64
7za - A file archiver with highest compression ratio

SYNOPSIS
7za [adeltux] [-] [SWITCH]


Related Posts
http://crazedmuleproductions.blogspot.com/2007/10/multithreading-in-ffmpeg-and-mpstat.html

Fedora 12, x86-64 upgrade

The time has come again..sytem upgrade. Ugh.

From Fedora 10 x86-64 to Fedora 12 x86-64
I say "ugh", but I truly am excited as Fedora 12 does have some nice performance improvements (ext4, kernel modesetting, faster boot, rpm) that they've packaged since the Fedora 10 system I'm working with now:
http://fedoraproject.org/wiki/Releases/11/FeatureList
http://fedoraproject.org/wiki/Releases/12/FeatureList

To be clear, I don't do upgrades. I will tar up my /home directory to USB, install the new OS from scratch and then blast my /home directory onto the clean new OS and RAID array.

Thinking Hard
I've spent quite a bit of time planning this upgrade. One of the big things I am doing is to profile the performance of my system before and after the OS and hardware upgrades. Of course, I won't be able to determine whether or not the performance gain is coming from the OS or the new RAID array, but at the end of the day, I simply want to be able to say "my system is now X% faster."

I will be looking at the performance of the system from the OS, Cinelerra and encoder perspectives.

Learning about Fedora 12
http://fedoraproject.org/wiki/Common_F12_bugs
http://www.scribd.com/doc/24513176/Fedora-12-Installation-Guide
Changes_in_Fedora_for_Desktop_Users

Hardware changes going in
New RAID configuration:
3WARE Pci-e 9650SE RAID card with Battery Backup
four Western Digital 1.5 TB Green SATA 32MB Cache Hard Drive

Virtual Machine Testbed
One of the things that has helped me in the process is using VMware Server to test out Fedora 12. I've caught a couple things right off the bat: as it is a proprietary format, FAAC is not installed with FFmpeg by default. I was able to resolve this through Doran's excellent post here:
http://fozzolog.fozzilinymoo.org/tech/2009/11/recompiling-ffmpeg-for-fedora-12-to-add-faac-support.html

Also, H264 encoder magic has changed a bit. Other than that, my output testing to various formats (MPEG-PS, HDV, DVD, iPod/iPhone) has worked very well.

General prep work
work out bugs with Fedora 12 virtual machine
clean up old F10 system
backup F10 system files via script
backup /home directory via tar to external drive

Installation steps
Install new F12, Developer's edition
Install RPMs via script
Build and install FFmpeg RPM with faac support from nonfree RPM Fusion repo via script
Install favorite programs
Install Cinelerra dependencies
Install Cinelerra

For those with strong constitutions, here's the full project plan:
http://spreadsheets.google.com/ccc?key=0AjSzE_zejuQZdFphck9aQUVBbzZVOWhyOC1CaVFVQmc&hl=en

I'm almost there..most of the planning is done. Now, to execute! I'll let you know how it goes.
The Mule

Reference
http://www.graphics-muse.org/wp/?p=501

Saturday, January 16, 2010

best practices to alleviate audio sync problems in Cinelerra

Audio synchronization problems are the bane of video editors everywhere. Here's what I do in Cinelerra to try to prevent them.

The first thing to understand is that playback in Cinelerra is a separate process from rendering (exporting) your project to a final format. So it is a good idea to calibrate the audio-video synchronization of your files when they are played back in the Cinelerra compositor as well as the a/v sync of rendered output. More specifically:
1) You need to calibrate the audio you see being played back in the compositor. Do this by setting Audio Offset in the Preferences -> Playback -> Audio Out so that your playback audio is in sync with the video. I generally use ALSA as my audio driver under Preferences -> Playback. (You might also want to try to use OSS or ESound to see if those audio drivers help your playback sync issues.) For reference, my offset is .1 seconds.

2) You'll need to calibrate the audio and video once it is rendered out of Cinelerra. This doesn't have to be the absolute final format of the file. Just an intermediate file format to determine that audio is not drifting and in sync. You'll do this by setting Nudge on your audio tracks so that your rendered audio and video are in sync. Here's an article on nudge:
http://crazedmuleproductions.blogspot.com/2007/05/nudge-avidemux2-and-reminder-about.html

Let me give you an example.

My projects usually run about an hour on the timeline. When I start a project, I will concatenate a bunch of clips or raw videos on the timeline. I will then render a short segment of video, about 15 seconds long, from about 45 minutes into the timeline. The segment I take should have key features like someone speaking or someone hitting a drum that I can use to determine audio synchronization. I then render the file to a format that works well in the various Linux media players:
-Quicktime for Linux using MPEG4 video compression and MP4 or twos complement (pcm) audio compression
-Quicktime for Linux container using JPEG video compression and MP4 or twos complement

The side benefit of using MPEG4 video compression is that it renders damn fast.

The good thing about these steps is that if you work with the same format of video over and over, you won't need to change #1, the Audio Offset.

Here are notes regarding specific source formats and output formats.

MPEG SOURCE FILES to MPEG RENDERED OUTPUT
After much study and pain, I've found that when working with MPEG-TS HDV files as my source (and MPEG formats in general), the best pipe to render from Cinelerra in order to alleviate sync headaches is mpeg2enc. I'm not five channel yet, so I just export my 48.1Khz stereo audio as MPEG Layer II audio MP3s @ 384kbps. I then use mplex to combine my audio and video streams into a program stream. Further on, I use VLC to convert that PS into MPEG-TS (HDV) and then use FFMPEG to convert the HDV into DVD and iPod/iPhone compatible formats.

QUICKTIME (QT) SOURCE FILES to QT RENDERED OUTPUT
If my source video format is Quicktime for Linux (like from a screen capture), then I have no sync problems rendering out to QT for Linux.

MPEG SOURCE FILES to QT RENDERED OUTPUT
If I render my MPEG-TS, HDV projects using Quicktime for Linux as an output format (MPEG4 or JPEG video w/twos complement or MP4 audio compression), then I will get sync problems in the rendered output. I then follow the above best practices to alleviate the problem.

TEST YOUR OUTPUT
In Fedora, I've found that the best media players to test final output are mplayer, vlc and ffmpeg.

Finally, there are options to mplex and ffmpeg to offset audio and video sync problems:
mplex -O ; eg, mplex -O 350
ffmpeg -itsoffset ; eg, ffmpeg -itsoffset 0.35

Hope this helps,
the mule

Reference
My Article on Cinelerra's "nudge" parameter
FFMPEG HowTo
http://man-wiki.net/index.php/1:mplex

Saturday, January 09, 2010

automating repetitive tasks by scripting Cinelerra EDL, part I

I produce a bi-monthly video of my band's jam sessions:
http://feeds.feedburner.com/StormpigsPodcast

The format of the video edit is roughly the same for every video:
  • intro titles
  • staff titles
  • songs
  • end credits
Since the Cinelerra EDL (edit decision list) is an XML text file, it occurred to me that I should be able to add the titles by editing this text file.

Cinelerra's Edit Decision List (EDL)
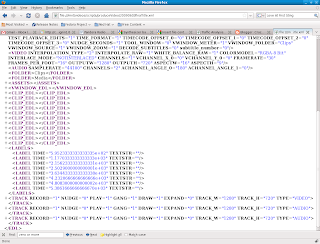
Let's look at Cinelerra's EDL. This is an XML text file that gets written when you save a Cinelerra project. The easiest way to review the EDL is to open it in a browser, as the browser will let you expand and collapse the XML elements. Here's a screen cap of the EDL in Firefox:


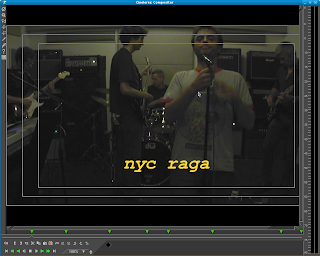
When I create my monthly video podcast, I place title effects on Cinelerra's timeline for each song of about a dozen songs. The title effect looks like this:


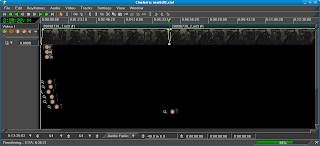
Placing title effects is a real time sink, especially when I have to place one for each song. I place title effects about 20 seconds into each song. I separate each song by placing a label between the clips. So the labels indicate where in the video track I will need to place title effects. You can see that the title effect is placed after the appearance of a label in Cinelerra's timeline below:


The Task
My goal is to have a shell script find the position of the label in the EDL and plop the title effects about 20s after the appearance of the label. After I add the labels programmatically, I can do fancier edits to the project later on.

In today's post, I will describe a bit more about my workflow and the EDL, and also show you a basic shell script command to insert a title effect into the EDL.

The Procedure
First, I put my basic edit together assembling the clips on the timeline, doing my audio and video fades and placing labels between the clips. This is my first round of edits. At this point, my timeline is very simple. I only have a video track and two audio tracks:


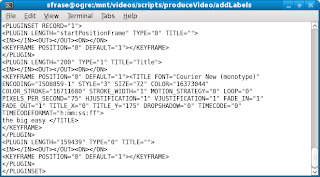
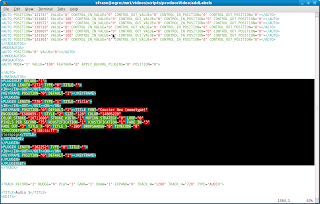
I will use a script to insert a title effect into the EDL file. In the Cinelerra EDL, a title effect (designated by the PLUGINSET XML element) looks like this:


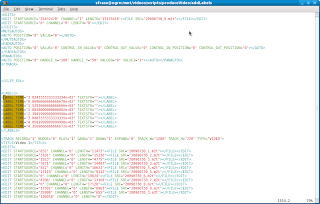
Let's inspect the EDL in order to find the block of labels. If you grep for 'LABEL TIME' in the EDL, you'll find an XML code block that looks like this:


I will need to edit the video TRACK that appears directly beneath the LABELS in the EDL. Since there is quite a bit of confusing repetition in the EDL file, finding the list of LABELs helps identify which TRACK we need to edit. I've capitalized the words in the above sentence to highlight the XML elements you'll need to look for when editing EDL.

Using a bash shell script, I'll add a title effect after the last MASKAUTOS XML tag, but before the closing TRACK tag. Again, this is the closing TRACK tag of the video TRACK:


I've created a second file containing just one title effect, the PLUGINSET example from above:


I will then use a bit of sed (stream editor) magic to insert that file into the right spot in the main Cinelerra EDL for the project. Here is the script command that will place the PLUGINSET into the correct position in the XML:
sed -e "/LABEL TIME/,/^<\/MASKAUTOS/{ /<\/MASKAUTOS>/r titleEffectPluginset.txt
}" cinelerraEdl.xml > cinelerraEdlNewEdit.xml


Let's break this apart:
sed -e "/LABEL TIME/ # This finds the first occurrence of "LABEL TIME" (a label) in the EDL. Remember that the appearance of labels in the EDL tells us that the video TRACK in which we need to insert our title effect comes next in the file.

,/^<\/MASKAUTOS/{ # This finds the first occurrence of a closing MASKAUTOS tag after the string "LABEL TIME". Our title effect, the PLUGINSET, will be inserted after this closing tag.

/<\/MASKAUTOS>/r titleEffectPluginset.txt # Insert the title effect boilerplate after the end MASKAUTOS XML tag

}" cinelerraEdl.xml > cinelerraEdlNewEdit.xml # Have sed perform the edit on "cinelerraEdl.xml", but save the output to "cinelerraEdlNewEdit.xml

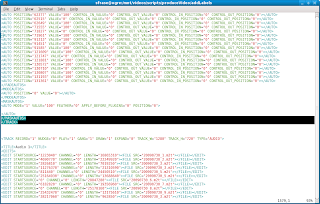
The Result - Before


The Result - After


You can see that sed has inserted the title effect (the PLUGINSET XML boilerplate) in between the closing MASKAUTOS tag and the closing tag of the video TRACK. Pretty cool!

This is a simple example of editing Cinelerra EDL, but is the first step to helping me automate otherwise manual tasks in my monthly video podcast creation.

I will try to expand upon this subject in future posts.

-enjoy-
The Mule