While trying to render out a DVD-ready file, I'm not sure why I got this libx264 error today:
trying popen( ffmpeg -f yuv4mpegpipe -i - -y -target dvd -ilme -ildct -f mpeg2video /root/synth.m2v)
ffmpeg: error while loading shared libraries: libx264.so.54: cannot open shared object file: No such file or directory
I have the -devel package for libx264 installed. Since I haven't been editing video lately, perhaps I updated the package and did not notice. So the resolution is to link libx264.so.54 to the latest libx264. In my case, that happens to be libx264.so.55.
Since I am running 64-bit Fedora, my libraries are in /usr/lib64. Here is the command:
ln -s /usr/lib64/libx264.so.55 /usr/lib64/libx264.so.54
cheers.
Thursday, December 27, 2007
libx264.so.54: cannot open shared object file
If this post was useful to you..consider buying me a beer via PayPal!
Even a $1 Draft will keep the Mule happily working..and help pay for equipment upgrades!
Tuesday, October 23, 2007
NVidia in da house (er, new server)!
So I've been on a quest to get a modern PCI Express card working in my new Dell SC1430. With this goal in mind, I had ordered a PCI Express 8x to 16x Adapter like this one off of eBay:
http://www.orbitmicro.com/global/pciexpressx8tox16adapter-p-755.html
The SC1430 has 8x connectors (running 4x speed PCI Express). In the hopes that it would work in the box, I bought a BFG Geforce 8500 GT PCI Express 256MB card from BestBuy. I checked and it is cheaper on Amazon.
Here's a good article from Tom's Hardware on PCI Express scaling:
http://www.tomshardware.com/2007/03/27/pci_express_scaling_analysis/
I figured that even if the card didn't work, I'd use it later in the next box I build. Now, I understood that the adapter would raise the card in the slot. The Dell has a hinged metal door that holds all the expansion cards in place, but I noticed that that little door can be left open while the case is closed. This would allow me to use the card for a while until I had the chance to machine a new bracket for the card.
Last night, I attached the adapter to the new BFG card (with a satisfying "click", no less) and put it in the first PCI Express slot (SLOT1_PCIE) of the Dell. I left the hinged door open, but was able to close the case. I hooked up my FP1901 to the digital output and my FP1907 to the analog output. I can tell you I was quite surprised when I started the server and the FP1901 that was connected to the digital output came to life!
I booted into runlevel 3 (nongraphical, multiuser mode) in Fedora and grabbed the latest NVidia driver installer for my 64-bit OS via lynx. I ran the installer. There was not a default kernel module for my particular kernel, so the installer created one and then asked if I wanted to create a new xorg.conf for the X Windows. I said yes and the installer finished. I was elated to see X startup with the NVidia splash screen! I soon had Twin View setup and GLXgears gave me 6200FPS! Unlike the ATI card I had running in the box previously, mplayer and xine ran my HDV videos like champs! Hoohah! Cinelerra runs well, but I've decided to not compile OpenGL just yet, as it did cause some instability on my previous box.
I tell you, NVidia drivers are an absolute joy to setup and use. As I've reiterated many times on this blog, most recently here:
/2007/10/year-later-ati-linux-drivers-still-suck.html
ATIs Linux drivers are riddled with bugs; hence, I returned the ATI card, a VisionTek x1550, to the store.
In sum, the BFG Geforce 8500 GT PCI Express 256MB card works in the Dell with a PCI Express 8x to 16x adapter card. If you use a PCI Express adapter, be aware that the card will be raised in the slot when it is seated.
the mule
ps - Now I just have to debug and fix a nagging audio noise with Fedora and the Dell and I will be one happy dude.
http://www.orbitmicro.com/global/pciexpressx8tox16adapter-p-755.html
The SC1430 has 8x connectors (running 4x speed PCI Express). In the hopes that it would work in the box, I bought a BFG Geforce 8500 GT PCI Express 256MB
Here's a good article from Tom's Hardware on PCI Express scaling:
http://www.tomshardware.com/2007/03/27/pci_express_scaling_analysis/
I figured that even if the card didn't work, I'd use it later in the next box I build. Now, I understood that the adapter would raise the card in the slot. The Dell has a hinged metal door that holds all the expansion cards in place, but I noticed that that little door can be left open while the case is closed. This would allow me to use the card for a while until I had the chance to machine a new bracket for the card.
Last night, I attached the adapter to the new BFG card (with a satisfying "click", no less) and put it in the first PCI Express slot (SLOT1_PCIE) of the Dell. I left the hinged door open, but was able to close the case. I hooked up my FP1901 to the digital output and my FP1907 to the analog output. I can tell you I was quite surprised when I started the server and the FP1901 that was connected to the digital output came to life!
I booted into runlevel 3 (nongraphical, multiuser mode) in Fedora and grabbed the latest NVidia driver installer for my 64-bit OS via lynx. I ran the installer. There was not a default kernel module for my particular kernel, so the installer created one and then asked if I wanted to create a new xorg.conf for the X Windows. I said yes and the installer finished. I was elated to see X startup with the NVidia splash screen! I soon had Twin View setup and GLXgears gave me 6200FPS! Unlike the ATI card I had running in the box previously, mplayer and xine ran my HDV videos like champs! Hoohah! Cinelerra runs well, but I've decided to not compile OpenGL just yet, as it did cause some instability on my previous box.
I tell you, NVidia drivers are an absolute joy to setup and use. As I've reiterated many times on this blog, most recently here:
/2007/10/year-later-ati-linux-drivers-still-suck.html
ATIs Linux drivers are riddled with bugs; hence, I returned the ATI card, a VisionTek x1550, to the store.
In sum, the BFG Geforce 8500 GT PCI Express 256MB
the mule
ps - Now I just have to debug and fix a nagging audio noise with Fedora and the Dell and I will be one happy dude.
If this post was useful to you..consider buying me a beer via PayPal!
Even a $1 Draft will keep the Mule happily working..and help pay for equipment upgrades!
Thursday, October 18, 2007
A year later, ATI Linux drivers still suck
Folks, just in case you don't know, ATI's display drivers for Linux still suck, one year later:
/2006/09/ati-opengl-20-implementation.html
/2006/09/opengl-acceleration-for-cinelerra-not.html
Here's a bit of the latest pain:
https://init.linpro.no/pipermail/skolelinux.no/cinelerra/2007-October/012026.html
Here's another tale of woe (read starting with post #1014):
http://forums.fedoraforum.org/showthread.php?t=155503&page=102&pp=10
In the interest of having a clean system to start with, I reinstalled Fedora Core 6, 64-bit. I installed all Cinelerra source dependencies and attendent media players and apps as per this post (/2007/09/building-cinelerra-on-fc6-64-bit.html). I then made the very intelligent choice of backing up my system by using a Knoppix Bootable CD (www.knoppix.com) to load partimage and make an image of my system drive. For those who'd like to know how to do this, I will try to post a doc on what to do.
Update 2008/11/16
Here's how you can do this.
end update
This allows me to easily restore from image if anything went drastically wrong with the ATI install process. It is a good thing I did this.
After having the core softwares installed, I compiled Cinelerra and created a project by recording a screen capture with voiceover, some fades and a simple mask. This worked well, so I then decided to tackle building the 8.36.5 version of the ATI installer. I built the ATI rpms with the following command:
./ati-driver-installer-8.36.5-x86.x86_64.run --buildpkg Fedora/FC6
With the recent clean install of FC6 x86-64-bit, I was surprised to see that the build process actually worked! Previously, this build process failed. I speculate that the reason for the previous failure was that I kept my repositories consistent on this OS build. This means I tried not to mix rpm bases from more than two non-Fedora repositories: Dries and Livna, respectively. Refer to http://crazedmuleproductions.blogspot.com/2007/09/building-cinelerra-on-fc6-64-bit.html) for the detail. So having this build process work was unexpected. It gave me hope that I might have some resolution to my ATI woes.
I installed the created ATI rpms and shutdown the box. I popped in the VisionTek card and rebooted to init 3, full multi-user mode, without X enabled. I then ran the ATI configurator:
./aticonfig --initial -f
[sodo@ogre 8.36]# ls -l
total 65244
-rwxr-xr-x 1 root root 53331877 Oct 8 21:18 ati-driver-installer-8.36.5-x86.x86_64.run
-rw-r--r-- 1 root root 6469324 Oct 10 22:49 ATI-fglrx-8.36.5-1.fc6.x86_64.rpm
-rw-r--r-- 1 root root 3367465 Oct 10 22:49 ATI-fglrx-control-center-8.36.5-1.fc6.x86_64.rpm
-rw-r--r-- 1 root root 45017 Oct 10 22:49 ATI-fglrx-devel-8.36.5-1.fc6.x86_64.rpm
-rw-r--r-- 1 root root 3192548 Oct 10 22:49 ATI-fglrx-IA32-libs-8.36.5-1.fc6.x86_64.rpm
-rw-r--r-- 1 root root 309737 Oct 10 22:49 kernel-module-ATI-fglrx-2.6.18-1.2798.fc6-8.36.5-1.fc6.x86_64.rpm
This created a default fglrx /etc/X11/xorg.conf file. I started X and was pleasantly surprised to see both my monitors (Dell FP1901 and FP1907) come alive. I started the ATI Catalyst Display utility and was excited to see that OpenGL was indeed active. I switched from Clone mode (2 separate screens displaying the same thing) to Big Desktop mode, one large desktop. Excitedly, I wanted to see the behavior of xine and mplayer under 8.36.5, as I read some threads that lead me to believe I might get OpenGL without the xine crashes and mplayer sluggishness I had seen using 8.39.4 and 8.40.4. Unfortunately, it was not to be, as I loaded mplayer to see the same sluggishness on HDV content display. I then started xine and true to form, xine displayed the HDV content, but then promptly crashed X.
Ah well. At this point, I decided to restart the system, just to see if the restart improved conditions. When I restarted, I got the following error:
/etc/rc.d/rc.sysinit line 819: Segmentation fault
Oh boy. That does not look good. And the entire system has locked up..I can't even reboot. After a hard shutdown, I restarted, only to find the same error condition reappear. Google is again my best friend:
http://www.linuxforums.org/forum/servers/15670-help-segmentation-fault.html
So, it seems my choices are that:
1) my system memory is corrupt
2) grep is corrupt
3) I've been hacked
This is a new server with ECC memory, so I really doubt the memory has gone bad. But I'd rather be sure. Through the above Google find, I see that memtest86 (www.memtest86.com) is a solid program for testing your system memory that I haven't used before. The doc on the website is very good. I grabbed the ISO online and burned a copy to CD and let my machine churn for about three hours running through memory tests. Thank goodness, no memory errors were found. It seems that Mr. Brady knows his stuff! Thanks Chris!
Secondly, I tried to remark out the offending "for" loop within rc.sysinit. I needed to boot off a Knoppix (www.knoppix.com) CD to be able to assemble my software RAID partition, mount it and edit the file. Doing this and rebooting yielded the same results.
My third and final troubleshooting procedure was to remove and replace "grep" which is where the init loader failed. Again, I booted off the Knoppix CD, assembled and mounted my RAID. This time, however, I changed my root (chroot) partition in order the remove and reinstall grep via rpm and the Fedora install DVD. I did this, rebooted and received the same error.
At this point, I threw my hands up in the air and decided to reinstall my clean partimage image. Knoppix to the rescue again, and I restored the image of my clean install off a second drive I had on the system. A reboot later and I was back up and running. Praise the Lord!
So..what is the moral of this story, you might ask? It must be this, cause I can't think of anything else right now: Don't trust people over 30 and be sure that ATI will always disappoint you if you run Linux.
Harumph!
The Mule
If this post was useful to you..consider buying me a beer via PayPal!
Even a $1 Draft will keep the Mule happily working..and help pay for equipment upgrades!
Sunday, October 14, 2007
rendering on the dual quad core Dell SC1430
I'm starting to get used to the new rig and what works and what doesn't. Here's a video describing how a render works on the new Dell SC1430, dual quad core xeon box running FC6, 64-bit Cinelerra. The render format (not shown in the video) is the following:
File format: Quicktime for Linux
Audio compression scheme: MPEG-4 audio, 128kbps bitrate, quantization quality 50%
Video compression scheme: H.264, 1000000 fixed bitrate (1Mbps)
I was listening to Aaron Newcomb's SourceShow podcast from LinuxWorld in Ohio while describing the render, so that's the voice you'll hear in the background.
PS - I rendered to Quicktime for Linux in this example, but you can use the
-threads [numberOfCpus]
command line switch to use more than one CPU.
enjoy,
the mule
If this post was useful to you..consider buying me a beer via PayPal!
Even a $1 Draft will keep the Mule happily working..and help pay for equipment upgrades!
getting started with Cinelerra
A couple of friends asked me about how to get started with Cinelerra. Here are a few techniques that have helped me:
Download and install the CV version of Cinelerra
As it is actively updated, the community version of Cinelerra is a good starting point:
http://cvs.cinelerra.org/getting_cinelerra.php
Run Cinelerra from a Terminal
Once you install it, run Cinelerra in a terminal, so you can see the error output. It will look like this:
[mule@ogre ~]# cinelerra
Cinelerra 2.1CV (C) 2006 Heroine Virtual Ltd.
Compiled on Mon Oct 8 23:47:21 EDT 2007
Cinelerra is free software, covered by the GNU General Public License,
and you are welcome to change it and/or distribute copies of it under
certain conditions. There is absolutely no warranty for Cinelerra.
Render::run 1
Render::run 2
Render::run 3
Render::run 4
Render::run 5
Render::run 6
Render::run 7
Render::run 8
Render::run 8.1
Render::run 8.2
Render::run 8.3
Render::run 9
Render::run 10
x264 [info]: using cpu capabilities MMX MMXEXT SSE SSE2
x264 [info]: slice I:71 Avg QP: 2.00 size:199495 PSNR Mean Y:64.88 U:65.58 V:65.60 Avg:65.10 Global:65.06
x264 [info]: slice P:17600 Avg QP: 5.00 size: 3153 PSNR Mean Y:62.18 U:62.58 V:62.57 Avg:62.30 Global:62.12
x264 [info]: mb I I16..4: 41.8% 0.0% 58.2%
x264 [info]: mb P I16..4: 1.0% 0.0% 0.2% P16..4: 9.6% 0.2% 0.1% 0.0% 0.0% skip:89.0%
x264 [info]: SSIM Mean Y:0.9999576
x264 [info]: PSNR Mean Y:62.192 U:62.595 V:62.579 Avg:62.308 Global:62.131 kb/s:945.04
Read the Doc!
The most important step! As Cinelerra is a very powerful program, its functionality is very deep. Therefore, there is a lot to know about it. Read the documentation! If you don't read documentation, this program is not for you.
http://cvs.cinelerra.org/docs.php
A very nice beginner's guide written by Raffaella Traniello:
Cinelerra for Grandma
If Cinelerra Crashes
1) restart and select File -> Load from Backup
- This allows you to start where you left off
2) Check the buglist:
http://bugs.cinelerra.org/
Try Alternatives
If something doesn't work in the expected fashion:
1) Read the documentation (as above)
2) Try alternatives
For instance, if a file does not import in Cinelerra, convert it to a format that will! You can use ffmpeg to convert from any format to almost any format. Here is a sample ffmpeg command line to do this:
ffmpeg -i inputFile.containerFormat outputFile.containerFormat
For example
ffmpeg -i inputDvd.mpg outputQuicktime.mov
FFMPEG References
Nice howto: http://howto-pages.org/ffmpeg/
FFMPEG documentation: http://http//ffmpeg.sourceforge.net/documentation.php
Don't forget to read my Beginner's Guide to Exporting Video from Cinelerra!
/2007/06/beginners-guide-to-exporting-video-from.html
I hope this helps,
the mule
If this post was useful to you..consider buying me a beer via PayPal!
Even a $1 Draft will keep the Mule happily working..and help pay for equipment upgrades!
Friday, October 12, 2007
introduction to Blogger video tutorial
Written for a friend, thought others might find it useful. Screencaptured and edited in Cinelerra, of course!
Part I - regarding settings within blogger
Part II - regarding posting
Part III - regarding the template, analytics and adsense
Part I - regarding settings within blogger
Part II - regarding posting
Part III - regarding the template, analytics and adsense
If this post was useful to you..consider buying me a beer via PayPal!
Even a $1 Draft will keep the Mule happily working..and help pay for equipment upgrades!
Friday, October 05, 2007
moving my RAID set to a new box: collision!
For performance, I have my videos stored on a stripe set, using Fedora's software RAID technology. I've recently setup my Dell Octo Core box, but had not yet migrated the RAID set to it. This morning, at about midnight, I decided to start the migration. That was my first mistake.
Contention for the Same Device Name
The RAID set is a couple of 120GB IDE drives on a Sil680 PCI card. Not the best performers, but I was minding my pennies when I bought the drives and card. So I popped the card and the drives in the server. Thankfully, the card was immediately recognized by the BIOS on bootup. However, from the dmesg output:
Oct 4 23:53:53 localhost kernel: md: considering hdd1 ...
Oct 4 23:53:53 localhost kernel: md: adding hdd1 ...
Oct 4 23:53:53 localhost kernel: md: adding hdc1 ...
Oct 4 23:53:53 localhost kernel: md: md0 already running, cannot run hdd1
I saw that the device name of RAID set that held my videos /dev/md0 conflicted with the RAID set that I had created as my / (root) partition for 64-bit Core 6. Argh! Once per year, like Christmas, I have to dust off my rusty mdadm skills. Ugh. This was that time.
The Plan
After reading a number of references listed below, I decided to eliminate the contention, by renaming my video RAID set from /dev/md0 to /dev/md1. To accomplish this, I had to update the superblock on the RAID set to a different preferred minor number. More on this in a moment.
Since putting the drives in the new server, I was a little nervous about the condition of the data on them drives. To give myself a bit more of comfort, I decided on the following course of action:
- put the drives and card back in the original computer
- renumber the preferred minor number of the RAID set there
- test to verify that I can still mount the filesystems on the RAID and access the data
- move the devices back into the new server
- assemble, test and mount the RAID
So Let's Get Started!
I put the card and drives back into the original box. Here is the detail of what the RAID set looked like there:
[root@computer ~]# mdadm --detail /dev/md0
/dev/md0:
Version : 00.90.03
Creation Time : Sat Aug 19 23:57:28 2006
Raid Level : raid0
Array Size : 234436352 (223.58 GiB 240.06 GB)
Raid Devices : 2
Total Devices : 2
Preferred Minor : 0
Persistence : Superblock is persistent
Update Time : Fri Oct 5 14:31:37 2007
State : active
Active Devices : 2
Working Devices : 2
Failed Devices : 0
Spare Devices : 0
Chunk Size : 64K
UUID : 9c4c078f:8935e3e4:bfface8f:6a3c2c18
Events : 0.15
Number Major Minor RaidDevice State
0 22 1 0 active sync /dev/hdc1
1 22 65 1 active sync /dev/hdd1
Update the RAID Device Number (Preferred Minor)
I first stopped the RAID set:
[root@computer ~]# mdadm --stop /dev/md0
mdadm: stopped /dev/md0
Next, I issued the following command to update the minor number. Unfortunately, it didn't work, as I received the following error:
[root@computer ~]# mdadm --assemble /dev/md1 --update=super-minor -m0 /dev/hdd1 /dev/hdc1
mdadm: error opening /dev/md1: No such file or directory
Oh boy. From the error, it looked like I needed to have a block device file called /dev/md1 created. I wasn't sure, though, as my mdadm and RAID chops were rusty. So, after a LOT of research (references listed below), I learned that I needed to create the block device file.
Creating a Block Device
Referring to these instructions, I created the block device for /dev/md1 with the following commands:
[root@computer ~]# mknod /dev/md1 b 9 1
I wanted to keep the permissions consistent with the old /dev/md0 device file, so I ran the following commands:
[root@computer ~]# chmod 640 /dev/md1;chown disk /dev/md1
[root@computer ~]# ll /dev/md*
brw-r----- 1 root disk 9, 0 Oct 5 14:24 /dev/md0
brw-r----- 1 root disk 9, 1 Oct 5 14:43 /dev/md1
Updating and Testing the Preferred Minor Number (device id)
Once the block device file was created, I issued the command to update the preferred minor number of the RAID set to 1:
[root@computer ~]# mdadm --assemble /dev/md1 --update=super-minor -m0 /dev/hdd1 /dev/hdc1
mdadm: /dev/md1 has been started with 2 drives.
Sweet! The RAID device started! Let's see how it looks (note the Preferred Minor number!):
[root@computer ~]# mdadm --detail /dev/md1
/dev/md1:
Version : 00.90.03
Creation Time : Sat Aug 19 23:57:28 2006
Raid Level : raid0
Array Size : 234436352 (223.58 GiB 240.06 GB)
Raid Devices : 2
Total Devices : 2
Preferred Minor : 1
Persistence : Superblock is persistent
Update Time : Fri Oct 5 15:43:48 2007
State : clean
Active Devices : 2
Working Devices : 2
Failed Devices : 0
Spare Devices : 0
Chunk Size : 64K
UUID : 9c4c078f:8935e3e4:bfface8f:6a3c2c18
Events : 0.20
Number Major Minor RaidDevice State
0 22 1 0 active sync /dev/hdc1
1 22 65 1 active sync /dev/hdd1
I like the word "clean"! And how are the individual drives making up the set doing?
[root@computer ~]# mdadm -E /dev/hdc1
/dev/hdc1:
Magic : a92b4efc
Version : 00.90.01
UUID : 9c4c078f:8935e3e4:bfface8f:6a3c2c18
Creation Time : Sat Aug 19 23:57:28 2006
Raid Level : raid0
Device Size : 117218176 (111.79 GiB 120.03 GB)
Raid Devices : 2
Total Devices : 2
Preferred Minor : 1
Update Time : Fri Oct 5 16:03:24 2007
State : active
Active Devices : 2
Working Devices : 2
Failed Devices : 0
Spare Devices : 0
Checksum : 8bd047df - correct
Events : 0.21
Chunk Size : 64K
Number Major Minor RaidDevice State
this 0 22 1 0 active sync /dev/hdc1
0 0 22 1 0 active sync /dev/hdc1
1 1 22 65 1 active sync /dev/hdd1
[root@computer ~]# mdadm -E /dev/hdd1
/dev/hdd1:
Magic : a92b4efc
Version : 00.90.01
UUID : 9c4c078f:8935e3e4:bfface8f:6a3c2c18
Creation Time : Sat Aug 19 23:57:28 2006
Raid Level : raid0
Device Size : 117218176 (111.79 GiB 120.03 GB)
Raid Devices : 2
Total Devices : 2
Preferred Minor : 1
Update Time : Fri Oct 5 16:03:24 2007
State : active
Active Devices : 2
Working Devices : 2
Failed Devices : 0
Spare Devices : 0
Checksum : 8bd04821 - correct
Events : 0.21
Chunk Size : 64K
Number Major Minor RaidDevice State
this 1 22 65 1 active sync /dev/hdd1
0 0 22 1 0 active sync /dev/hdc1
1 1 22 65 1 active sync /dev/hdd1
Love the word "correct"!
Is My Data Still There?
So how about we try a mount?
[root@computer ~]# mount -t ext2 /dev/md1 /mnt/videos
[root@computer ~]#
No errors on the mount! That's great! Now for the finale..let's look at a test file:
[root@computer ~]# head -2 /mnt/videos/paris/newtrip.xml
<?xml version="1.0"?>
<EDL VERSION="2.0CV" PROJECT_PATH="/root/installFiles/paris/newtrip.xml">
Awesome! I'm very relieved I can read the content off the drive. That is a load off my mind. The last task was to edit /etc/fstab and reboot to make sure the RAID set comes up correctly on boot. Blissfully, those steps were also successful.
Put 'Em In Da New Box!
I then took the whole kit and caboodle to the new server. I am very happy to report that the kernel recognized the newly renumbered RAID set, as shown in the output of dmesg:
md: created md1
md1: setting max_sectors to 128, segment boundary to 32767
and created the /dev/md1 device, as shown in this file listing:
[root@ogre ~]# ll /dev/md*
brw-r----- 1 root disk 9, 0 Oct 5 19:27 /dev/md0
brw-r----- 1 root disk 9, 1 Oct 5 19:27 /dev/md1
I added the following line to /etc/fstab:
/dev/md1 /mnt/videos ext2 defaults 1 1
And ran "mount -a" to reinitialize the file system table. Lo and behold, I've got data on my drive!
[root@ogre ~]# ls /mnt/videos
20060319 20060812 20070316 20070811 axe cinelerra movies paris_tape1 stockholm_tape1
20060406 20070111 20070425 20070912 bloody lost+found paris paris_tape2 stockholm_tape2
Caveat for RAID under a Knoppix CD
At one point in my debugging, I pulled out my trusty Knoppix bootable CD. If you need to load your RAID set from a rescue disk or more specifically, Knoppix, you'll need to load the md module and then run mdadm --assemble to start your existing RAID set.
root@Knoppix:/ramdisk/home/knoppix# modprobe md
root@Knoppix:/ramdisk/home/knoppix# mdadm --assemble -m 0 /dev/md0
Well, another chapter in the life of the Mule is closed. Hopefully, someone will find these notes instructive.
Update 2009/03/25
Some hdparm drive read measurements. Note the 60% read speed increase of the stripe set versus the mirrored set.
/dev/md0 is a software RAID0 (stripe) of two 500GB, 16MB cache SATA drives:
[mule@ogre ~]$ sudo hdparm -tT /dev/md0
sudo hdparm -tT /dev/md0
/dev/md0:
Timing cached reads: 5748 MB in 2.00 seconds = 2877.62 MB/sec
Timing buffered disk reads: 352 MB in 3.02 seconds = 116.68 MB/sec
/dev/md0 is a software RAID1 (mirror) of two 500GB, 16MB cache SATA drives:
[mule@ogre ~]$ sudo hdparm -tT /dev/md2
/dev/md2:
Timing cached reads: 5218 MB in 2.00 seconds = 2612.72 MB/sec
Timing buffered disk reads: 218 MB in 3.03 seconds = 72.04 MB/sec
*** end update ***
The Mule
References
http://www.redhat.com/magazine/019may06/departments/tips_tricks
http://www.linuxdevcenter.com/pub/a/linux/2002/12/05/RAID.html?page=1
http://www.docunext.com/category/raid/
Nice Beginner's Guide
http://www.linuxhomenetworking.com/wiki/index.php/Quick_HOWTO_:_Ch26_:_Linux_Software_RAID
The Man Page
http://www.linuxmanpages.com/man8/mdadm.8.php
HowTo (with good description of chunk sizes)
http://www.tldp.org/HOWTO/Software-RAID-HOWTO.html
MDADM Recipes
http://www.koders.com/noncode/fid76840E0EBBC19222CBCC0913D4AED97C1F5D2A45.aspx
Notes for Debian MDADM users
http://svn.debian.org/wsvn/pkg-mdadm/mdadm/trunk/debian/README.upgrading-2.5.3?op=file
If this post was useful to you..consider buying me a beer via PayPal!
Even a $1 Draft will keep the Mule happily working..and help pay for equipment upgrades!
Tuesday, October 02, 2007
xmms error: alsa_setup_mixer(): Failed to find mixer element: PCM
So here's a way to not spend an hour troubleshooting a problem:
LOOK AT THE F'ING PREFERENCES MENU!!
Sorry to be yelling, but man, do I hate my own stupidity. I had installed the xmms-wma plugin and wanted to test the playability of WMA files in Linux. Since this is my new Dell server with a new Creative Labs AudigyLS card and a fresh build of FC6, x86-64, I hadn't used the xmms install on the system yet. So when I started xmms, I noticed that I got the following error:
alsa_setup_mixer(): Failed to find mixer element: PCM
Oooh. That's not nice. So, it my typical fashion, I googled the error:
And found that a lot of people had a similar issue. And the more I looked at the entries, the more the people seemed to be having pretty cryptic difficulties. Oh, this might be a bad one. I assumed the worst.
So back and forth I went. Looking at the google results, trying to find the correct ALSA device name and hand entering it into xmms's config file. I got confused at the lsmod and modprobe.conf output and entered the wrong sound device name. I repeated this process multiple times.
Finally, after the end of an hour, I remembered that there was a Preferences menu within xmms! So I started up xmms and saw the original error, but xmms still allowed me to go into the menus. In Preferences, I found the following "Audio I/O Plugins" menu:

Under the "Audio I/O Plugins" menu, I found a Configure button specifically related to the ALSA sound output on my box. I clicked it:

Therein, I saw that the "Mixer Device" was indeed set to PCM. Well, look at that neat little arrow thingy next to PCM. Why, it's a pull-down menu showing me more choices! And look at that! There is a choice for the Audigy's "Analog Front" slider! Gee! Can I really select that? Why, of course! >:[
You'd never know that I've spent the last twenty years working with computers. And the final kick in the nuts was that even though I have the xmms-wma plugin installed, the WMAs didn't even play after I got xmms working properly! I received this error:
[root@localhost dell]# xmms ../beck1.wma
*** stack smashing detected ***: /usr/libexec/xmms terminated
Aborted
I'm too tired to resolve this issue tonight. But in sum, outside of my own stupidity..if you have a Creative Labs Audigy installed in your Fedora box and see the above error, do yourself a favor and use the Preferences->Audio I/O Plugins->Configure->Mixer Device to change PCM to Analog Front.
Good Night!
the stupid mule
ps - this is what I get for staying up until 3:30am the previous evening
If this post was useful to you..consider buying me a beer via PayPal!
Even a $1 Draft will keep the Mule happily working..and help pay for equipment upgrades!
Monday, October 01, 2007
multithreading in ffmpeg and the mpstat program
My new server, the Dell SC1430, is dual Xeon processor, quad core. Therefore, I have a full eight cores available for processing tasks. As I have recently completed a new install of FC6, 64-bit on this system, I've been focused on Cinelerra performance optimization. As an adjunct, I happened to notice that when I ran command line ffmpeg, only one of my processors was being used. I had thought that FFMPEG was multithreaded by default, so I was perplexed.
Chasing My Tail
Thinking it was a compile option that needed to be specified, I bounced a few ideas off my friend Graham and at the time, we were thinking "compile option." I googled FFMPEG_CFLAGS, ffmpeg smp and a host of other searches while sniffing down what was to be the wrong track. Taking a step back, I figured I'd try to find information from the source, rather than looking for just a command line option solution. I found from the FFMPEG site (http://ffmpeg.mplayerhq.hu/changelog.html) that that as of version 0.4.9-pre1, FFMPEG supports multithreading/smp for the following codecs:
- multithreaded/SMP motion estimation
- multithreaded/SMP encoding for MPEG-1/MPEG-2/MPEG-4/H.263
- multithreaded/SMP decoding for MPEG-2
OK. So it supports multithreading, but not for all codecs. The absence of multithreading of jpeg/mjpeg was a bummer. And when I ran the following conversion script to convert a DVD to a smaller format MPEG:
ffmpeg -i testdvd.mpg -target svcd output.mpg
I saw that only one of my processors was being utilized. Let's investigate this further.
mpstat to the rescue!
A new find for me is mpstat. mpstat is a program available in RedHat/Fedora that allows you to view the CPU utilization of each processor in your system. Nice! From its output, I saw that only one processor out of eight was being utilized:
[root@localhost ~]# mpstat -P 0 -P 1 -P 2 -P 3 -P 4 -P 5 -P 6 -P 7 4
09:51:21 AM CPU %user %nice %sys %iowait %irq %soft %steal %idle intr/s
09:51:23 AM 0 0.00 0.00 0.00 0.00 0.00 0.00 0.00 100.00 6.00
09:51:23 AM 1 89.50 0.00 1.50 1.00 0.00 0.00 0.00 7.50 17.00
09:51:23 AM 2 7.00 0.00 0.50 0.00 0.00 0.00 0.00 93.00 3.00
09:51:23 AM 3 8.00 0.00 0.00 0.00 0.00 0.00 0.00 92.00 0.00
09:51:23 AM 4 5.50 0.00 0.00 0.00 0.00 0.00 0.00 94.50 250.50
09:51:23 AM 5 3.00 0.00 0.00 0.00 0.00 0.00 0.00 97.00 0.00
09:51:23 AM 6 5.50 0.00 0.50 1.00 0.00 0.00 0.00 93.00 0.00
09:51:23 AM 7 9.00 0.00 0.00 0.00 0.00 0.00 0.00 91.00 0.00
So something is wrong. As I was out of ideas, I finally decided to ask the folks who should know: the ffmpeg-users mailing list:
http://lists.mplayerhq.hu/mailman/listinfo/ffmpeg-user
I soon received an answer from Lukas: the "-threads" option!
I tried the "-threads" parameter with various settings (1,2,8 threads). As I have eight processors, the limit was eight threads. If I used more threads than available CPUs, I saw this error at the bottom of the FFMPEG output:
[mpeg2video @ 0x3bfd518850]too many threads
So I then ran a couple of interesting tests.
TEST 1
Convert QT mov file to MPEG2 DVD
Syntax:
ffmpeg -i test.mov -threads 8 -target dvd output.mpg
In this test, the Quicktime file used MJPEG video compression scheme and is not supported for multithreading in FFMPEG. However, MPEG2 is supported.
From the output of top, I did see that process utilization increased slightly each time I increased the number of threads:
1 thread: 12.5% cpu used
2 threads: 14.7% cpu used
8 threads: 16.3% cpu used
However, when I looked at the output of mpstat, it showed the original behavior, whereby one processor was getting fed the entire task:
09:51:29 AM CPU %user %nice %sys %iowait %irq %soft %steal %idle intr/s
09:51:31 AM 0 7.00 0.00 0.00 0.00 0.00 0.00 0.00 93.00 6.00
09:51:31 AM 1 95.00 0.00 1.00 1.00 0.00 0.00 0.00 3.00 10.00
09:51:31 AM 2 5.00 0.00 0.00 0.00 0.00 0.00 0.00 95.00 3.00
09:51:31 AM 3 7.00 0.00 0.50 0.00 0.00 0.00 0.00 92.50 0.00
09:51:31 AM 4 5.00 0.00 0.00 0.00 0.00 0.00 0.00 95.00 0.00
09:51:31 AM 5 3.50 0.00 0.00 0.00 0.00 0.00 0.00 97.00 250.50
09:51:31 AM 6 5.00 0.00 0.00 0.00 0.00 0.00 0.00 95.00 0.00
09:51:31 AM 7 3.50 0.00 0.00 0.00 0.00 0.00 0.00 96.50 0.00
Hmmm. On to test two:
TEST 2
Convert a DVD of high quality to smaller resolution mpeg2video
Syntax:
ffmpeg -i testdvd.mpg -threads 8 -target svcd output.mpg
In this test, both the source and destination codecs are supported for multithreading in FFMPEG. Now this is where the testing got fun. The output from mpstat was somewhat different this time:
10:00:28 AM CPU %user %nice %sys %iowait %irq %soft %steal %idle intr/s
10:00:32 AM 0 22.50 0.00 0.50 0.00 0.00 0.00 0.00 77.00 5.00
10:00:32 AM 1 17.50 0.00 0.00 0.00 0.00 0.00 0.00 82.50 3.00
10:00:32 AM 2 23.00 0.00 1.50 0.00 0.00 0.00 0.00 75.75 0.00
10:00:32 AM 3 12.00 0.00 0.25 0.00 0.00 0.00 0.00 88.00 250.25
10:00:32 AM 4 29.00 0.00 1.25 0.00 0.00 0.00 0.00 70.25 0.00
10:00:32 AM 5 12.00 0.00 0.25 2.25 0.00 0.00 0.00 85.75 0.00
10:00:32 AM 6 71.25 0.00 3.25 4.00 0.00 0.00 0.00 22.00 17.00
10:00:32 AM 7 18.75 0.00 0.25 0.00 0.00 0.00 0.00 81.00 0.00
Sweet! Notice that all my processors are being utilized. Best part of all, my resulting render fps went from 48fps to 150fps. Awesome!
The Key Thing to Remember
So the key is that multithreading using the "-threads" option in FFMPEG only works when BOTH the source and destination files are of the supported types:
- multithreaded/SMP motion estimation
- multithreaded/SMP encoding for MPEG-1/MPEG-2/MPEG-4/H.263
- multithreaded/SMP decoding for MPEG-2
Remember this, Grasshopper.
And I am so very happy that I don't have to recompile..
thanks to Graham Evans and the ffmpeg-users mail list!
The Mule
related posts
http://crazedmuleproductions.blogspot.com/2010/01/batch-render-redux.html
/2010/01/compile-times-performance-improved.html
If this post was useful to you..consider buying me a beer via PayPal!
Even a $1 Draft will keep the Mule happily working..and help pay for equipment upgrades!
Saturday, September 29, 2007
first impressions: Cinelerra on dual, quad core Dell SC1430
I'm on my dual, new quad-core, 64-bit FC6 box (woah!) and I'm happy to say that I've got Cinelerra running, with some minor speed bumps along the way (read /2007/09/building-cinelerra-on-fc6-64-bit.html and
http://www.techanswerguy.com/2007/09/setting-up-dell-sc1430.html
Update 2008/02/03
Here are some related articles:
/2007/10/multithreading-in-ffmpeg-and-mpstat.html
/2007/10/rendering-on-dual-quad-core.html
*** end update ***
Eight Core Power!
I see from the output of /proc/cpuinfo, that I've got eight processors (first and last listed below):
[root@localhost ~]# cat /proc/cpuinfo
processor : 0
vendor_id : GenuineIntel
cpu family : 6
model : 15
model name : Intel(R) Xeon(R) CPU E5310 @ 1.60GHz
stepping : 7
cpu MHz : 1595.929
cache size : 4096 KB
physical id : 0
siblings : 4
core id : 0
cpu cores : 4
fpu : yes
fpu_exception : yes
cpuid level : 10
wp : yes
flags : fpu vme de pse tsc msr pae mce cx8 apic sep mtrr pge mca cmov pat pse36 clflush dts acpi mmx fxsr sse sse2 ss ht tm syscall nx lm constant_tsc pni monitor ds_cpl vmx tm2 cx16 xtpr lahf_lm
bogomips : 3195.17
clflush size : 64
cache_alignment : 64
address sizes : 36 bits physical, 48 bits virtual
power management:
...
processor : 7
vendor_id : GenuineIntel
cpu family : 6
model : 15
model name : Intel(R) Xeon(R) CPU E5310 @ 1.60GHz
stepping : 7
cpu MHz : 1595.929
cache size : 4096 KB
physical id : 1
siblings : 4
core id : 3
cpu cores : 4
fpu : yes
fpu_exception : yes
cpuid level : 10
wp : yes
flags : fpu vme de pse tsc msr pae mce cx8 apic sep mtrr pge mca cmov pat pse36 clflush dts acpi mmx fxsr sse sse2 ss ht tm syscall nx lm constant_tsc pni monitor ds_cpl vmx tm2 cx16 xtpr lahf_lm
bogomips : 3191.96
clflush size : 64
cache_alignment : 64
address sizes : 36 bits physical, 48 bits virtual
power management:
HDV Render Test: Project with no effect
Now that I've got her up, I'm testing a render of 40 minutes of MPEG-TS HDV content. While rendering, it seems that my CPUs are sloughin about..only about 30% busy. What is going on here? Shouldn't all the CPUs be working at 100%?
Here is the output of iostat, showing 70% idle CPUs:
Time: 12:14:23 AM
avg-cpu: %user %nice %system %iowait %steal %idle
27.75 0.00 0.60 1.00 0.00 70.65
Time: 12:14:28 AM
avg-cpu: %user %nice %system %iowait %steal %idle
27.35 0.00 0.37 0.95 0.00 71.33
Top seems a little funny too, whereby the third line down shows 27.4%, near what iostat reports, but then the listed CPU utilization for Cinelerra is about 220 in the process list below:
top - 00:15:42 up 46 min, 4 users, load average: 2.83, 2.35, 1.82
Tasks: 186 total, 2 running, 184 sleeping, 0 stopped, 0 zombie
Cpu(s): 27.4%us, 0.4%sy, 0.0%ni, 70.9%id, 1.2%wa, 0.0%hi, 0.0%si, 0.0%st
Mem: 2055048k total, 2038468k used, 16580k free, 736k buffers
Swap: 4562440k total, 632k used, 4561808k free, 514344k cached
PID USER PR NI VIRT RES SHR S %CPU %MEM TIME+ COMMAND
5640 root 17 0 3170m 1.0g 45m S 220 53.2 41:39.23 cinelerra
3540 root 15 0 183m 89m 34m S 1 4.4 6:43.95 Xorg
I will investigate that inconsistency later.
The render finished in about 50 minutes, so that's a little bit longer than Heroine Warrior's assertion that encoding HD content with a 64-bit system should be in realtime:
http://www.heroinewarrior.com/cinelerra7.php3
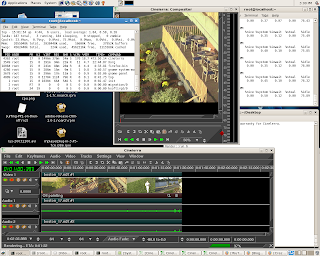
HDV Render Test 2: Project with Oil Painting effect
So then I ran a Cinelerra project with a more computationally intense render (one with an Oil Painting effect applied to an HDV track), CPU utilization is now up to 80-90% per cpu (attached graphic):

Here's the test video:
Analysis
There are many cores and they are relatively low speed (1.6Ghz). As Cinelerra takes advantage of all the processors, each CPU is working on a task (the render) and those tasks process at the speed of each corresponding CPU. In other words, as fast as each individual processor can handle. So simple tasks, like rendering raw HDV video with no effects, don't take up much individual CPU. However, more computationally intense tasks, like adding the oil painting effect to a video, utilize more of each CPU. Thus, the video rendered with the oil paint effect takes more CPU horsepower than the simple, no effect render.
This server is kind of like having a big dump truck. The thing has a powerful engine and can haul a ton of stuff, but can't go very fast. Unlike a Ferrari that can't handle much luggage, but can go super fast. I think we might see that a box with faster CPUs would get simple renders done quicker than what my Dell can do, but it might choke on renders with lots of complex effects.
Now if I could only harness these CPUs for speed! I'd be interested in getting people's opinions on 64-bit and multicore operation, as this is my first multicore/64 system.
Other Observations on 64-bit Fedora Core 6
1) I see that command-line ffmpeg is not multithreaded for multi processing machines. I will have see if I can use the external ffmpeg compile option in Cinelerra.
2) I can't get an NVidia card to work in this box. Much pain listed here:
http://forums.anandtech.com/messageview.aspx?catid=31&threadid=2080542
3) The Adobe Flash plugin only works in 32-bit mode Firefox
more to come,
the crazed mule
http://www.techanswerguy.com/2007/09/setting-up-dell-sc1430.html
Update 2008/02/03
Here are some related articles:
/2007/10/multithreading-in-ffmpeg-and-mpstat.html
/2007/10/rendering-on-dual-quad-core.html
*** end update ***
Eight Core Power!
I see from the output of /proc/cpuinfo, that I've got eight processors (first and last listed below):
[root@localhost ~]# cat /proc/cpuinfo
processor : 0
vendor_id : GenuineIntel
cpu family : 6
model : 15
model name : Intel(R) Xeon(R) CPU E5310 @ 1.60GHz
stepping : 7
cpu MHz : 1595.929
cache size : 4096 KB
physical id : 0
siblings : 4
core id : 0
cpu cores : 4
fpu : yes
fpu_exception : yes
cpuid level : 10
wp : yes
flags : fpu vme de pse tsc msr pae mce cx8 apic sep mtrr pge mca cmov pat pse36 clflush dts acpi mmx fxsr sse sse2 ss ht tm syscall nx lm constant_tsc pni monitor ds_cpl vmx tm2 cx16 xtpr lahf_lm
bogomips : 3195.17
clflush size : 64
cache_alignment : 64
address sizes : 36 bits physical, 48 bits virtual
power management:
...
processor : 7
vendor_id : GenuineIntel
cpu family : 6
model : 15
model name : Intel(R) Xeon(R) CPU E5310 @ 1.60GHz
stepping : 7
cpu MHz : 1595.929
cache size : 4096 KB
physical id : 1
siblings : 4
core id : 3
cpu cores : 4
fpu : yes
fpu_exception : yes
cpuid level : 10
wp : yes
flags : fpu vme de pse tsc msr pae mce cx8 apic sep mtrr pge mca cmov pat pse36 clflush dts acpi mmx fxsr sse sse2 ss ht tm syscall nx lm constant_tsc pni monitor ds_cpl vmx tm2 cx16 xtpr lahf_lm
bogomips : 3191.96
clflush size : 64
cache_alignment : 64
address sizes : 36 bits physical, 48 bits virtual
power management:
HDV Render Test: Project with no effect
Now that I've got her up, I'm testing a render of 40 minutes of MPEG-TS HDV content. While rendering, it seems that my CPUs are sloughin about..only about 30% busy. What is going on here? Shouldn't all the CPUs be working at 100%?

Here is the output of iostat, showing 70% idle CPUs:
Time: 12:14:23 AM
avg-cpu: %user %nice %system %iowait %steal %idle
27.75 0.00 0.60 1.00 0.00 70.65
Time: 12:14:28 AM
avg-cpu: %user %nice %system %iowait %steal %idle
27.35 0.00 0.37 0.95 0.00 71.33
Top seems a little funny too, whereby the third line down shows 27.4%, near what iostat reports, but then the listed CPU utilization for Cinelerra is about 220 in the process list below:
top - 00:15:42 up 46 min, 4 users, load average: 2.83, 2.35, 1.82
Tasks: 186 total, 2 running, 184 sleeping, 0 stopped, 0 zombie
Cpu(s): 27.4%us, 0.4%sy, 0.0%ni, 70.9%id, 1.2%wa, 0.0%hi, 0.0%si, 0.0%st
Mem: 2055048k total, 2038468k used, 16580k free, 736k buffers
Swap: 4562440k total, 632k used, 4561808k free, 514344k cached
PID USER PR NI VIRT RES SHR S %CPU %MEM TIME+ COMMAND
5640 root 17 0 3170m 1.0g 45m S 220 53.2 41:39.23 cinelerra
3540 root 15 0 183m 89m 34m S 1 4.4 6:43.95 Xorg
I will investigate that inconsistency later.
The render finished in about 50 minutes, so that's a little bit longer than Heroine Warrior's assertion that encoding HD content with a 64-bit system should be in realtime:
http://www.heroinewarrior.com/cinelerra7.php3
HDV Render Test 2: Project with Oil Painting effect
So then I ran a Cinelerra project with a more computationally intense render (one with an Oil Painting effect applied to an HDV track), CPU utilization is now up to 80-90% per cpu (attached graphic):

Here's the test video:
Analysis
There are many cores and they are relatively low speed (1.6Ghz). As Cinelerra takes advantage of all the processors, each CPU is working on a task (the render) and those tasks process at the speed of each corresponding CPU. In other words, as fast as each individual processor can handle. So simple tasks, like rendering raw HDV video with no effects, don't take up much individual CPU. However, more computationally intense tasks, like adding the oil painting effect to a video, utilize more of each CPU. Thus, the video rendered with the oil paint effect takes more CPU horsepower than the simple, no effect render.
This server is kind of like having a big dump truck. The thing has a powerful engine and can haul a ton of stuff, but can't go very fast. Unlike a Ferrari that can't handle much luggage, but can go super fast. I think we might see that a box with faster CPUs would get simple renders done quicker than what my Dell can do, but it might choke on renders with lots of complex effects.
Now if I could only harness these CPUs for speed! I'd be interested in getting people's opinions on 64-bit and multicore operation, as this is my first multicore/64 system.
Other Observations on 64-bit Fedora Core 6
1) I see that command-line ffmpeg is not multithreaded for multi processing machines. I will have see if I can use the external ffmpeg compile option in Cinelerra.
2) I can't get an NVidia card to work in this box. Much pain listed here:
http://forums.anandtech.com/messageview.aspx?catid=31&threadid=2080542
3) The Adobe Flash plugin only works in 32-bit mode Firefox
more to come,
the crazed mule
If this post was useful to you..consider buying me a beer via PayPal!
Even a $1 Draft will keep the Mule happily working..and help pay for equipment upgrades!
Thursday, September 27, 2007
building Cinelerra on FC6 64-bit
Update 10/26/2007:
These instructions work well for F7 (Fedora 7), 64-bit, too!
Update 10/29/2008:
These instructions still kick ass..a year later when I blew up my system!
Update 11/20/2008:
I've rebuilt my Fedora 7 system as Fedora 9. The Cinelerra build instructions are different than the Fedora 7 instructions in that they use ATrpms repository. But all-in-all, the install went well!
I just purchased a Dell SC1430 dual Xeon, quad-core server to replace my aging Dell SC400 tower. I will give a full review of that server in a later post. More immediately however, I thought I'd give the 64-bit Fedora Core 6 installation a whirl, as these Xeons support 64-bit. I figured that Cinelerra should fly with 64-bit install! Also, to ease my pain, I figured I'd stay with FC6, as I'm well familiar with this distribution. Eventually, I'll build out a 64-bit Debian Lenny distro to see how that performs (thanks for the suggestion, Graham)!
Here's How Things Went
The Fedora install is the same installer you get with the 32-bit version and went very smoothly.
I then proceeded to install the dependencies for building Cinelerra from source. In a nutshell, the yum installation was very similar to my 32-bit FC6 install which I described here, with some minor differences:
/2007/03/fedora-core-6-cinelerra-dependencies.html
The quick steps are:
1) have the proper yum repositories online (all Fedora, Livna and Dries)
2) make sure you have your GPG-KEYs loaded from Livna and Dries
3) remove the dries repositories (with the --disablerepo=dries switch shown) and install using the script below with only Fedora and Livna online:
4) remove the Livna repositories, enable FreshRPMs and install mjpegtools using the command:
yum --disablerepo=livna install mjpegtools*
5) get Cinelerra source code (refer to previous post on those details)
6) build from source (refer to previous post on those details)
7) install your favorite multimedia applications
The only differences between the 32-bit install and the 64-bit install that I noticed were that I had to specify the install of fftw specifically on 64-bit:
1) fftw (instead of fftw3)
2) fftw-devel
I've amended the script below to reflect those differences. Another interesting note is that with FC6 and above, no SMP-specific kernel is necessary. This is good! Finally, I installed my favorite multimedia apps:
yum install avidemux mencoder mplayer transcode vlc* xmms
However, to avoid this error, you should install xine separately without Livna repos online:
yum --disablerepo=livna install xine
I haven't gotten to really test out Cinelerra's capabilities on 64-bit, but I did render out a 40 minute Cinelerra project with full 720P HDV in a little over an hour. I rendered using QT container, MPEG-4 video compression with a constant bit rate of 10,000,000 and twos complement audio. This *almost* achieves what Heroine Warrior states about being able to achieve real-time rendering with HDV. Obviously, I believe some performance tweaks are in order and will need to work through these issues.
Here is that yum script which should get you going on 64-bit Fedora Core 6:
The Cinelerra FC6 64-bit Source Dependencies Install Script
yum install --disablerepo=dries \
libquicktime \
ffmpeg \
gsm-devel \
xvidcore* \
lame \
lame-devel \
libvorbis* \
libogg* \
libtool* \
a52* \
libtheora* \
libpng* \
libjpeg* \
libtiff* \
esound* \
audiofile* \
libraw1394* \
libavc1394* \
freetype* \
fontconfig* \
nasm \
e2fsprogs* \
faad2-dev* \
OpenEXR* \
fftw \
fftw-devel \
libsndfile* \
libiec61883* \
x264 \
x264-d* \
faac* \
libdv*
Don't forget to chmod a+x the file!
cheers,
the mule
If this post was useful to you..consider buying me a beer via PayPal!
Even a $1 Draft will keep the Mule happily working..and help pay for equipment upgrades!
Friday, September 14, 2007
color space and color sampling reference
I was having a hard time finding information about the differences between the color spaces used in Cinelerra. Then I actually looked up some entries in Wikipedia:
Color Space (general)
http://en.wikipedia.org/wiki/Color_space
RGB color space
http://en.wikipedia.org/wiki/RGB_color_space
YCbCr color space
http://en.wikipedia.org/wiki/YCbCr
YUV color space
http://en.wikipedia.org/wiki/YUV
Also, here is an excellent article on understanding color sampling:
http://www.dvxuser.com/articles/colorspace/
YUV-RGB Conversion Formula
Wow. I finally understand color sampling!
cheers.
If this post was useful to you..consider buying me a beer via PayPal!
Even a $1 Draft will keep the Mule happily working..and help pay for equipment upgrades!
Monday, September 10, 2007
migrated my FC6 system to faster disk
When I was on Fedora Core 4, I had been using a fast, 250GB Western Digital SATA drive as my main root partition. Since I live in both XP and Fedora worlds, I divided up the drive into the following partitions:
/dev/sda1: XP boot (40GB)
/dev/sda2: Fedora Core 4 /boot (128MB)
/dev/sda3: Fedora Core 4 / (root) (120GB)
/dev/sda4: unused
/dev/sda5: swap (6GB)
/dev/sda6: FAT32 (to transfer files in between Linux and XP) (60GB)
This configuration allows me to dual boot XP and FC easily, as well as transfer files in between the two OSs. Speaking of NTFS-ext2/3 transfers, I'm slowing phasing out the FAT32 partition for transfers because I have had success using ntfs-3g (http://www.ntfs-3g.org) to write to and read from my NTFS partitions. NTFS-3g has been very solid for reading and writing from Linux to NTFS.
Earlier this year, I installed Fedora Core 6 as a development/test system on a separate 40GB drive. Doing the install this way instead of an upgrade of FC4 meant that I didn't have to cripple the FC4 system in case anything went wrong with FC6. As it happens, Cinelerra on FC6 happens to be the most stable Cinelerra I've used these past two years, apart from an audio sync issue on rendered videos. I correct the sync problem using the Nudge feature on each audio track, detailed here:
/2007/05/nudge-avidemux2-and-reminder-about.html
Lo these past six months, I have been editing on FC6, albeit on a slower IDE drive, a 7200RPM Barracuda. The 250GB SATA with 16MB memory cache is quite a bit faster. So the goal was to move the boot/root of the FC6 system to the boot/root of the faster SATA drive.
LVM versus ext3
The first issue I encountered was that the default installation of FC6 automatically creates a Volume Group and Logical Volumes instead of plain old ext2/ext3 filesystems. My FC4 system used ext3 for boot/root, so my original plan was to do a simple partimage backup of the two FC6 filesystems. That idea would not work, as FC6 was on LVM and partimage doesn't recognize LVM partitions.
As an experiment (and because I wanted to get up and running quickly), I simplified the plan to install the new drive in the machine, mount the FC4 filesystems on the fast drive, delete the content on them and replace the content with the FC6 system files. I'd have to then tweak fstab and grub.conf appropriately on the updated drive to make the whole thing work.
The Plan
1) install both drives in the same machine with FC6 as the primary system,
2) mount the FC4 partitions of the fast drive in FC6 (/mnt/fc4boot & /mnt/fc4root),
3) remove all the files off of the FC4 boot/root filesystems,
4) copy the files from the FC6 boot/root parts to the FC4 partitions,
5) carefully tweak grub.conf and fstab to reference the new partition scheme
6) hope for the best on reboot
Here is where we had "a few issues" as an old boss of mine would say.
Problems!
I guess it is my cursory knowledge of the boot process that got me into trouble. The first issue after performing these four steps was the following error:
mount: could not find filesystem '/dev/root'
setuproot: moving /dev failed: No such file or directory
setuproot: error mounting /proc: No such file or directory
setuproot: error mounting /sys: No such file or directory
switchroot: mount failed: No such file or directory
Kernel panic - not syncing: Attempted to kill init!
Ouch! That doesn't look good. Following the advice of this thread:
http://www.linuxquestions.org/questions/showthread.php?t=497332
First, using SysRescCD, I verified my partition labels on the fast drive using e2label:
e2label /dev/hdN
where N is the Fedora partition
I double-checked my grub.conf and fstab:
/boot/grub/grub.conf
Here's the old entry:
title Fedora Core (2.6.19-1.2911.fc6)
root (hd0,0)
kernel /vmlinuz-2.6.19-1.2911.fc6 ro root=/dev/VolGroup00/LogVol00
initrd /initrd-2.6.19-1.2911.fc6.img
Here's the new entry:
title Fedora Core (2.6.19-1.2911.fc6)
root (hd0,1)
kernel /vmlinuz-2.6.19-1.2911.fc6 ro root=LABEL=/
initrd /initrd-2.6.19-1.2911.fc6.img
Note the changes in bold that I needed to enter in order to move the root from the first partition on the older, slow drive to the second partition on the faster drive. Also, LVM goes away to be replaced by the simpler naming scheme of the ext3 formatted partition.
/etc/fstab
Secondly, the fstab changes as well, from:
/dev/VolGroup00/LogVol00 / ext3 defaults 1 1
/dev/VolGroup00/LogVol01 swap swap defaults 0 0
To:
LABEL=/ / ext3 defaults 1 1
/dev/sda5 swap swap defaults 0 0
The /boot entry stays the same:
LABEL=/boot /boot ext3 defaults 1 2
The output of e2label showed that my fast drive partition labels matched those in grub.conf and fstab. So no smoking gun there.
The next thing suggested in the thread was to create mkinitrd, the initial ram disk the Linux kernel uses for system files. Oh boy. I've forgotten about this one. I knew I had the correct partition labels, but I needed a little more background on mkinitrd and these articles helped:
http://www.faqs.org/docs/Linux-mini/Loopback-Root-FS.html
http://www.opennet.ru/docs/HOWTO/Kernel-HOWTO-11.html+creating+initrd
http://www.ibm.com/developerworks/linux/library/l-initrd.html
Redhat/Fedora has a nice utility called mkinitrd that simplifies many of the steps mentioned in the IBM and HOWTO articles above. I regenerated the initial ramdisk image on the new boot partition using the following command:
mkinitrd ./initrd-2.6.19-1.2911.fc6.img 2.6.19-1.2911.fc6
OK. There were no errors on creation and the file is there and has data:
-rw------- 1 root root 2398566 Sep 9 11:52 /boot/initrd-2.6.19-1.2911.fc6.img
Cool. Now for the moment of truth. The reboot! I powered down and waited for the system to come back up. Thankfully, the kernel got beyond the panic and booted properly! Hooray! However, I did see some errors still:
No volume groups found
Volume group "VolGroup00" not found
Unable to access resume device (/dev/VolGroup00/LogVol01)
But, the system loads fine and Cinelerra and all my apps seem to work. So I will have to research this error further.
Also, I saw when I started Evolution, I got the following error:
Error while storing folder 'Inbox'
Researching this, I saw that there were inconsistencies in the index files that Evolution creates. The workaround is simple: delete any mail folders in ~./evolution/mail/local with an extension of ev.~summary. These are indexing files only and you can safely remove them. Reference:
https://bugs.launchpad.net/ubuntu/+source/evolution/+bug/27014
For the past couple of days, I have been editing and Cinelerra is performing well. I'm glad I went through this exercise. Though, I really need to learn more about how to backup and restore LVM partitions. I might have saved myself some pain.
cheers!
The Mule
If this post was useful to you..consider buying me a beer via PayPal!
Even a $1 Draft will keep the Mule happily working..and help pay for equipment upgrades!
Monday, August 27, 2007
bringing the digital audio workstation back to life
After about six months in a disabled state, I spent most of yesterday resurrecting my digital audio workstation. It is a 1.8Ghz Pentium IV running Win2K and a host of audio apps, mainly Cubase SX and Reason 2. My main SCSI hard drive, a Western Digital 18300 connected via an Adaptec 29160N PCI card, was a bit flakey and gave me errors on bootup. I resolved them by going into the Adaptec BIOS configuration menu (CTRL-A on boot) and checking the drive for errors. Thankfully, this procedure resolved the errors and I was able to boot successfully into the system.
The next task was to reinstall my M-Audio Delta 66 card. I couldn't find my driver disk, so I downloaded the latest off of their site (http://www.m-audio.com). M-Audio's site is very easy to navigate and I was able to find and install the drivers within a few minutes. The drivers required two reboots, which was somewhat of a pain.
I am going to do a favor for a friend by capturing some old video from VCR, so I installed my old ATI All-in-Wonder Radeon 8500DV. This will allow me to grab video via a composite source, my old VCR. Normally, I'd try this task in Fedora, but I really need to get the capture completed quickly and Win2K seems the quickest route. However, when I put the card in, the box booted, but just gave me a blinking prompt without any BIOS information appearing. Uh boy. I went through the laborious task of yanking all the other cards out of the machine, reconnecting all the IDE cables and trying a different card just to get the BIOS screen to appear. Once this was done, I put the Radeon 8500DV back in, checked the seating of the card and booted up. Thankfully, the machine booted properly this time. But these steps wasted about 45 minutes.
Once the machine booted into Windows, it seemed that I already had the Catalyst drivers installed (http://ati.amd.com/products/catalyst.html ), so the card was recognized right off the bat. This was a nicety after the other problems I've had so far.
With the audio and video hardware finally installed and working, I tried running a basic test of audio input via the Delta 66. When I did this, I found that Cubase SX selected the onboard audio drivers of my ASUS P4S333 motherboard (http://usa.asus.com/products1.aspx?l1=3&l2=0&l3=0&modelmenu=0&share=txt/60), the C-Media CMI8738. Cubase seems to get the primary audio card information from Windows, so I needed to go into the Sound settings in Control Panel to select the Delta 66 as the main audio interface. Once this is done, Cubase then recognizes the card and assigns it to the project. I was very happy to hear noise out of the card and see audio levels flickering in the M-Audio software Monitor-Mixer!
Next step is to get MIDI running with my M-Audio MIDISport 2x2 MIDI interface, with input from the electronic drums and Handsonic and keyboard. I'll try this one tonight. If I have anything interesting to say about this task, I'll let you know, but I'm hoping it will be uneventful.
cheers,
the mule
If this post was useful to you..consider buying me a beer via PayPal!
Even a $1 Draft will keep the Mule happily working..and help pay for equipment upgrades!
Tuesday, August 21, 2007
Hello from On Holiday!
If this post was useful to you..consider buying me a beer via PayPal!
Even a $1 Draft will keep the Mule happily working..and help pay for equipment upgrades!
Sunday, August 05, 2007
screen capture using Cinelerra
Unfortunately, capturing video live into Cinelerra CVS is broken, as of 1/21/2009. However! I tested it out and Cinelerra CAN capture screen activity directly to the timeline! This is a really nice feature.
The basic steps are:
1) go into Preferences -> Recording
2) select the destination File Format and whether you want to capture audio, video or both
3) set Audio In prefs (TwosComplement and keep your sample rate low!)
4) set Video In prefs (MPEG4 worked for me)
5) set Record Driver to Screencapture (set size of captured frame here and FPS)
6) apply your changes
7) press "r" for record and you'll see the Cinelerra Video In box popup with the active display
8) click the record button, which is the red, round button next to Transport: and you'll start recording as noted by the Position
9) click the stop button, which is the white square button next to Transport:
10) select your insertion strategy (I left mine at "Paste at insertion point"
11) click the green checkmark or just hit enter to accept and paste your captured video
If you click the "Monitor Video" radio button, you'll see the part of the screen to be captured. If you have dual monitors, note that you can pan the area of the desktop that you can record by click-dragging the desktop area within the "Monitor Video" window. I stumbled upon that undocumented feature.
The resolution of captured video is proportionate to the speed of your system overall. Thus, faster CPU, high-speed memory and striped hard drives help get you screen captures that are larger in resolution and smoother in playback. But there are other things than hardware upgrades that you can change in Cinelerra in order to increase the relative smoothness of your video capture. By "relative smoothness", I mean decreasing video frame drops and clipped audio samples.
For better performance, do the following:
- record using a lower audio sample rate (22Khz or below)
- record to an uncompressed video format. RGB/RGBA works well for me. I do this because compressed video formats like MPEG4 tend to hog CPU power and thus contribute to video frame drops. Your final output will most likely be a compressed format, so the uncompressed format will only be an intermediary that you will discard. Be careful with uncompressed formats, though! Five minutes of video sucked up about a gigabyte of disk! :)
- limit your mouse movements while recording. Try to use keyboard shortcuts to open, close and move windows
Here's a video of the process:
If this post was useful to you..consider buying me a beer via PayPal!
Even a $1 Draft will keep the Mule happily working..and help pay for equipment upgrades!
Saturday, June 09, 2007
xine: no demuxer plugin available to handle file
I recently installed xine on my Fedora Core 6 virtual machine. Trying to view a file, I get this error:
There is no demuxer plugin available to handle "file xxx"
Usually this means that the file format was not recognized.

After a bit of googling, I found that this error can be caused by a couple things:
1) a corrupted .xine/catalog.cache file
2) a bad xine-libs install
I also learned that you can run "xine-check" to check out your xine installation. Here's the result of my xine-check before fixing things:
[root@localhost ~]# xine-check
Please be patient, this script may take a while to run...
[ good ] you're using Linux, doing specific tests
[ good ] looks like you have a /proc filesystem mounted.
[ good ] You seem to have a reasonable kernel version (2.6.18-1.2798.fc6)
[ good ] intel compatible processor, checking MTRR support
[ good ] you have MTRR support and there are some ranges set.
[ good ] found the player at /usr/bin/xine
[ good ] /usr/bin/xine is in your PATH
[ hint ] No xine-config found. Assuming xine from RPMs
The xine-config script can be used to determine some file locations
used by xine-lib, but you don't have such a script on your system.
However, it looks like you installed xine from the RedHat packages.
So I'll just guess that you are using the standard locations.
If you want me to be sure about those file locations, you can install
the 'xine-lib-devel' package (or 'xine-devel', depend on what packages
you're using, which contains xine-config. However, this package is
not really needed to run xine...
pressto continue...
[ good ] plugin directory /usr/lib/xine/plugins exists.
[ good ] found unknown plugin: *.so
[OUCH!!] There are no input plugins.
xine needs at least one input plugin, but none is installed.
You should probably reinstall xine-lib...
pressto continue...
[OUCH!!] There are no demux plugins.
xine needs at least one demux plugin, but none is installed.
You should probably reinstall xine-lib...
pressto continue...
[OUCH!!] There are no decoder plugins.
xine needs at least one decoder plugin, but none is installed.
You should probably reinstall xine-lib...
pressto continue...
[OUCH!!] There are no video_out plugins.
xine needs at least one video_out plugin, but none is installed.
You should probably reinstall xine-lib...
pressto continue...
[OUCH!!] There are no audio_out plugins.
xine needs at least one audio_out plugin, but none is installed.
You should probably reinstall xine-lib...
pressto continue...
OK! So it looks like I have a few problems. But now, at least, I had two avenues to pursue:
1) delete .xine/catalog.cache
2) reinstall xine and xine-libs
I tried the first option, but to no avail. I got the same error.
Secondly, I reinstalled xine-libs, but still received the same error. Since I've had some yum repository conflicts this weekend, I started thinking that Livna or Dries might be at fault here, as they are my main repositories.
So then, I decided to:
1) remove xine and xine-libs
2) try to install xine without the Livna repos online.
Doing this, I got this error with only the Fedora and Dries repos online:
Error: Missing Dependency: xine-lib = 1.1.4 is needed by package xine-lib-moles
Hmmm. OK, so that didn't work. Let me try the next option:
1) remove xine and xine libs
2) install the Freshrpms repositories
3) rerun the install without Livna, but with Dries and Freshrpms
I installed the Freshrpms repos by using the below URL to start the yum graphical installer widget on the Core 6 desktop:
http://ftp.freshrpms.net/pub/freshrpms/fedora/linux/6/freshrpms-release/freshrpms-release-1.1-1.fc.noarch.rpm
After Freshrpms repos were online, I disabled Livna in my yum install request:
[root@localhost ~]# yum install --disablerepo=livna xine
Loading "installonlyn" plugin
Setting up Install Process
Setting up repositories
freshrpms 100% ========================= 2.1 kB 00:00
Reading repository metadata in from local files
primary.xml.gz 100% ========================= 62 kB 00:00
################################################## 168/168
Parsing package install arguments
...
Dependencies Resolved
=======================================
Package Arch Version Repository Size
=======================================
Installing:
xine i386 0.99.5-1.fc6 freshrpms 2.2 M
Installing for dependencies:
libfame i386 0.9.1-12.fc6.rf dries 227 k
xine-lib-moles i386 1.1.6-1.fc6 freshrpms 1.8 M
Transaction Summary
=======================================
Install 3 Package(s)
Update 0 Package(s)
Remove 0 Package(s)
Total download size: 4.3 M
Is this ok [y/N]: y
Downloading Packages:
(1/3): xine-0.99.5-1.fc6. 100% ========================= 2.2 MB 00:21
(2/3): libfame-0.9.1-12.f 100% ========================= 227 kB 00:01
(3/3): xine-lib-moles-1.1 100% ========================= 1.8 MB 00:17
Running Transaction Test
Finished Transaction Test
Transaction Test Succeeded
Running Transaction
Installing: libfame ######################### [1/3]
Installing: xine-lib-moles ######################### [2/3]
Installing: xine ######################### [3/3]
Installed: xine.i386 0:0.99.5-1.fc6
Dependency Installed: libfame.i386 0:0.9.1-12.fc6.rf xine-lib-moles.i386 0:1.1.6-1.fc6
Complete!
This time, no missing dependency! Looks like Freshrpms had the necessary files! Sweet! Now for the final test, to play a video. Sure enough, my videos played and xine-check found my plugins. Hooray. But yeesh..what a headache!
So, the lesson here is that Fedora dependency resolution can be a tricky thing and that you should keep as few repos in your yum repository list as possible. This will minimize your pain. Though I must admit that, on the whole, the repos are doing a better job than they used to.
Finally, if the options above don't work, try compiling from source:
http://www.xinehq.de/index.php/download
May you all be blessed to work with just one repository. Ha!
Update 2/25/2008
This latest post provides further troubleshooting steps. It lists specific information regarding Xine installs on Fedora 7, x86-64:
/2008/02/xine-install-on-fedora-7-x86-64.html
There is no demuxer plugin available to handle "file xxx"
Usually this means that the file format was not recognized.

After a bit of googling, I found that this error can be caused by a couple things:
1) a corrupted .xine/catalog.cache file
2) a bad xine-libs install
I also learned that you can run "xine-check" to check out your xine installation. Here's the result of my xine-check before fixing things:
[root@localhost ~]# xine-check
Please be patient, this script may take a while to run...
[ good ] you're using Linux, doing specific tests
[ good ] looks like you have a /proc filesystem mounted.
[ good ] You seem to have a reasonable kernel version (2.6.18-1.2798.fc6)
[ good ] intel compatible processor, checking MTRR support
[ good ] you have MTRR support and there are some ranges set.
[ good ] found the player at /usr/bin/xine
[ good ] /usr/bin/xine is in your PATH
[ hint ] No xine-config found. Assuming xine from RPMs
The xine-config script can be used to determine some file locations
used by xine-lib, but you don't have such a script on your system.
However, it looks like you installed xine from the RedHat packages.
So I'll just guess that you are using the standard locations.
If you want me to be sure about those file locations, you can install
the 'xine-lib-devel' package (or 'xine-devel', depend on what packages
you're using, which contains xine-config. However, this package is
not really needed to run xine...
press
[ good ] plugin directory /usr/lib/xine/plugins exists.
[ good ] found unknown plugin: *.so
[OUCH!!] There are no input plugins.
xine needs at least one input plugin, but none is installed.
You should probably reinstall xine-lib...
press
[OUCH!!] There are no demux plugins.
xine needs at least one demux plugin, but none is installed.
You should probably reinstall xine-lib...
press
[OUCH!!] There are no decoder plugins.
xine needs at least one decoder plugin, but none is installed.
You should probably reinstall xine-lib...
press
[OUCH!!] There are no video_out plugins.
xine needs at least one video_out plugin, but none is installed.
You should probably reinstall xine-lib...
press
[OUCH!!] There are no audio_out plugins.
xine needs at least one audio_out plugin, but none is installed.
You should probably reinstall xine-lib...
press
OK! So it looks like I have a few problems. But now, at least, I had two avenues to pursue:
1) delete .xine/catalog.cache
2) reinstall xine and xine-libs
I tried the first option, but to no avail. I got the same error.
Secondly, I reinstalled xine-libs, but still received the same error. Since I've had some yum repository conflicts this weekend, I started thinking that Livna or Dries might be at fault here, as they are my main repositories.
So then, I decided to:
1) remove xine and xine-libs
2) try to install xine without the Livna repos online.
Doing this, I got this error with only the Fedora and Dries repos online:
Error: Missing Dependency: xine-lib = 1.1.4 is needed by package xine-lib-moles
Hmmm. OK, so that didn't work. Let me try the next option:
1) remove xine and xine libs
2) install the Freshrpms repositories
3) rerun the install without Livna, but with Dries and Freshrpms
I installed the Freshrpms repos by using the below URL to start the yum graphical installer widget on the Core 6 desktop:
http://ftp.freshrpms.net/pub/freshrpms/fedora/linux/6/freshrpms-release/freshrpms-release-1.1-1.fc.noarch.rpm
After Freshrpms repos were online, I disabled Livna in my yum install request:
[root@localhost ~]# yum install --disablerepo=livna xine
Loading "installonlyn" plugin
Setting up Install Process
Setting up repositories
freshrpms 100% ========================= 2.1 kB 00:00
Reading repository metadata in from local files
primary.xml.gz 100% ========================= 62 kB 00:00
################################################## 168/168
Parsing package install arguments
...
Dependencies Resolved
=======================================
Package Arch Version Repository Size
=======================================
Installing:
xine i386 0.99.5-1.fc6 freshrpms 2.2 M
Installing for dependencies:
libfame i386 0.9.1-12.fc6.rf dries 227 k
xine-lib-moles i386 1.1.6-1.fc6 freshrpms 1.8 M
Transaction Summary
=======================================
Install 3 Package(s)
Update 0 Package(s)
Remove 0 Package(s)
Total download size: 4.3 M
Is this ok [y/N]: y
Downloading Packages:
(1/3): xine-0.99.5-1.fc6. 100% ========================= 2.2 MB 00:21
(2/3): libfame-0.9.1-12.f 100% ========================= 227 kB 00:01
(3/3): xine-lib-moles-1.1 100% ========================= 1.8 MB 00:17
Running Transaction Test
Finished Transaction Test
Transaction Test Succeeded
Running Transaction
Installing: libfame ######################### [1/3]
Installing: xine-lib-moles ######################### [2/3]
Installing: xine ######################### [3/3]
Installed: xine.i386 0:0.99.5-1.fc6
Dependency Installed: libfame.i386 0:0.9.1-12.fc6.rf xine-lib-moles.i386 0:1.1.6-1.fc6
Complete!
This time, no missing dependency! Looks like Freshrpms had the necessary files! Sweet! Now for the final test, to play a video. Sure enough, my videos played and xine-check found my plugins. Hooray. But yeesh..what a headache!
So, the lesson here is that Fedora dependency resolution can be a tricky thing and that you should keep as few repos in your yum repository list as possible. This will minimize your pain. Though I must admit that, on the whole, the repos are doing a better job than they used to.
Finally, if the options above don't work, try compiling from source:
http://www.xinehq.de/index.php/download
May you all be blessed to work with just one repository. Ha!
Update 2/25/2008
This latest post provides further troubleshooting steps. It lists specific information regarding Xine installs on Fedora 7, x86-64:
/2008/02/xine-install-on-fedora-7-x86-64.html
If this post was useful to you..consider buying me a beer via PayPal!
Even a $1 Draft will keep the Mule happily working..and help pay for equipment upgrades!
Fedora Core 6 virtual Cinelerra machine for VMware
I got a wild hair yesterday and decided to create a Fedora Core 6 VMware virtual machine for VMware Player. This virtual machine (vm) has the latest Cinelerra CVS version 1009 compiled and installed on it, of course, along with a bunch of supporting applications:
avidemux2 flash mplayer vlc xine
I'm thinking the main use for this vm is for render farms. So that someone who has access to a large number of PCs can setup VMware Player or Server.
Here are some instructions on how to install VMware Player on Linux:
http://www.techanswerguy.com/2007/06/vmware-player-install-on-linux-fedora.html
By the way, I believe audio only works using VMware Player, rather than VMware Server. Also, if you try this vm for actual editing, you'll probably get a lot of audio drops unless the machine hosting the virtual guest is very, very powerful (greater than 3.0Ghz single core).
In case you try this vm and get no audio, here's a solution:
http://www.techanswerguy.com/2007/06/vmware-player-no-sound-bad-directsound.html
Also, I've left the default display at 1024x768.
The virtual machine is gzipped and is about a gigabyte in size (1,151,131,294 bytes). Have fun downloading it!
http://www.stormpigs.com/vm/fc6cinelerra.tar.gz
Root password is crazedmule
The nonroot user is "cinelerra" with the password cinelerra
Update 2009/04/03
Update:
I've superceded this VM with a 64-bit version. This vm uses Fedora 10, x86-64 and will only play on Intel machines that support 64-bit OSs:
http://www.stormpigs.com/fedora10Vm.html
*** end update *** ~3GB
Hopefully, someone will find this useful. Please drop me a line..love to hear from you.
The Mule!
If this post was useful to you..consider buying me a beer via PayPal!
Even a $1 Draft will keep the Mule happily working..and help pay for equipment upgrades!
dreaded x264 compile error: 'struct ' has no member named 'b_cbr'
For fun, I built out a virtual Fedora Core 6 machine with Cinelerra and all supporting apps installed to share with the world (fedora-core-6-virtual-cinelerra-machine.html). During the process, however, I received an error while compiling the package:
Good Lord! What is this? When I did my first Cinelerra CVS install back in April (fedora-core-6-cinelerra-dependencies.html), I didn't encounter this error. And I was only using the same dries, livna and standard Fedora repositories. So something must have changed with the repositories between the beginning of April and now, early June. But what gives with the compile failure?
No sense complaining about it. Let's just see if someone else has encountered it and we'll fix it. Sure enough, folks on the Ubuntu boards had seen it:
http://ubuntuforums.org/showthread.php?t=215252
Essentially, the problem is that the version of Cinelerra is incompatible with the version of x264. The x264 from Livna is rev. 537 and Cinelerra is version 2.1 (at this time, rev. 1009). We'll use x264 rev. 536 to alleviate the problem.
The solution is hard to pick through on that forum posting, so I will condense the steps to fixing it here:
1) uninstall x264
2) download x264 revision 537
3) compile x264 with specific options
4) reinstall packages that were removed when we uninstalled x264
5) install x264 program files
6) patch directories in the Cinelerra source tree
7) configure Cinelerra with specific options
8) compile Cinlerra and hopefully, install!
1) uninstall x264
yum remove x264
This will remove a bunch of other packages:
Running Transaction
Removing : mjpegtools ####################### [ 1/10]
Removing : mjpegtools-devel ####################### [ 2/10]
Removing : mjpegtools-libs ####################### [ 3/10]
Removing : ffmpeg ####################### [ 4/10]
Removing : ffmpeg-libs ####################### [ 5/10]
Removing : x264 ####################### [ 6/10]
Removing : mencoder ####################### [ 7/10]
Removing : x264-devel ####################### [ 8/10]
Removing : libquicktime ####################### [ 9/10]
Removing : mjpegtools-gui ####################### [10/10]
Don't worry, we'll replace them in Step 4.
2) download x264 revision 537
Assuming you have subversion installed, go get rev 536 of x264:
svn checkout svn://svn.videolan.org/x264/trunk x264 -r536
3) compile x264 with specific options and make the x264 program files
From the directory in which you downloaded the x264 source code, run:
./configure --extra-cflags=-fPIC --extra-asflags=-D__PIC__
make
4) reinstall packages that were removed when we uninstalled x264
yum --disablerepo=dries install ffmpeg libquicktime mencoder mjpegtools*
Note that I have the Fedora Core, Extras, Updates, Livna and Dries repositories only listed in yum when I run the install.
Here we see the final result of the install:
Running Transaction
Installing: x264 ######################### [1/9]
Installing: ffmpeg-libs ######################### [2/9]
Installing: ffmpeg ######################### [3/9]
Installing: libquicktime ######################### [4/9]
Installing: mjpegtools-libs ######################### [5/9]
Installing: mencoder ######################### [6/9]
Installing: mjpegtools ######################### [7/9]
Installing: mjpegtools-devel ######################### [8/9]
Installing: mjpegtools-gui ######################### [9/9]
Notice that installing the programs will also the bad version of x264. In the next step, I will overwrite the program files of the conflicting version of x264 with the working, rev. 536 version.
5) install x264 program files
In the directory you compiled x264, run:
make install
Doing this, I have overwritten the conflicting version of x264 with the one that works with Cinelerra.
6) patch directories in the Cinelerra source tree
In the Cinelerra source tree directory, hvirtual, create these missing directories and fill with appropriate files:
mkdir plugins/chromakey-hsv && cp plugins/chromakeyhsv/* plugins/chromakey-hsv
mkdir plugins/seltempavg && cp plugins/denoiseseltempavg/* plugins/seltempavg/
Take a look at them to make sure they exist and have files in them:
[root@localhost hvirtual]# ls plugins/chromakey-hsv/
chromakey.C chromakey.h Makefile Makefile.am Makefile.in picon.png picon_png.h
[root@localhost hvirtual]# ls plugins/seltempavg/
Makefile Makefile.in picon_png.h seltempavg.C seltempavgwindow.C
Makefile.am picon.png restart_marker.png seltempavg.h seltempavgwindow.h
7) configure Cinelerra with specific compiler options
./configure --with-pic
for Ubuntu 64-bit users, this configure syntax may need to change to this:
./configure --with-pic --disable-shared --enable-static
I cannot confirm this as I am not an Ubuntu user.
To explain: as a general rule, Cinelerra themes and plugins are loaded dynamically as modules. If static linking is defined (the --enable-static part of the command), the SUV theme will not get built as it is not designed for static linking in the CVS tree. A corrolary to this is that if you disable shared libraries (the --disable-shared part of the command), the SUV theme also doesn't get built. My testing on FC6 bears this out.
The unfortunate thing is that if the SUV theme is not built, you'll get this nasty error when you try to startup Cinelerra and the program won't start for love or money:
MWindow::init_theme: theme S.U.V not found
I have not found a workaround, so if at all possible, do not use those two switches in your configure command.
8) compile Cinlerra and hopefully, install!
make
make install
These steps fixed my problem. Hopefully, they will fix it on your system.
Good luck!
gcc -DHAVE_CONFIG_H -I. -I. -I../../.. -D_LARGEFILE_SOURCE -D_LARGEFILE64_SOURCE -D_FILE_OFFSET_BITS=64 -D_GNU_SOURCE -DHAVE_AV_CONFIG_H -I./.. -g -O2 -MT x264.lo -MD -MP -MF .deps/x264.Tpo -c x264.c -fPIC -DPIC -o .libs/x264.o
x264.c: In function 'X264_init':
x264.c:139: error: 'struct' has no member named 'b_cbr'
make[5]: *** [x264.lo] Error 1
make[5]: Leaving directory `/opt/hvirtual/quicktime/ffmpeg/libavcodec'
make[4]: *** [all-recursive] Error 1
make[4]: Leaving directory `/opt/hvirtual/quicktime/ffmpeg/libavcodec'
make[3]: *** [all-recursive] Error 1
make[3]: Leaving directory `/opt/hvirtual/quicktime/ffmpeg'
make[2]: *** [all-recursive] Error 1
make[2]: Leaving directory `/opt/hvirtual/quicktime'
make[1]: *** [all-recursive] Error 1
make[1]: Leaving directory `/opt/hvirtual'
make: *** [all] Error 2
Good Lord! What is this? When I did my first Cinelerra CVS install back in April (fedora-core-6-cinelerra-dependencies.html), I didn't encounter this error. And I was only using the same dries, livna and standard Fedora repositories. So something must have changed with the repositories between the beginning of April and now, early June. But what gives with the compile failure?
No sense complaining about it. Let's just see if someone else has encountered it and we'll fix it. Sure enough, folks on the Ubuntu boards had seen it:
http://ubuntuforums.org/showthread.php?t=215252
Essentially, the problem is that the version of Cinelerra is incompatible with the version of x264. The x264 from Livna is rev. 537 and Cinelerra is version 2.1 (at this time, rev. 1009). We'll use x264 rev. 536 to alleviate the problem.
The solution is hard to pick through on that forum posting, so I will condense the steps to fixing it here:
1) uninstall x264
2) download x264 revision 537
3) compile x264 with specific options
4) reinstall packages that were removed when we uninstalled x264
5) install x264 program files
6) patch directories in the Cinelerra source tree
7) configure Cinelerra with specific options
8) compile Cinlerra and hopefully, install!
1) uninstall x264
yum remove x264
This will remove a bunch of other packages:
Running Transaction
Removing : mjpegtools ####################### [ 1/10]
Removing : mjpegtools-devel ####################### [ 2/10]
Removing : mjpegtools-libs ####################### [ 3/10]
Removing : ffmpeg ####################### [ 4/10]
Removing : ffmpeg-libs ####################### [ 5/10]
Removing : x264 ####################### [ 6/10]
Removing : mencoder ####################### [ 7/10]
Removing : x264-devel ####################### [ 8/10]
Removing : libquicktime ####################### [ 9/10]
Removing : mjpegtools-gui ####################### [10/10]
Don't worry, we'll replace them in Step 4.
2) download x264 revision 537
Assuming you have subversion installed, go get rev 536 of x264:
svn checkout svn://svn.videolan.org/x264/trunk x264 -r536
3) compile x264 with specific options and make the x264 program files
From the directory in which you downloaded the x264 source code, run:
./configure --extra-cflags=-fPIC --extra-asflags=-D__PIC__
make
4) reinstall packages that were removed when we uninstalled x264
yum --disablerepo=dries install ffmpeg libquicktime mencoder mjpegtools*
Note that I have the Fedora Core, Extras, Updates, Livna and Dries repositories only listed in yum when I run the install.
Here we see the final result of the install:
Running Transaction
Installing: x264 ######################### [1/9]
Installing: ffmpeg-libs ######################### [2/9]
Installing: ffmpeg ######################### [3/9]
Installing: libquicktime ######################### [4/9]
Installing: mjpegtools-libs ######################### [5/9]
Installing: mencoder ######################### [6/9]
Installing: mjpegtools ######################### [7/9]
Installing: mjpegtools-devel ######################### [8/9]
Installing: mjpegtools-gui ######################### [9/9]
Notice that installing the programs will also the bad version of x264. In the next step, I will overwrite the program files of the conflicting version of x264 with the working, rev. 536 version.
5) install x264 program files
In the directory you compiled x264, run:
make install
Doing this, I have overwritten the conflicting version of x264 with the one that works with Cinelerra.
6) patch directories in the Cinelerra source tree
In the Cinelerra source tree directory, hvirtual, create these missing directories and fill with appropriate files:
mkdir plugins/chromakey-hsv && cp plugins/chromakeyhsv/* plugins/chromakey-hsv
mkdir plugins/seltempavg && cp plugins/denoiseseltempavg/* plugins/seltempavg/
Take a look at them to make sure they exist and have files in them:
[root@localhost hvirtual]# ls plugins/chromakey-hsv/
chromakey.C chromakey.h Makefile Makefile.am Makefile.in picon.png picon_png.h
[root@localhost hvirtual]# ls plugins/seltempavg/
Makefile Makefile.in picon_png.h seltempavg.C seltempavgwindow.C
Makefile.am picon.png restart_marker.png seltempavg.h seltempavgwindow.h
7) configure Cinelerra with specific compiler options
./configure --with-pic
for Ubuntu 64-bit users, this configure syntax may need to change to this:
./configure --with-pic --disable-shared --enable-static
I cannot confirm this as I am not an Ubuntu user.
To explain: as a general rule, Cinelerra themes and plugins are loaded dynamically as modules. If static linking is defined (the --enable-static part of the command), the SUV theme will not get built as it is not designed for static linking in the CVS tree. A corrolary to this is that if you disable shared libraries (the --disable-shared part of the command), the SUV theme also doesn't get built. My testing on FC6 bears this out.
The unfortunate thing is that if the SUV theme is not built, you'll get this nasty error when you try to startup Cinelerra and the program won't start for love or money:
MWindow::init_theme: theme S.U.V not found
I have not found a workaround, so if at all possible, do not use those two switches in your configure command.
8) compile Cinlerra and hopefully, install!
make
make install
These steps fixed my problem. Hopefully, they will fix it on your system.
Good luck!
If this post was useful to you..consider buying me a beer via PayPal!
Even a $1 Draft will keep the Mule happily working..and help pay for equipment upgrades!
Sunday, June 03, 2007
how to backup a LVM volume
excellent tutorial on LVM:
http://www.howtoforge.com/linux_lvm
how to back them up
http://www.howtoforge.com/linux_lvm_snapshots
http://www.howtoforge.com/linux_lvm
how to back them up
http://www.howtoforge.com/linux_lvm_snapshots
If this post was useful to you..consider buying me a beer via PayPal!
Even a $1 Draft will keep the Mule happily working..and help pay for equipment upgrades!
Subscribe to:
Posts (Atom)

