Showing posts with label mdadm. Show all posts

Sunday, November 16, 2008

using partimage with RAID

Background
As I am planning on a purchase of a 1080p cam, I will need my system to be up on the latest and greatest kernal and software to get the highest performance from Cinelerra. In that light, I'd like to backup my current Fedora 7 boot and root filesystems, just in case something goes wrong with the Fedora 9 install.

Partimage and My System
I will use partimage to backup these filesystems. Partimage will need to see source and destination filesystems. My first task is to figure out what I have. I built this system over a year ago and don't remember all the specifics of which physical drive has x or y filesystems. I could go back into my notes to find out how I partitioned my system, but that would be cheating. So let's see what the filesystem tells me.

The first thing I do is look at the output of df:
[mule@ogre ~]# df -m
Filesystem 1M-blocks Used Available Use% Mounted on
/dev/md0 457295 6720 426972 2% /
/dev/md2 469453 417004 28602 94% /mnt/videos
/dev/sda1 99 19 76 20% /boot
tmpfs 1007 0 1007 0% /dev/shm


I have two RAID devices, one mounted as my root partition (/dev/md0) and one mounted as my video storage (/dev/md2). Next, I see that /dev/sda1 is my boot partition. Finally, there is a filesystem defined for shared memory, though I am not concerned about saving the contents of that as it is RAM.

How It Works
Partimage backs up filesystems that are not mounted. But partimage is started from a bootable rescue disk, like Knoppix or SysRescCd. The twist here is that I am using RAID partitions. Thus, when I boot with one of these CDs, I will need to assemble my RAID drives in order to have a source to backup (my root filesystem) and a destination to write to (my /mnt/videos filesystem). Partimage will not use a mounted filesystem as a source, but I will need to mount the destination.

Assembling My RAID Drives
I have forgotten the configuration of my RAID drives, so I look at /etc/mdadm.conf to figure out what partitions and UUIDs make up my two RAID sets:
[mule@ogre ~]# cat /etc/mdadm.conf
# mdadm.conf written out by anaconda
DEVICE partitions
MAILADDR root
ARRAY /dev/md0 level=raid0 num-devices=2 uuid=c0d4b597:c33b3014:ab694cee:76920165
ARRAY /dev/md2 level=raid1 num-devices=2 UUID=1705b387:1c71d83e:364b60b4:fb0cc192


This tells me that my root partition (/dev/md0) is a stripe set (RAID0) and that the storage for my important stuff, all my videos in /mnt/video is mirrored (RAID1) in case of a failure. I'm glad I built the system this way, as I like the performance benefits of a stripe set for my root partition, but I would consider it tragic if I lost all my work. Therefore, I've mirrored the video drive on two drives in case of a failure.

Video Display Problem with Linux and NVidia Card
For some reason I have not figured out, I cannot see virtual consoles once I exit Gnome. This is due to some incompatibility between the NVidia 8800GT card and my Dell SC1430. This also effects the display when I boot with either Knoppix or SysRescCD. Using these tools, the screen goes black and I can't see any terminal sessions or virtual consoles. Therefore, in order to use the boot cd, I removed the NVidia card and booted using Dell's ATI ES1000 onboard video.

Booting with Knoppix
Once Knoppix is fully booted, I need to assemble my two RAID partitions. You can use either use the UUID or the super-minor number of each RAID set to do this. I chose the super-minor, as it was simpler.

Assemble the Source RAID set
Here I am assembling the source drive, my root filesystem:
root@Knoppix:/ramdisk/home/knoppix# modprobe md
root@Knoppix:/ramdisk/home/knoppix# mdadm --assemble -m 0 /dev/md0


Mount the Destination Partition
Since I want to store the backup image on the same mirrored drive set that holds my videos, I'll mount that partition as the destination for the partimage. Of course, I first have to create the mount point:
mkdir /mnt/videos
mount -t ext3 /dev/md2 /mnt/videos


Run Partimage to Backup Root Partition
I'll need three things to run partimage:
-an assembled RAID set of the source, my root/boot partitions, unmounted
-an assembled RAID set of the destination, mounted
-a compression method

Here's the partimage process:
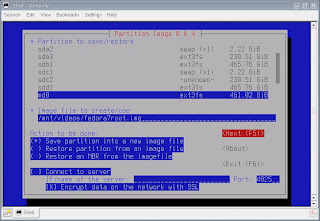
1) Select the partition to save and give the backup a destination and name. Note that the "Save partition into an image file" is selected as the default behavior:

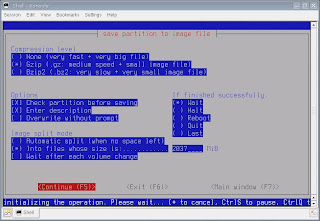
2) Select a compression method:

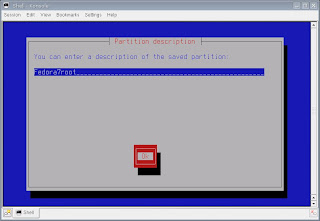
3) Give the backup image a description (optional):

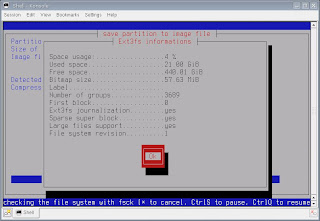
4) Partimage takes a few minutes to gather information about large (500GB+ drives), but then displays basic information about the partition to be backed up:

5) Partimage starts the imaging process. I had about 6GB to backup:
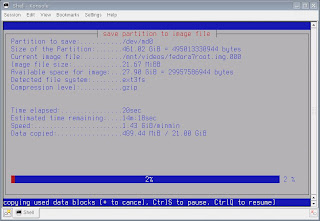

6) Partimage took about 20 minutes to create the backup image:
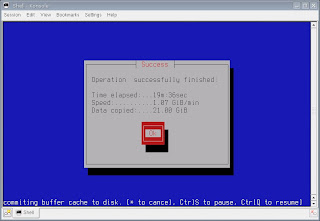

Backup complete. The restore process is similar, but instead of backing up an image file as in Step 1 above, you'll choose the "Restore Partition from an image file" option.

Run Partimage for Boot Partition
Since my boot partition is small 128MB, creating a backup image shouldn't take very long. My boot partition is /dev/sda1
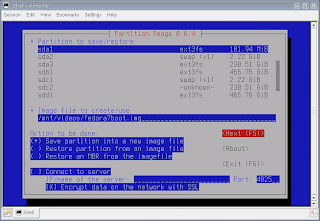

Now I should be ready to an upgrade to Fedora 9. One hurdle I already see: the Fedora 9 installation doesn't recognize pre-existing RAID sets. Yarg. Looks like I might have to blow away the existing stripe set that is home to my root partition. Let you know how that goes.

Update 11/17/2008
The Fedora 9 x86-64 install went well. Here are some of the natty details:
http://crazedmuleproductions.blogspot.com/2008/11/fedora-9-x86-64-install.html
end update

Good day,
The Mule

References
mdadm man page

Friday, October 05, 2007

moving my RAID set to a new box: collision!

For performance, I have my videos stored on a stripe set, using Fedora's software RAID technology. I've recently setup my Dell Octo Core box, but had not yet migrated the RAID set to it. This morning, at about midnight, I decided to start the migration. That was my first mistake.

Contention for the Same Device Name
The RAID set is a couple of 120GB IDE drives on a Sil680 PCI card. Not the best performers, but I was minding my pennies when I bought the drives and card. So I popped the card and the drives in the server. Thankfully, the card was immediately recognized by the BIOS on bootup. However, from the dmesg output:
Oct 4 23:53:53 localhost kernel: md: considering hdd1 ...
Oct 4 23:53:53 localhost kernel: md: adding hdd1 ...
Oct 4 23:53:53 localhost kernel: md: adding hdc1 ...
Oct 4 23:53:53 localhost kernel: md: md0 already running, cannot run hdd1

I saw that the device name of RAID set that held my videos /dev/md0 conflicted with the RAID set that I had created as my / (root) partition for 64-bit Core 6. Argh! Once per year, like Christmas, I have to dust off my rusty mdadm skills. Ugh. This was that time.

The Plan
After reading a number of references listed below, I decided to eliminate the contention, by renaming my video RAID set from /dev/md0 to /dev/md1. To accomplish this, I had to update the superblock on the RAID set to a different preferred minor number. More on this in a moment.

Since putting the drives in the new server, I was a little nervous about the condition of the data on them drives. To give myself a bit more of comfort, I decided on the following course of action:
- put the drives and card back in the original computer
- renumber the preferred minor number of the RAID set there
- test to verify that I can still mount the filesystems on the RAID and access the data
- move the devices back into the new server
- assemble, test and mount the RAID

So Let's Get Started!
I put the card and drives back into the original box. Here is the detail of what the RAID set looked like there:
[root@computer ~]# mdadm --detail /dev/md0
/dev/md0:
Version : 00.90.03
Creation Time : Sat Aug 19 23:57:28 2006
Raid Level : raid0
Array Size : 234436352 (223.58 GiB 240.06 GB)
Raid Devices : 2
Total Devices : 2
Preferred Minor : 0
Persistence : Superblock is persistent

Update Time : Fri Oct 5 14:31:37 2007
State : active
Active Devices : 2
Working Devices : 2
Failed Devices : 0
Spare Devices : 0
Chunk Size : 64K
UUID : 9c4c078f:8935e3e4:bfface8f:6a3c2c18
Events : 0.15

Number Major Minor RaidDevice State
0 22 1 0 active sync /dev/hdc1
1 22 65 1 active sync /dev/hdd1


Update the RAID Device Number (Preferred Minor)
I first stopped the RAID set:
[root@computer ~]# mdadm --stop /dev/md0
mdadm: stopped /dev/md0


Next, I issued the following command to update the minor number. Unfortunately, it didn't work, as I received the following error:
[root@computer ~]# mdadm --assemble /dev/md1 --update=super-minor -m0 /dev/hdd1 /dev/hdc1
mdadm: error opening /dev/md1: No such file or directory


Oh boy. From the error, it looked like I needed to have a block device file called /dev/md1 created. I wasn't sure, though, as my mdadm and RAID chops were rusty. So, after a LOT of research (references listed below), I learned that I needed to create the block device file.

Creating a Block Device
Referring to these instructions, I created the block device for /dev/md1 with the following commands:
[root@computer ~]# mknod /dev/md1 b 9 1

I wanted to keep the permissions consistent with the old /dev/md0 device file, so I ran the following commands:
[root@computer ~]# chmod 640 /dev/md1;chown disk /dev/md1
[root@computer ~]# ll /dev/md*
brw-r----- 1 root disk 9, 0 Oct 5 14:24 /dev/md0
brw-r----- 1 root disk 9, 1 Oct 5 14:43 /dev/md1


Updating and Testing the Preferred Minor Number (device id)
Once the block device file was created, I issued the command to update the preferred minor number of the RAID set to 1:
[root@computer ~]# mdadm --assemble /dev/md1 --update=super-minor -m0 /dev/hdd1 /dev/hdc1
mdadm: /dev/md1 has been started with 2 drives.

Sweet! The RAID device started! Let's see how it looks (note the Preferred Minor number!):
[root@computer ~]# mdadm --detail /dev/md1
/dev/md1:
Version : 00.90.03
Creation Time : Sat Aug 19 23:57:28 2006
Raid Level : raid0
Array Size : 234436352 (223.58 GiB 240.06 GB)
Raid Devices : 2
Total Devices : 2
Preferred Minor : 1
Persistence : Superblock is persistent

Update Time : Fri Oct 5 15:43:48 2007
State : clean
Active Devices : 2
Working Devices : 2
Failed Devices : 0
Spare Devices : 0
Chunk Size : 64K
UUID : 9c4c078f:8935e3e4:bfface8f:6a3c2c18
Events : 0.20

Number Major Minor RaidDevice State
0 22 1 0 active sync /dev/hdc1
1 22 65 1 active sync /dev/hdd1


I like the word "clean"! And how are the individual drives making up the set doing?
[root@computer ~]# mdadm -E /dev/hdc1
/dev/hdc1:
Magic : a92b4efc
Version : 00.90.01
UUID : 9c4c078f:8935e3e4:bfface8f:6a3c2c18
Creation Time : Sat Aug 19 23:57:28 2006
Raid Level : raid0
Device Size : 117218176 (111.79 GiB 120.03 GB)
Raid Devices : 2
Total Devices : 2
Preferred Minor : 1

Update Time : Fri Oct 5 16:03:24 2007
State : active
Active Devices : 2
Working Devices : 2
Failed Devices : 0
Spare Devices : 0
Checksum : 8bd047df - correct
Events : 0.21
Chunk Size : 64K

Number Major Minor RaidDevice State
this 0 22 1 0 active sync /dev/hdc1

0 0 22 1 0 active sync /dev/hdc1
1 1 22 65 1 active sync /dev/hdd1

[root@computer ~]# mdadm -E /dev/hdd1
/dev/hdd1:
Magic : a92b4efc
Version : 00.90.01
UUID : 9c4c078f:8935e3e4:bfface8f:6a3c2c18
Creation Time : Sat Aug 19 23:57:28 2006
Raid Level : raid0
Device Size : 117218176 (111.79 GiB 120.03 GB)
Raid Devices : 2
Total Devices : 2
Preferred Minor : 1

Update Time : Fri Oct 5 16:03:24 2007
State : active
Active Devices : 2
Working Devices : 2
Failed Devices : 0
Spare Devices : 0
Checksum : 8bd04821 - correct
Events : 0.21
Chunk Size : 64K

Number Major Minor RaidDevice State
this 1 22 65 1 active sync /dev/hdd1

0 0 22 1 0 active sync /dev/hdc1
1 1 22 65 1 active sync /dev/hdd1


Love the word "correct"!

Is My Data Still There?
So how about we try a mount?
[root@computer ~]# mount -t ext2 /dev/md1 /mnt/videos
[root@computer ~]#

No errors on the mount! That's great! Now for the finale..let's look at a test file:
[root@computer ~]# head -2 /mnt/videos/paris/newtrip.xml
<?xml version="1.0"?>
<EDL VERSION="2.0CV" PROJECT_PATH="/root/installFiles/paris/newtrip.xml">

Awesome! I'm very relieved I can read the content off the drive. That is a load off my mind. The last task was to edit /etc/fstab and reboot to make sure the RAID set comes up correctly on boot. Blissfully, those steps were also successful.

Put 'Em In Da New Box!
I then took the whole kit and caboodle to the new server. I am very happy to report that the kernel recognized the newly renumbered RAID set, as shown in the output of dmesg:
md: created md1
md1: setting max_sectors to 128, segment boundary to 32767


and created the /dev/md1 device, as shown in this file listing:
[root@ogre ~]# ll /dev/md*
brw-r----- 1 root disk 9, 0 Oct 5 19:27 /dev/md0
brw-r----- 1 root disk 9, 1 Oct 5 19:27 /dev/md1


I added the following line to /etc/fstab:
/dev/md1 /mnt/videos ext2 defaults 1 1

And ran "mount -a" to reinitialize the file system table. Lo and behold, I've got data on my drive!
[root@ogre ~]# ls /mnt/videos
20060319 20060812 20070316 20070811 axe cinelerra movies paris_tape1 stockholm_tape1
20060406 20070111 20070425 20070912 bloody lost+found paris paris_tape2 stockholm_tape2


Caveat for RAID under a Knoppix CD
At one point in my debugging, I pulled out my trusty Knoppix bootable CD. If you need to load your RAID set from a rescue disk or more specifically, Knoppix, you'll need to load the md module and then run mdadm --assemble to start your existing RAID set.
root@Knoppix:/ramdisk/home/knoppix# modprobe md
root@Knoppix:/ramdisk/home/knoppix# mdadm --assemble -m 0 /dev/md0


Well, another chapter in the life of the Mule is closed. Hopefully, someone will find these notes instructive.

Update 2009/03/25
Some hdparm drive read measurements. Note the 60% read speed increase of the stripe set versus the mirrored set.

/dev/md0 is a software RAID0 (stripe) of two 500GB, 16MB cache SATA drives:
[mule@ogre ~]$ sudo hdparm -tT /dev/md0
sudo hdparm -tT /dev/md0

/dev/md0:
Timing cached reads: 5748 MB in 2.00 seconds = 2877.62 MB/sec
Timing buffered disk reads: 352 MB in 3.02 seconds = 116.68 MB/sec


/dev/md0 is a software RAID1 (mirror) of two 500GB, 16MB cache SATA drives:
[mule@ogre ~]$ sudo hdparm -tT /dev/md2

/dev/md2:
Timing cached reads: 5218 MB in 2.00 seconds = 2612.72 MB/sec
Timing buffered disk reads: 218 MB in 3.03 seconds = 72.04 MB/sec


*** end update ***

The Mule

References
http://www.redhat.com/magazine/019may06/departments/tips_tricks
http://www.linuxdevcenter.com/pub/a/linux/2002/12/05/RAID.html?page=1
http://www.docunext.com/category/raid/

Nice Beginner's Guide
http://www.linuxhomenetworking.com/wiki/index.php/Quick_HOWTO_:_Ch26_:_Linux_Software_RAID

The Man Page
http://www.linuxmanpages.com/man8/mdadm.8.php

HowTo (with good description of chunk sizes)
http://www.tldp.org/HOWTO/Software-RAID-HOWTO.html

MDADM Recipes
http://www.koders.com/noncode/fid76840E0EBBC19222CBCC0913D4AED97C1F5D2A45.aspx

Notes for Debian MDADM users
http://svn.debian.org/wsvn/pkg-mdadm/mdadm/trunk/debian/README.upgrading-2.5.3?op=file

Sunday, August 20, 2006

system reconfig, final entry

Sil680 Not Recognized by Fedora
OK. I'm tired. Going to make this quick. Sil680 ATA RAID0 stripe set not recognized automatically by Fedora. Tried reinstall of Fedora. Does not recognize the RAID0 set I created. ARGH.

Saved by MDADM
I had to dust off my very, very rusty Linux RAID creation skills and manually create a software RAID set. In short:
- fdisk to mark the drives as part of a raid set
- use mdadm to make the raid set active
- create a mdadm.conf for the array
- put it in /etc/fstab
- format the stripe set

Here is the most important snip of what I did:
[root@computer /]# mdadm --create /dev/md0 --level=0 --raid-devices=2 /dev/hdg1 /dev/hdh1
mdadm: array /dev/md0 started.
[root@computer /]# mdadm --detail --scan >> /etc/mdadm.conf
[root@computer /]# cat /etc/mdadm.conf
DEVICE /dev/hdg* /dev/hdh*
ARRAY /dev/md0 level=raid0 num-devices=2 UUID=9c4c078f:8935e3e4:bfface8f:6a3c2c18
devices=/dev/hdg1,/dev/hdh1

[root@computer RPMS]# cat /etc/fstab
# This file is edited by fstab-sync - see 'man fstab-sync' for details
LABEL=/ / ext3 defaults 1 1
LABEL=/boot /boot ext3 defaults 1 2
/dev/devpts /dev/pts devpts gid=5,mode=620 0 0
/dev/shm /dev/shm tmpfs defaults 0 0
/dev/proc /proc proc defaults 0 0
/dev/sys /sys sysfs defaults 0 0
/dev/hda5 swap swap defaults 0 0
/dev/fd0 /media/floppy auto pamconsole,exec,noauto,managed 0 0
/dev/hdc /media/cdrecorder auto pamconsole,exec,noauto,managed 0 0
/dev/md0 /mnt/videos ext2 defaults 1 1
[root@computer /]# mkfs.ext2 /dev/md0
mke2fs 1.37 (21-Mar-2005)
Filesystem label=
OS type: Linux
Block size=4096 (log=2)
Fragment size=4096 (log=2)
29310976 inodes, 58609088 blocks
2930454 blocks (5.00%) reserved for the super user
First data block=0
Maximum filesystem blocks=58720256
1789 block groups
32768 blocks per group, 32768 fragments per group
16384 inodes per group
Superblock backups stored on blocks:
32768, 98304, 163840, 229376, 294912, 819200, 884736, 1605632, 2654208,
4096000, 7962624, 11239424, 20480000, 23887872

Writing inode tables: done
Writing superblocks and filesystem accounting information: done

This filesystem will be automatically checked every 32 mounts or
180 days, whichever comes first. Use tune2fs -c or -i to override.


Congrats to me/Girlfriend Doesn't Care
Pretty good for a guy who didn't know mdadm before tonight. So yeah! RAID0 set works! Hoohah! Copied a movie to it and then tested it in Cinelerra. HOLY SMOKES! Getting 50fps on a 1280x720 HDV movie! Damn that's fast! I can't understand why my girlfriend doesn't care about this at 1am??!

Gotta crash. I think my work is done here.

Update, 9/11/07:
Here is a very nicely organized article on adding new hard drives to Fedora:
http://fedoranews.org/tchung/storage/