In past versions of Cinelerra (pre-2.0), the process of creating content readable by media players across all platforms was cumbersome at best and maddeningly frustrating at worst. Cinelerra 2.0 seems to be much better in this regard, and can produce high-quality video in a variety of formats. However, the newcomer to Cinelerra may still find it difficult to output a simple DVD or web-ready video. This guide addresses this audience by explaining how to get usable content out of Cinelerra quickly and easily.
Disclaimer
This guide doesn't intend to support one particular format or compression method over another, but serves to give the reader a methodology to produce video content that displays properly in as many media players for as many viewers as possible.
Assumptions
The steps described below assume a properly installed version of Cinelerra 2.0. Also, the steps below were tested successfully with NTSC formatted video (thanks to Graham Evans for the clarification).
Test System
The procedures below were tested and certified by a non-independent, first party on the following machine:
Dell SC400, 3.2Ghz Pentium IV, 800Mhz FSB,
1GB PC3200 RAM, 80GB (x2) working drives
Fedora Core 4
FreshRPMs Cinelerra build 2.0-0.3.20051210.2.fc4.i386
http://rpmfind.net/linux/RPM/freshrpms/fedora/4/cinelerra/cinelerra-2.0-0.3.20051210.2.fc4.i386.html
Who is your Audience?
So! You've edited your masterpiece in Cinelerra and now it is time to export or "render" it to a final format. Congratulations! However, you first must consider your audience before you decide how you want to distribute the video. Who is going to watch your video and how are they going to watch it? Are you going to give them a DVD, submit a video feed to iTunes, send them a link to a website or just load the video into your iPod? Given that you have a destination for your video, this document will show you how to produce content ready for all of those options:
*
HDV 720P
*
a DVD
*
a vodcast
*
a webpage or web download
*
Video iPod
Here is a chart comparing the different distribution methods and file formats:
Distribution File Format         Video Compression Audio Format
HDV720P      MPEG2               YUV4MPEG          MPEG, Layer II (384Kbps)
DVD          MPEG2               YUV4MPEG          Twos Comp'mnt
Vodcast      Quicktime for Linux H.264             MPEG-4 Audio
Web Download Quicktime for Linux MPEG-4 Video      Twos Comp'mnt
Video iPod   Quicktime for Linux MPEG-4 Video      MPEG-4 Audio

Distribution Test Video          Size   Render Time
HDV720P      no example yet
DVD          test.mpg            11.5MB      15 sec
Vodcast      test.h264.mov        5.5MB      50 sec
Web Download test.mpeg4.mov       7.8MB      30 sec
Video iPod   test.mpeg4.ipod.mov  1.4MB      30 sec
Note: the dimensions of the test videos were reduced from DVD resolution (720x480) to a lower resolution (320x180) in order to make it easier for readers to download. Also, the only way to reduce the resolution of your video is to render it to a different resolution (described in advanced techniques below). You can resize or crop your video, but in doing so, you would lose some part of the viewable picture.
Once you've rendered your video, don't forget to
verify that your video is correctly formatted! And there are sections on
advanced techniques for those people who would like to learn more and
troubleshooting for folks who may be having problems.
What Operating System Does Your Audience Use?
As in all things Linux, there are a hundred different ways of accomplishing a single task. After much trial and error with file format and compression settings in Cinelerra, I've have had some success using the above formats across operating systems and players. Surprisingly, the QuickTime 7 player on XP is the most consistent media player. As well, MPEG2 is the most compatible format across players of different operating systems.
Here is a chart describing the compatibility of the above test files in major Linux and XP players:
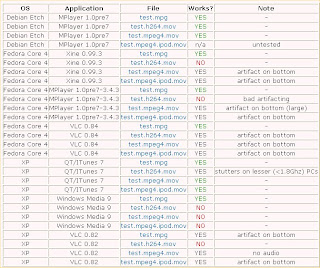 Update 2008/12/24
I've put together a new compatibility chart of Cinelerra export container formats and codecs for Fedora 10, x86-64:
http://crazedmuleproductions.blogspot.com/2008/12/fedora-10-x86-64-compability-chart.html
The chart was created using a 720P resolution Cinelerra project. It is not yet complete.
In a perfect world, this chart should represent the compatibility for all distributions. In reality, your mileage may vary.
end update
Now that we've put some thought into who our audience is and what operating systems and players they use, let's export some video!
Exporting HDV Video
No example yet
For a HDV720P formatted file, we will save the audio and video streams separately. The audio will be saved as MPEG Layer II (384Kbps) and the video will be encoded using mpeg2enc. Once we are done saving the audio and video streams separately, we will then combine (or "mux") the streams together using mplex into a program stream. Finally, we will use VLC to convert the program stream into a MP@HL compliant MPEG transport stream (MPEG-TS).
The general specifications of the combined file are:
File Format: MPEG
Compression Type: MPEG-2
Audio: MPEG Layer II, 384Kbps
Here are the steps. First, render the audio:
* in Cinelerra, press Shift-R for the Render menu.
* under Select a file to render to, choose a destination directory and filename
* under File Format, choose "MPEG Audio"
* under Audio, check the "Render audio tracks" checkbox
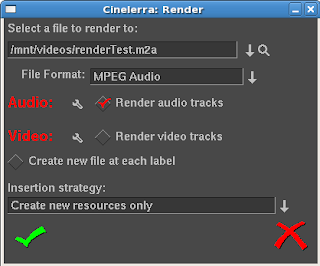
* click the wrench icon next to Audio
* select "II" from the Layer dropdown
* select "384" from the Kbits per second dropdown
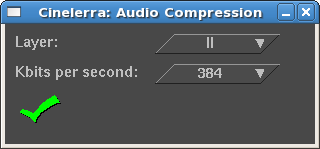
* accept the changes by clicking the checkbox in the lower left hand corner of the dialog box
* under Video, uncheck the "Render video tracks" checkbox
* accept the changes by clicking the checkbox in the lower left hand corner of the dialog box
* make sure that "Create new file at each label" is not checked
* make sure that "Insertion strategy" is set to "Create new resources only"
* To start rendering, click the checkbox in the lower left hand of the dialog.
Audio does not take very long to render. On my machine, a 3.2Ghz Pentium IV with 1GB of PC3200 memory, a 5 minute stream of MPEG Layer II audio takes about a minute to render.
Secondly, render the video:
* in Cinelerra, press Shift-R for the Render menu.
* under Select a file to render to, choose a destination directory and filename for the video (ending in .m2v). This file should go in the same directory as the audio file. This is not a necessity, but will make it easier when we mux (combine) the audio and video in the next and final step.
* under File Format, select "YUV4MPEG Stream"
* under Audio, uncheck the "Render audio tracks" checkbox
* under Video, check the "Render video tracks" checkbox
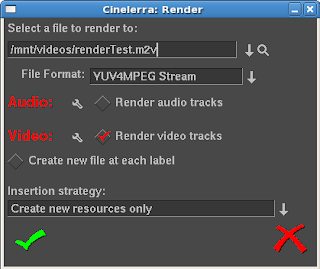
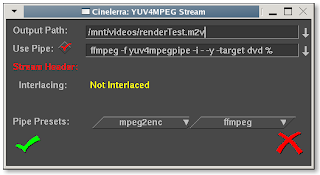
* click the wrench icon next to Video. Choose the following options:
* "Output Path" should have the filename and location you selected in the previous steps with a new extension, .m2v
* "Use Pipe" should be selected. If not, select "Use Pipe"
* enter or cut and paste the following render information into the Use Pipe textbox:
mpeg2enc --verbose 0 --aspect 3 --format 3 --frame-rate 4 --video-bitrate 18300 --nonvideo-bitrate 384 --interlace-mode 0 --force-b-b-p --video-buffer 448 --video-norm n --keep-hf --no-constraints --sequence-header-every-gop --min-gop-size 6 --max-gop-size 6 -o %
* under "Stream Header, Interlacing" will be left as "Unknown"
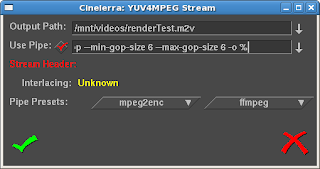
* accept the changes by clicking the checkbox in the lower left hand corner of the dialog box
* make sure that "Create new file at each label" is not checked
* make sure that the "Insertion strategy" is set to "Create new resources only"
* To start rendering, click the checkbox in the lower left hand of the dialog. MPEG2 video at HDV resolution takes a long time to render. If you have a dual, dual core machine, HDV video at 720P resolution takes about two minutes to render per minute of video.
After rendering the audio and video streams, mux (combine) them together into an MPEG program stream (PS) file using mplex. This step should not take that long, perhaps one minute for every 10 minutes of HDV video:
* Go to a terminal/shell prompt
* Navigate to the directory where you put both the separate audio and video files
Use this command:
mplex -f 3 -b 2000 video.m2v audio.m2a -o output.ps
The final step in creating an HDV 720P file is to convert it to a transport stream. Do this using VLC.
(screen shots to come)
Once the MPEG-TS file is output, you should have a proper HDV 720P that matches the MP@HL spec. This file can then be copied to a media player that accepts HDV content or output to an HDV camera that accepts 720P (MP@HL) formatted video.
Exporting Video for a DVD
See example:
test.mpg (11.5MB)
For a DVD formatted file, we will save the audio and video streams separately. The audio will be saved as a Microsoft WAV file and the video will be encoded using YUV4MPEG compression. Luckily, as of Cinelerra version 1.2.2, Heroine Warrior replaced the much slower mpeg2enc encoding with fast YUV4MPEG. Hooray! Once we are done saving the audio and video, we will then combine (or "mux") the streams together for the final product using ffmpeg.
The general specifications of the combined file are:
File Format: MPEG
Compression Type: MPEG-2
Audio: Twos complement
Here are the steps. First, render the audio:
* in Cinelerra, press Shift-R for the Render menu.
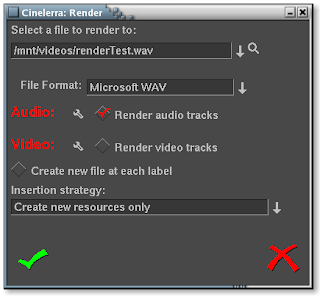
* under Select a file to render to, choose a destination directory and filename (ending in .wav)
* under File Format, choose "Microsoft WAV"
* under Audio, check the "Render audio tracks" checkbox
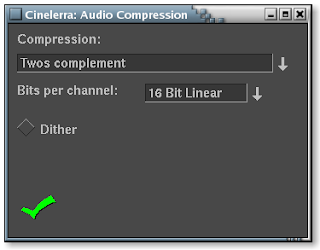
* click the wrench icon next to Audio
* Accept the Compression default of "16 Bit Linear"
* Leave "Dither" unselected
* Accept the changes by clicking the checkbox in the lower left hand corner of the dialog box
* under Video, uncheck the "Render video tracks" checkbox
* accept the changes by clicking the checkbox in the lower left hand corner of the dialog box
* make sure that "Create new file at each label" is not checked
* make sure that "Insertion strategy" is set to "Create new resources only"
* To start rendering, click the checkbox in the lower left hand of the dialog.
Audio does not take very long to render. On my machine, a 3.2Ghz Pentium IV with 1GB of PC3200 memory, a 5 minute stream of audio takes about thirty seconds to render.
Secondly, render the video:
* in Cinelerra, press Shift-R for the Render menu.
* under Select a file to render to, choose a destination directory and filename for the video (ending in .m2v). This file should go in the same directory as the audio file. This is not a necessity, but will make it easier when we mux (combine) the audio and video in the next and final step.
* under File Format, select "YUV4MPEG Stream"
* under Audio, uncheck the "Render audio tracks" checkbox
* under Video, check the "Render video tracks" checkbox
* click the wrench icon next to Video. Choose the following options:
* "Output Path" should have the filename and location you selected in the previous steps
* skip "Use Pipe" for now
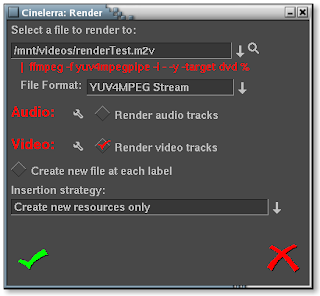
* go down to the "Pipe Presets" section and click ffmpeg. There will be two choices here. Select the DVD format. Depending on the version of Cinelerra that you've downloaded or compiled, you may see one of two versions of the ffmpeg DVD pipe:
1) The first should be used for progressive content
ffmpeg -f yuv4mpegpipe -i - -y -target ntsc-dvd %
2) The second should be used for interlaced content:
ffmpeg -f yuv4mpegpipe -i - -y -target ntsc-dvd -ilme -ildct -hq -f mpeg2video %
Note that if you have problems rendering, the
-ilme -ildct -hq arguments or just the
-hq argument alone should be removed. In addition, some versions of FFMPEG do not support the
-hq option and you will get the below error if you try to render video using this pipe:
ffmpeg: unrecognized option '-hq'
Received sigpipe
write_frame() failed: system error (failed read/write)
Unfortunately, FFMPEG is a moving target, as the tool is in a state of continuous development. That is good, as new features and functionality are being implemented, but distressing when the new features or command line switches change and break scripts that previously worked.
* At this point, the "Use Pipe" checkbox above should be checked and the ffmpeg command pipe should populate the text input field. You should not need to edit this command, as the default pipes' output settings yield high quality video.
* under "Stream Header, Interlacing" will be left as "Unknown"
* accept the changes by clicking the checkbox in the lower left hand corner of the dialog box
* You will notice that underneath "Select a file to render to", the ffmpeg command is represented as a pipe command.
* make sure that "Create new file at each label" is not checked
* make sure that the "Insertion strategy" is set to "Create new resources only"
* To start rendering, click the checkbox in the lower left hand of the dialog. Heroine Warrior has done an excellent job of enhancing the performance of the MPEG streamer, but it still takes quite a while if you've got more than 10 minutes of video. Again, on my machine (described above), it should take about 10 minutes to render 10 minutes of video as an MPEG stream.
Finally, we will mux (combine) the audio and video streams together into a DVD-ready product. Here's what you do:
* Go to a terminal/shell prompt
* Navigate to the directory where you put both the separate audio and video files
Use this command:
ffmpeg -i filename.wav -i filename.m2v -target dvd destinationFilename.mpg
Here is a description of what the switches I chose for ffmpeg mean:
-i = input (either sound or video file)
-target dvd = specifies standard DVD dimensions for the video (720x480) and default bitrate quality levels of ~7Mbps (other targets: "vcd", "svcd", "dvd", "dv", "pal-vcd", "ntsc-svcd" (see -formats switch below))
When not using -target switch, other useful arguments apply:
-aspect = aspect ratio: choose 4:3, 16:9, 1.3333, 1.7777
-b = bitrate in kbps (default = 200 kbps)
-r = frame rate (default = 25)
-s = size (default 160x128)
-ab = audio bitrate (default = 64 kbps)
-ac = audio channels (default = 1)
-formats = file formats, codecs and protocols that ffmpeg supports
Of course, running "man ffmpeg" in a terminal will tell you more than you ever wanted to know about ffmpeg, but here's a nice tutorial on getting started with ffmpeg:
http://howto-pages.org/ffmpeg/
References:
FFMPEG documentation:
http://ffmpeg.org/documentation.html
FFMPEG command line options:
http://ffmpeg.mplayerhq.hu/ffmpeg-doc.html
In general, using ffmpeg may take quite a while based upon the resolution and length of your video. And if you haven't guessed it already, we are rendering the file for a second time. Video purists would frown upon such a transgression, but for the sake of simplicity, please excuse. By the way, ffmpeg is a very powerful program and there are many more switches you can use to slice and dice your video in any way possible before or after you get it into Cinelerra. Let it be known that the procedure just described will give you a file that will work well with any DVD authoring software.
Don't forget to
verify that your video is correctly formatted!
Exporting Video for a Vodcast
See example:
test.h264.mov (5.5MB)
To put your video up as a video podcast or vodcast, we will format the video using H.264 compression, as Heroine Warrior terms "one of the highest quality video codecs around, making HDTV distribution over the Internet almost practical." That may be, but users of lowered powered PCs may have difficulty viewing files of this format. Stuttered playback may occur on Intel P4 systems less than 1.8Ghz. I have not yet tested on Apples.
The general specifications of the file are:
File Format: Quicktime for Linux
Compression Type: H.264
Audio: MPEG-4 Audio
Once you've prepared your video in Cinelerra, follow these instructions to prepare it as a podcast:
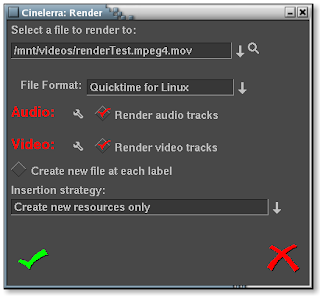
* in Cinelerra, press Shift-R for the Render menu.
* under Select a file to render to, choose a destination directory and filename (ending in .mov)
* under File Format, select "Quicktime for Linux"
* under Audio, check the "Render audio tracks" checkbox
* click the wrench icon next to Audio

* change the default Compression default from "Twos complement" to MPEG-4 Audio.
* If you want your video to have very high quality sound, accept the default Bitrate of 256000. Otherwise, change this value to something lower to save space. 128000 is sufficient for stereo music. 64000 or lower for voice.
* leave the Quantization Quality at 100%.
* accept the changes by clicking the checkbox in the lower left hand corner of the dialog box.
* under Video, check the "Render video tracks" checkbox
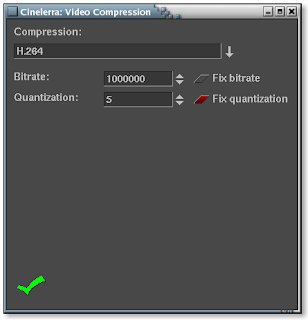
* click the wrench icon next to Video. Choose the following options:
* use H.264 compression. This is Apple's preferred format for iTunes, so let's all bow down to Mr.Jobs. Kidding aside, this format does do an excellent job of saving space with limited reduction in quality.
* keep the default bitrate of 1000000. I've noticed that changing the default bitrate does not change the file size or quality of the output file.
* change the quantization from 5 to 20. This level of quantization will reduce the size of the file by a factor of 66%!
* leave "Fix quantization" checked
* accept the changes by clicking the checkbox in the lower left hand corner of the dialog box
* make sure that Create new file at each label is not checked
* make sure that the Insertion strategy is set to "Create new resources only"
* To start rendering, click the checkbox in the lower left hand of the dialog. If you're video is less than 15 minutes long, read your mail or do some research on that new iPod you're lusting after. If your video is longer than a half hour, go out and paint the town red, because it's gonna take a long time.
Don't forget to
verify that your video is correctly formatted!
Exporting Video for a Web Page or a Web Download
See example:
test.mpeg4.mov (7.8MB)
Lastly, to prep your video for a web audience, we will format the video using MPEG-4 compression. Using this format results in the smallest file of the three options chosen.
The general specifications of this file are:
File Format: Quicktime for Linux
Compression Type: MPEG-4 Video
Audio: Twos complement
Once your video is set to be put on a webpage, follow these instructions:
* in Cinelerra, press Shift-R for the Render menu.
* under Select a file to render to, choose a destination directory and filename (ending in .mov)
* under File Format, select "Quicktime for Linux"
* under Audio, check the "Render audio tracks" checkbox
* click the wrench icon next to Audio
* accept the Compression default of "Twos complement" and Bits per channel of "16 Bit Linear".
* leave "Dither" unselected
* accept the changes by clicking the checkbox in the lower left hand corner of the dialog box
* under Video, check the "Render video tracks" checkbox
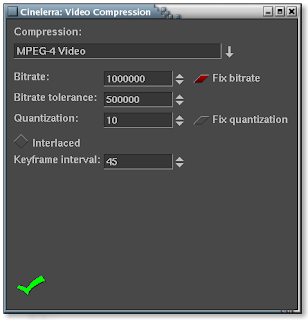
* click the wrench icon next to Video. Choose the following options:
* use MPEG-4 Video compression. This saves quite a bit of space, with limited reduction in quality
* keep the default bitrate of 1000000, bitrate tolerance of 500000, quantization of 10 and interlaced keyframe interval of 45.
* leave "Fix bitrate" checked
* accept the changes by clicking the checkbox in the lower left hand corner of the dialog box
* make sure that "Create new file at each label" is not checked
* make sure that the "Insertion strategy" is set to "Create new resources only"
* To start rendering, click the checkbox in the lower left hand of the dialog. Go get a cup of coffee if you're video is less than 15 minutes long or take a nice long nap if the video is longer than 30 minutes.
Rendering takes mucho processing power, but Cinelerra can handle it! Now if I only had that Dual Opteron box..
:)
Don't forget to
verify that your video is correctly formatted!
Exporting Video for a Video iPod
See example:
test.mpeg4.ipod.mov (1.4MB)
Update 09/29/2008
Due to updates in FFMPEG and iTunes, the directions herein will only allow you to encode a video that can be replayed in iTunes.
However, the file will NOT play in your iPod. I have found a workaround:
http://crazedmuleproductions.blogspot.com/2008/09/h264-encoding-for-video-ipod.html
end update
Update 10/16/2008
Making a Podcast, by Apple
The test file from the above Web Download portion of this document (
test.mpeg4.mov) loads and plays in iTunes. However, when I went to upload it, iTunes gave me the message:
"Some of the songs in the iTunes music library, including the song "(Video name)", were not copied to your iPod because they cannot be played on this iPod."
Luckily, Apple provides a feature called "Convert Selection for iPod" when you right-click on the file. But geez! I already rendered this thing. I've have to re-render it? Ugh. OK then. But, oh no, the conversion utility takes too much time! Even on a very fast machine like mine, a 3.2Ghz P4 with 1GB of PC3200 memory, the conversion speed is roughly 1.5 minutes per minute of video. That is way TOO slow. But I went ahead and did the conversion with my short test video. On the bright side, once the video was converted, I could then update my iPod and the video was on my iPod. Yes!
I continued playing around and loading many different videos into iTunes. In my travels, I stumbled upon one that did not require a conversion. I was shocked! I then reasoned that I'd save much time if I just produced the videos in the format that iTunes expects in the first place. But how to do that? So, my next course of action was to research why that one file worked in iTunes without a conversion and why mine needed the conversion.
To do this, I analyzed the output of MPlayer to determine the differences between files. I learned quite a bit about audio and video formats by reviewing the output of MPlayer. It helps to have the text of both files displayed in two windows next to each other in order to more easily compare the files line by line. I've done this for you in the image below. On the left appears the file that is in the correct format; on the right, my file not in the correct iTunes format:
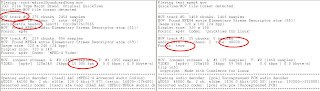
Reviewing the diffences, I noticed the following:
* iTunes compatible file had the audio track as the first track in the MOV container; my file had the video as the first track
* iTunes compatible file was 44.1Khz audio; my file was 48000Khz
* iTunes compatible file included an extra audio header; my file did not have the extra header
* iTunes compatible file audio compression method was MPEG-4; my file was twos complement
* iTunes compatible file FPS rate was 15; my file was 59.97
After way too many hours of trial and error, I found that it was the audio sampling rate and compression type that broke my file in iTunes. Here are the settings in Cinelerra that will make an MPEG-4 video totally compatible with iTunes so that iTunes does not need to re-render (the "Convert Selection for iPod" feature) the video! These settings are a slight variation on the Web Download procedures (MPEG-4 format).
Here are the specs I used:
For the project:
Set Format
Sample Rate to 44100khz
Number of Channels to two
FPS can be the FPS of your source video
Width 320
Height 240My video happened to be 320x180 because my source video was 16x9 hidef, which worked fine as well.

For the render:
Audio
MPEG-4 Audio
Bitrate 128000
Quantization of 100
Video
MPEG-4 Video
The rest of the parameters are Cinelerra's defaults, but I will reiterate here:
Bitrate 7000000
Tolerance 500000
Fixed Quantization selected
Quantization 10
Keyframe Interval 45
You need to abide by this format because iTunes is VERY STRICT when it comes to these settings! Also, the value for bitrate should be calculated based on the height, width, frames per second and quality requirements of your video product. More on this later. Here are Apple's specifications for iPod compliant videos (from
http://www.apple.com/ipod/specs.html):
H.264 video:
* up to 768 Kbps, 320 x 240, 30 frames per sec., Baseline Profile up to Level 1.3 with AAC-LC up to 160 Kbps, 48 Khz, stereo audio in .m4v, .mp4 and .mov file formats
MPEG-4 video:
* up to 2.5 mbps, 480 x 480, 30 frames per sec., Simple Profile with AAC-LC up to 160 Kbps, 48 Khz, stereo audio in .m4v, .mp4 and .mov file formats
If you expect to upload into iTunes without needing a re-render, DO NOT deviate from ANY of these settings.
iTunes Specific Information
When you drag and drop a video into the iTunes Library, the software will first evaluate the video to see if it can read the video file. If you drag and drop your newly created video onto iTunes, right-click and select "Convert Selection for iPod". If you have followed my directions, you should receive the following message:
"One or more videos were not converted because they are already in the correct format."
Once you see this message, you know you've been successful in creating a video file in compliance with the iTunes format specifications. Wonderful!!
Don't forget to
verify that your video is correctly formatted!
References:
http://www.apple.com/ipod/specs.html
http://www.ipodwizard.net/showthread.php?t=4413
http://members.shaw.ca/Kyle-Rogers/
Verifying Your Settings Are Correct
Once your render is complete for any of the formats above, use your favorite media player to view your masterpiece. After doing this though, you probably want to double-check that the bitrates and compression settings you've chosen for your rendered file are indeed correct. Below, I've listed the following switches of popular players that will display the audio and video settings of your video:
mplayer -identify
ffplay -stats
xine: ALT-i for detailed info, CTRL-i for a brief summary of video stats
qtinfo: displays the settings of any QuickTime video
Advanced Techniques
Reducing the resolution of your source video
I own a high definition video cam, the JVC HD10U. This camera outputs some beautiful HDV footage in MPEG2-TS (transport stream) format; however, the native 720P format is overkill for most applications, especially the three listed at the top of this document. Often then, I will need to decrease the resolution of my videos from 720P to a more manageable dimension. Normally, you'd need to reduce your videos' resolution outside of Cinelerra. This advanced technique will show you that you can save time by doing the resize within Cinelerra!
For example, I will reduce my source video to 480P in order to produce a good looking DVD. Therefore, this advanced technique begins from where we left off earlier in the document, Exporting Video for a DVD, so please refresh your memory before we start.
To reduce the resolution of your source video, you can remove the "-target dvd" switch from the YUV4MPEG Stream settings and replace it with the following switches to FFMPEG:
-aspect = aspect ratio: choose 4:3, 16:9, 1.3333, 1.7777
-b = bitrate in kbps (default = 200 kbps)
-r = frame rate (default = 25)
-s = size (default 160x128)
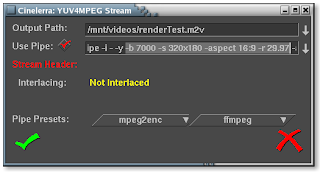
For example, when I reduced the resolution of the original video used earlier in this tutorial from 720x480 to 320x180, I used these FFMPEG switches when exporting the YUV4MPEG Stream:
-aspect 16:9 -b 7000 -r 29.97 -s 320x180
Here's what the YUV4MPEG Stream dialog looked like while I made these changes:
Here's what the Render dialog looked like after I made my changes:
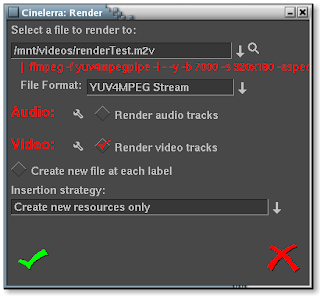
Notice the absence of the "
-target dvd" switch after the "
-y". Now you've resized your video all within Cinelerra. Awesome!
Combining a pre-existing audio file with a new video stream
In the previous example, I wanted to reduce the resolution of my video. In like fashion, I want to reduce the resolution, but I also want to keep the same audio stream. To do this, you'd normally have to combine the audio and video streams outside of Cinelerra. But again, we can save time by doing the mux within Cinelerra using this advanced technique!
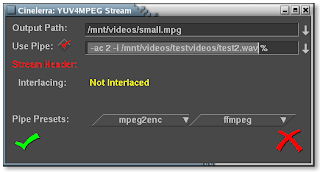
In my case, I have a pre-existing audio file that I will combine with a newly rendered video stream. Because the duration of the audio matched the larger resolution version, the audio file will be the same length as my video track. In practice, this does not necessarily have to be so, but if your goal is to reduce the resolution of a specific video, most likely you will have an audio file that is the same length as the video. So, just like the previous advanced technique, I edited the commands after the pipe symbol to include the full path of the audio file. I added the following directly before the last character, a "%", in the FFMPEG pipe command:
-ab 320 -ac 2 -i "audio file path/audio file name"
Here's what the YUV4MPEG Stream dialog looked like while I made these changes:
It bears repeating that the full path MUST be specified in the
-i switch. If you see errors such as these:
test2.wav: I/O error occured
Usually that means that input file is truncated and/or corrupted.
Received sigpipe
write_frame() failed: system error (failed read/write)
This usually means that your path to the file is incorrect and you'll need to fix it.
Finally, you'll notice two other switches in the pipe command I gave you. Recall these switches to FFMPEG:
-aspect = aspect ratio: choose 4:3, 16:9, 1.3333, 1.7777
-b = bitrate in kbps (default = 200 kbps)
-r = frame rate (default = 25)
-s = size (default 160x128)
-ab = audio bitrate (default = 64 kbps)
-ac = audio channels (default = 1)
As the audio was a high quality stereo mix, I opted for an audio bitrate of 320kbps and a two channel mix. The very nice thing about this advanced technique is that you don't have to mux the video outside of Cinelerra. You can do it within the program itself!
A word about bitrates
A detailed discussion on selecting an appropriate bitrate for your video is out of the scope of this article. So, in the spirit of my guide, I just let Cinelerra's bitrate defaults stand for the beginner who would rather not worry about the details just yet and render something that works the first time out of the box. That being said, I do use a quick-and-dirty method of determining bitrates for my videos.
To determine the bitrate for a video with high quality output, I use the following calculation:
bitrate in kbps = FPS * WIDTH * HEIGHT * QUALITY FACTOR
So, if I have a 320x240 video at 30FPS ready for iTunes, I would substitute in the following values:
= 30 * 320 * 240 * .255
= 587kbps
The final "Quality Factor" varies, but a value of .255 would yield good quality output. The higher the factor, the higher the bitrate and thus, better quality. Experiment with this quality factor to see if it works for you.
Here are some reference links to help you get an idea of what is involved in order to calculate the right bitrate for your video:
Understanding Bit Rates
DVD bitrate calculator
http://www.videohelp.com/calc
http://www.signvideo.com/bt-rts.htm
http://dvd-hq.info/Calculator.html
http://neuron2.net/LVG/ratesandsizes.html
http://www.cs.unc.edu/~hensley/zaurus/encode.html
Troubleshooting
Improper Audio Synchronization
I've had trouble with audio synchronization in a case where I rendered a file from a video track that did not start at zero on the timeline, but started a couple hundred frames after the audio. When I combined the rendered video and audio outside of Cinelerra in FFMPEG, the audio synchronization was off. To make your life easier, keep the start and end of your video and audio tracks perfectly aligned. Make sure to zoom in to less than five frames to verify this.
Types of Rendering Problems
First, confirm if the crash is a result of a problem in the timeline or your rendering parameters.
Crashes Due to Timeline Problems
I've had crashes due to problems in the timeline when rendering hour plus video out of Cinelerra for the following reasons:
-a bug while stacking video effects (specifically, when the Sharpen effect was at the bottom of a stack of six other effects on a video track)
-there were frames of no video between clips on a video track that was being rendered out (if you zoom in all the way on a track, make sure the clips are aligned next to each other)
- I've gotten crashes if I have a transition that overlaps a very short bit of empty space between two adjacent segments of audio or video. To stop this, I will go to the end of a segment, zoom in all the way, and make sure that the video and audio tracks end at the exact same time. If they don't end at the exact same time, I clip off a bit of whatever track is dangling by using the mark in/mark out indicators and doing a "cut". I can then be assured that when I paste a new segment to the end of this recently snipped one that the segments will align perfectly. Once the segments are aligned, I then apply the transition.
Crashes Due to Bad Rendering Parameters
As well, renders sometime bomb out due to parameters I've selected for the render. For instance, when I added the -ilme -ildct -hq arguments to the DVD render in the above example.
Troubleshooting Render Problems
Try to find the exact moment in the timeline where the render breaks. I found the Sharpen effect problem by rendering the first half of the video in the timeline and then successively rendering smaller sections of the timeline until I found the exact place in the timeline where the render is breaking. At which point, it is a matter of either finding a hole in the video or turning off effects/transitions until your render tests work without crashing.
This time consuming; however, if you've spend a lot of time editing, it is the only way to salvage all your hard editing work.
Truncated Video Track
Also, another difficulty I've had is when I open a just-rendered YUV4MPEG stream (.M2V video file) back into a project, the video is truncated and is shorter than the companion audio track. You can read about my troubles here:
https://init.linpro.no/pipermail/skolelinux.no/cinelerra/2006-March/005760.html.
I resolved this using two methods:
Don't re-import a YUV4MPEG video after rendering it. In other words, do all of your editing within Cinelerra and then render ONE TIME ONLY when you are done with all of your edits. This may not be feasible on large projects, though.
Use QuickTime for Linux container format to render to and re-import back into Cinelerra. This container does not have the same strange behavior as YUV4MPEG. In other words, when bringing a recently rendered video back into Cinelerra, the audio and video tracks are of the same length and perfectly in sync.
--------------------------------------------------------------------------------
I hope you enjoyed this evolving document. The developers of Cinelerra were kind enough to provide us with a very powerful product that would normally cost thousands of dollars. So I'd like to thank the folks at Heroine Warrior for doing such a fine job programming and all the people at
http://cvs.cinelerra.org/ who commit countless hours of their free time and energy on the software. As such, I felt it necessary to give back something to this community who has given us such a gift.
Please let me know of any new topics or improvements you'd like to see in this doc or maybe a new doc! Thanks!
***the mule***


