Saturday, March 14, 2009

motion stabilization tutorial

After reading Jacob's post today:
http://jakedth.tumblr.com/post/85794790/cinelerra-cv-motion-tracking-tutorial

I realized I never mastered a repeatable method to stabilize shakey video using Cinelerra's motion tracking tool. The Motion effect is very powerful, but also difficult to understand. At least for me. In addition, the manual isn't much help because it is couched in confusing terminology.

The motion tracker can do a lot of different things. However in this post, I am going to keep it simple and only describe how to stabilize shakey video. I made it easy for myself and chose a sample piece of video that bounces around pretty badly:


This movement left and right and up and down is called Translation. Or to a programmer, movement on the Cartesian Coordination System. Before we get into further discussion, familiarize yourself with what the manual says about the motion tracker:
http://heroinewarrior.com/cinelerra/cinelerra.html#MOTION

What You Need to Make It Work
Since the manual's description of motion tracking is cryptic, I'm going to try to clarify the muddy waters. In order to stabilize a section of video, you're going to need a few things:
1) a easily identifiable object in your video that will be used to track motion
2) a box that encircles that object. The following is important: this box needs to be wide and tall enough to encompass the range of motion of the shakey video.
3) a video track (master layer) with the range of motion that needs to be stabilized
4) a video track (target layer) that will be stabilized

I would suggest starting small. Just try stabilization with a clip of video that is short (<10seconds) and needs stabilization throughout.

Step 1: Apply the motion effect to the video track you want to stabilize
Like so:
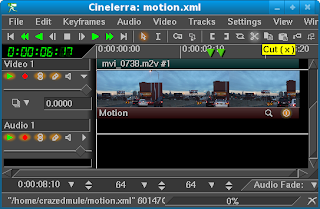

Step 2: Open the Motion tracker effect dialog.
In order to simplify the configuration process for the motion tracker, I've divided the configuration box into the only three sections you'll need to worry about:
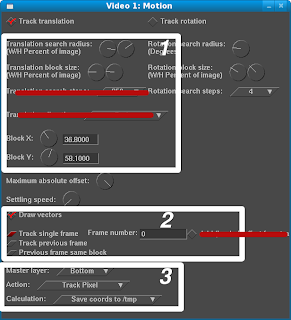

Step 3: Enable Draw Vectors (in Section 2 of the graphic above)
You may leave Track Single Frame selected. Also, Frame Number set to 0 means that the motion tracking of your video will start at the beginning of the timeline.

Step 4: Use Translation Block and Search Radius and Block X/Y to fit a box around an easily identifiable object in your video that will be used to track motion (in Section 1 of the graphic above)
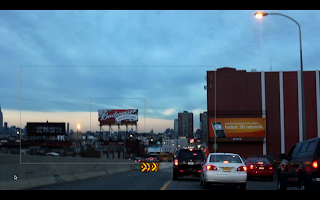
In the above picture, you'll notice there are two boxes around the Budweiser sign. The center box around the Budweiser sign is the Translation Block. You'll make the Translation Block fit neatly around the object you're tracking. The outer box is the Translation Search Radius. For the purpose of this tutorial, we'll make the Translation Block always fit within the Translation Search Radius. Below is a graphic depicting these components:
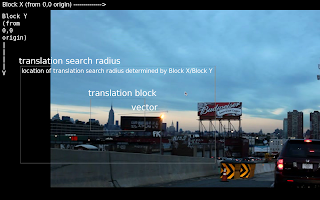

The Translation Search Radius needs to be as large as the range of motion of the video. In other words, the Search Radius needs to be large enough to accommodate all the shaking of your video. If the shaking extends beyond that box, strange things happen, like the motion tracker will start tracking another object in your video. Remember that.

Finally, Block X and Block Y represent the X/Y coordinate location of where you will move your Translation Search Radius.

In sum, you will configure those objects just discussed in the Motion Tracker effect dialog. To review:
1) Encircle the object you want to track with the Translation Block
2) Encompass the entire range of motion of your shakey video inside the Translation Search Radius
3) Use the Block X and Block Y coordinates to move the Translation Search Radius (including the Translation Block) around the screen

It is cumbersome to move the boxes around and X/Y coordinate plane using a round dial. The Translation Block and Search Radius should be drag and drop. The motion tracker interface can definitely be improved upon in this respect.

Step 5: In Section 3 of the Motion config screen, set Action to Track Pixel and set Calculation to Save Coordinates to /tmp
The reason why we do this is that we are going to Track the motion of the video around our selected object (the Translation Block). The coordinates of the movement will be saved in temporary files, which we will later apply to a second track.

You may now either playback the video or render out a test video to see the results of the motion tracking. As the motion effect is very CPU intensive, I would recommend just doing a few seconds of playback or rendering, just to make sure the motion tracker is working properly. I also recommend rendering to a file, as it will be at the same speed as a playback, but will also give you some output that you can replay at will.

Reviewing Vector Paths and Translation Block object
Once you've rendered out a test file, review the vector path to make sure the Motion tracker is always centered on the Translation Block, the object you want to track. I have found that the Motion tracker is easily confused if the object you've chosen to track is a similar color to the background. You'll know it loses track when the arrow on one end of the vector path no longer points to the original object in your translation block.

Also, the Motion tracker will lose track if the Translation Search Radius is not wide enough to capture the entire range of motion of the camera movement. In my Budweiser example, I found that I needed to widen Search Radius to more than half the width of the video so that the Motion tracker would stay on track.

Step 6: In the Motion effect on the original track, deselect Draw Vectors, set Action to Stabilize Pixel and set Calculation to Load Coordinates from /tmp


Step 7: Make a duplicate of your original track
Once you have good motion tracking, you will then be able to apply your saved coordinates to another track or Target Layer. In my Budweiser example, I simply made a duplicate of the track that I generated the coordinates from. One way to make a duplicate of the original track is to:
* in the patch bay of the original track, set both the playback and record to on
* select the entire track (key "a")
* press "c" for copy
* create a new video track (Shift-T)
* in the patch bay of the new track, make sure playback and record are both set to on
* press "v" for paste

This procedure *should* copy the motion effect as well, with the settings from Step 6. If the settings from Step 6 are not in the Motion effect dialog, manually set them.
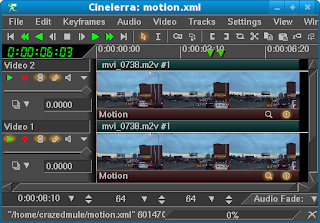

Step 8: Set the original track to not playback.
The Target Layer (duplicated track) should already be set to playback from the last step.
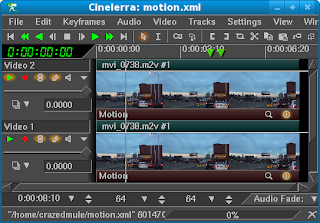

Step 9: Playback or Render the Video
Again, I suggest to render out the video to a file, as playing back or rendering will take the same amount of time.

Step 10: Analyze your results
You'll find that with motion stabilization, your video will tend to bounce around and you'll see black borders appear along with the motion removal. The easiest way to remove them is to experiment with different zoom levels (Z axis levels) using the Projector (NOT the Camera). For my Budweiser video, I found I needed to zoom in 1.6x. Of course, the side effect is that it may ruin whatever cinematic effect you were trying to achieve. So be advised!

Here were my results from earlier today:
1) The original video:


2) Motion vectors being generated to /tmp:


3) Motion stabilized


4) Video zoomed in to crop after stabilization. Note this crops out most of the interesting content of the video:


Advanced Use
I had a second video that bounced around quite a bit:


This time, I followed my own directions from above, but the resulting video came out jittery and jumpy:


Therefore, I increased the sensitivity of the Motion tracker by increasing Translation Search Steps from 256 to 1024:


This still was not sufficient, as I saw a couple jitters and jumps. I increased Translation Search Steps from 1024 to 8196. Be advised that this took about four times as long to render as having Translation Search Steps set to 1024. But it did remove the jitters and jumps!


The final outcome..sweet!


Enjoy!
The Mule

Saturday, February 21, 2009

Adobe 64-bit Flash plugin..and it works!

At the end of November, Adobe released a 64-bit Flash plugin:
http://labs.adobe.com/technologies/flashplayer10/

And, shocker of shockers, it actually works!

To Install Flash Plugin on x86-64
You'll download the tarball from here:
http://labs.adobe.com/technologies/flashplayer10/64bit.html


The only thing in the tarball is libflashplayer.so. To install the 64-bit Flash plugin, simply move libflashplayer.so into your user's .mozilla/plugins directory and restart Firefox.

Here's a more full set of instructions:
http://labs.adobe.com/technologies/flashplayer10/releasenotes_64bit.html#install

Even more amazing, the bloody thing works on my Fedora 10, x86-64 virtual machine running in VMware Fusion on my MacBook Pro! Yee haw! This will definetly help me as I'm preparing a presentation on Cinelerra for the Trenton Computer Festival in April.

Much thanks to the Adobe Linux team!
http://blogs.adobe.com/penguin.swf/2008/11/now_supporting_16_exabytes.html

the mule

Sunday, February 15, 2009

Fedora 10 x86-64 Cinelerra build

Update 2009/02/24
You can avoid having to build Cinelerra from source by using Nicolas Chauvet's (Kwizart) precompiled Cinelerra installs:
1) install the Kwizart yum repositories
http://rpms.kwizart.net/kwizart-release-10.rpm

2) install cinelerra-cv
[mule@ogre doc]$ sudo yum install cinelerra-cv* --enablerepo=kwizart
[sudo] password for sfrase:
Loaded plugins: refresh-packagekit
Setting up Install Process
Parsing package install arguments
Resolving Dependencies
--> Running transaction check
---> Package cinelerra-cv.x86_64 0:2.1-21.git20081103.fc10 set to be updated
--> Processing Dependency: bitstream-vera-fonts for package: cinelerra-cv
--> Processing Dependency: libmpeg3-utils for package: cinelerra-cv
---> Package cinelerra-cv-debuginfo.x86_64 0:2.1-21.git20081103.fc10 set to be updated
--> Running transaction check
---> Package libmpeg3-utils.x86_64 0:1.8-1.fc10 set to be updated
---> Package bitstream-vera-fonts.noarch 0:1.10-8 set to be updated
--> Finished Dependency Resolution

Dependencies Resolved

================================================================================
Package Arch Version Repository Size
================================================================================
Installing:
cinelerra-cv x86_64 2.1-21.git20081103.fc10 kwizart 6.3 M
cinelerra-cv-debuginfo x86_64 2.1-21.git20081103.fc10 kwizart 9.6 M
Installing for dependencies:
bitstream-vera-fonts noarch 1.10-8 fedora 345 k
libmpeg3-utils x86_64 1.8-1.fc10 rpmfusion-free 19 k

Transaction Summary
================================================================================
Install 4 Package(s)
Update 0 Package(s)
Remove 0 Package(s)
Total download size: 16 M
Is this ok [y/N]: y
Downloading Packages:
(1/4): libmpeg3-utils-1.8-1.fc10.x86_64.rpm | 19 kB 00:00
(2/4): bitstream-vera-fonts-1.10-8.noarch.rpm | 345 kB 00:00
(3/4): cinelerra-cv-2.1-21.git20081103.fc10.x86_64.rpm | 6.3 MB 00:05
(4/4): cinelerra-cv-debuginfo-2.1-21.git20081103.fc10.x8 | 9.6 MB 00:11
--------------------------------------------------------------------------------
Total 688 kB/s | 16 MB 00:24
warning: rpmts_HdrFromFdno: Header V3 DSA signature: NOKEY, key ID 5b01f801
kwizart/gpgkey | 1.7 kB 00:00
Importing GPG key 0x5B01F801 "Nicolas Chauvet (kwizart) " from /etc/pki/rpm-gpg/RPM-GPG-KEY-kwizart
Is this ok [y/N]: y
Running rpm_check_debug
Running Transaction Test
Finished Transaction Test
Transaction Test Succeeded
Running Transaction
Installing : libmpeg3-utils 1/4
Installing : bitstream-vera-fonts 2/4
Installing : cinelerra-cv-debuginfo 3/4
Installing : cinelerra-cv 4/4

Installed:
cinelerra-cv.x86_64 0:2.1-21.git20081103.fc10
cinelerra-cv-debuginfo.x86_64 0:2.1-21.git20081103.fc10

You're done!
*** end update ***

Building from Source
Though editing video on Linux is never easy, I'm happy to say that Fedora 10 is finally stable, after I've resolved or worked around the various bugs I've encountered.

I built Cinelerra from the CVS repository (not Heroine Warrior's) on Fedora 10 x86-64 about a month and a half ago, but haven't had time to post the steps. I can say I've put the Fedora 10 build through its paces by editing all different formats in the context of 1080p video. I will add the caveat that Cinelerra is very choosy about the formats it likes, as shown in my testing results below:

* Note that I haven't tested all combinations of containers and compression schemes, but this is a good first step

The steps are the same as the steps I ran to build Cinelerra on Fedora 9. Though this post will be rather short, consult my Fedora 9 post for all the details. FYI - the Fedora 9 system and Cinelerra build was so fraught with problems that I opted to move on to Fedora 10. I suggest you do the same.

Detail
The below steps should all be run as "root" or sudo
1) install Fedora 10
I usually select the Developer's package, as it will include many of the developer libraries necessary to build Cinelerra from source. Be aware that this install is rather large, weighing in at around 7GB.

Update 2008/02/17
After reviewing the storage consuming "Developer" install, I decided to build out a "Custom" install of Fedora. The base + Cinelerra dependencies yielded a slimmer install, at about 3.5GB.

However, for ease of use, it is probably easier to go ahead and install the "Developer" install. I did not do this, and even with all the Cinelerra dependencies checking out as "Found", I encountered three problems:
1) g++ was missing (go ahead and do "yum install gcc-c++" to resolve this)
2) libXv-devel was missing (the Cinelerra make process failed on a libxv header file)
3) libXxf86vm-devel was missing (the Cinelerra process failed on "/usr/bin/ld cannot find -lXxf86vm")

Oh, the fun we have!
*** end update ***

2) add the RPM Fusion repository for yum
http://rpmfusion.org/Configuration

3) install the dependencies for Cinelerra
For this step, I've provided a script below that installs all dependent programs for a Cinelerra installation from two repos: Fedora base and RPM Fusion.

Paste the below text into a file, save it and run it as a script. Don't forget to "chmod a+x yourFile" in order to make your script executable. The script will install all the dependencies in order to build Cinelerra
yum install gsm-devel \
libvorbis* \
libogg* \
libtool* \
libtheora* \
libpng* \
libjpeg* \
libtiff* \
esound* \
audiofile* \
libraw1394* \
libavc1394* \
freetype* \
fontconfig* \
nasm \
e2fsprogs* \
OpenEXR* \
fftw \
fftw-devel \
libsndfile* \
libiec61883* \
libdv* \
libquicktime \
ffmpeg \
xvidcore* \
lame \
lame-devel \
a52* \
faad2* \
x264* \
mjpegtools* \
faac* \
vlc*


4) get the Cinelerra source
git clone git://git.cinelerra.org/j6t/cinelerra.git cinelerra_source

5) in the Cinelerra source directory, run ./autogen.sh

6) in the Cinelerra source directory, run ./configure

7) As long as configure shows no errors, go ahead and run "make"

8) As long as make showed no errors, run "make install"

That should be it. Again, consult my Fedora 9 Cinelerra install post for more detail on these steps.

Lastly, you could avoid the whole build process and just use my Fedora 10, x86-64 VMware virtual machine, about 3GB, here:
Fedora10 VM

Please drop me a line and let me know how it goes..love to hear from you.

Good luck,
The Mule

Saturday, February 07, 2009

the dark of winter has me in its grasp

The Mule has been working long hours for himself and you, valued video compatriots!

That sounds positive, as it should be. Though in truth, I am feeling less positive than that message implies. Personal and professional life has got me down, but is par for the course these days. Oh well. A pithy quote to pick myself up would be rather nice here. Instead, let me regale you of the past weeks activities, as some of the tribulations may help individuals in similar need.

Sh*t Storm
This week, as I look back at my notes, I see a hailstorm of problems that I've dealt with:
-Fedora 10, x86-64 spontaneous system lockups/reboots (workaround: noapic on kernel cmd line)
-pulseaudio screwing up my audio
-usb keyboard stops working (workaround: disable keyboard acceleration)
-Gnome session saving broken (the workaround seems more of a pain than its worth)
-1080p editing eats RAM! (bought more RAM)
-Belkin firewire card causing reboots
-I didn't order my RAM in matched pairs, so I'm stuck waiting until Monday for RAM! (finally got it!)
-Evolution has trouble fetching mail from Comcast's POP servers, so I've reverted to use Pine (now "Alpine")

Needless to say, my productivity dropped and frustration was running high.

The Good News
Knock on wood, I think I was able to workaround the spontaneous reboots using "noapic" boot option to the kernel. Whereas the box was rebooting every six hours, now it has been up a full two days without a reboot! Of course, this isn't a true fix and I will have to submit a bug to the Fedora team. And the other problems still exist.

Most importantly, I've discovered a new scheme for solid, fast 1080P editing in Cinelerra:
1) convert Canon 5D video to MPEG2-TS
2) import into Cinelerra
3) render to any format you need

A Couple of Options
In my initial post on editing Canon 5D video, I found that the easiest way for me to get content from the Canon 5D into Cinelerra was using a conversion to MJPEG. However, the drawback with using mjpeg is that the image quality is lacking. Specifically, the output is darker than the original content. So over the past week, I found two solutions to convert the beautiful output of the Canon:

1) convert to H264 using this two pass string:
#CONVERT CANON USING H264, pass 1
ffmpeg -y -i INPUT.MOV -an -v 1 -threads 8 -vcodec libx264 -aspect 1.7777 -b 9000k -bt 7775k -refs 1 -loop 1 -deblockalpha 0 -deblockbeta 0 -parti4x4 1 -partp8x8 1 -me full -subq 1 -me_range 21 -chroma 1 -slice 2 -bf 0 -level 30 -g 300 -keyint_min 30 -sc_threshold 40 -rc_eq 'blurCplx^(1-qComp)' -qcomp 0.7 -qmax 51 -qdiff 4 -i_qfactor 0.71428572 -maxrate 10000k -bufsize 2M -cmp 1 -f mp4 -pass 1 /dev/null

#CONVERT CANON USING H264, pass 2
ffmpeg -y -i INPUT.MOV -v 1 -threads 8 -vcodec libx264 -aspect 1.7777 -b 9000k -bt 7775k -refs 1 -loop 1 -deblockalpha 0 -deblockbeta 0 -parti4x4 1 -partp8x8 1 -me full -subq 1 -me_range 21 -chroma 1 -slice 2 -bf 0 -level 30 -g 300 -keyint_min 30 -sc_threshold 40 -rc_eq 'blurCplx^(1-qComp)' -qcomp 0.7 -qmax 51 -qdiff 4 -i_qfactor 0.71428572 -maxrate 10000k -bufsize 2M -acodec libfaac -ab 160k -ar 48000 -ac 2 -cmp 1 -f mp4 -pass 2 OUTPUT.mp4


Now, this H264 content is beautiful, will import into Cinelerra and is editable. However, I found that when I went to render the final output, four minutes of the 1080p, H264 content took SIX HOURS to render!! That is unacceptable. I believe the lengthy render time has something to do with the color space or internal conversion that Cinelerra is doing. This bears further research.

If you're not familiar with H264 (x264 libraries on Linux), here's some useful H264 reference material.

2) convert to MPEG2-TS

Converting Canon to 1080p, MPEG2-TS
Now, there are a few steps here.

a. Take a file from the Canon and use ffmpeg to pass a lossless yuv4mpegpipe stream into mpeg2enc, with the result a video stream with no audio:
ffmpeg -i INPUT.MOV -threads 8 -s 1920x1088 -f yuv4mpegpipe - | mpeg2enc --multi-thread 8 --verbose 0 --aspect 3 --format 13 --frame-rate 5 --video-bitrate 24000 --nonvideo-bitrate 384 --interlace-mode 0 --force-b-b-p --video-buffer 448 --video-norm n --keep-hf --no-constraints --sequence-header-every-gop --min-gop-size 6 --max-gop-size 6 -o OUTPUT.m2v

Next, render out the audio:
ffmpeg -y -i INPUT.MOV -acodec mp2 -ar 44100 -ab 256k -ac 2 OUTPUT.m2a

Using mplex, mux the video and audio streams together:
mplex -f 3 -b 2000 OUTPUT.m2a OUTPUT.m2v -o OUTPUT.ps

Using VLC, convert the MPEG2-PS into an MPEG2-TS:
cvlc OUTPUT.ps --sout '#duplicate{dst=std{access=file,mux=ts,dst="OUTPUT.m2t"}}' vlc://quit

Update 2009/02/13
I've found that VLC is not writing proper keyframes at the beginning of the converted MPEG-PS video output from mplex. This is only for 1080p video. The VLC command for 720p video still works. For the 1080p, I've found a workaround using our savior, ffmpeg:
ffmpeg -y -i OUTPUT.ps -acodec copy -f mpegts -qscale 1 OUTPUT.m2t
*** end update ***

I used this method to output a new version of my Water video from Cinelerra to Vimeo here:
/2009/01/water-new-canon-5d-video.html

The quality and the colors are definetly improved upon over the old version. However, the larger file size is a drawback (479MB for 4m16s of video). So I'd like to get the H264 output without compression artifacts during the scenes with a lot of motion. So now its time to figure that out. Erg.

In general though, I think this is some good news!

Until the next time,
the mule

Friday, January 30, 2009

high quality h264 output

For the last few years, I've been working with 720P content. With the recent purchase of a Canon 5D, I'm now working with 1080P video. Both formats are in 16:9 aspect ratio. 

- 720P video implies a horizontal resolution of 1280 pixels, 1280x720 frame resolution with a total of 921,600 pixels. 

- 1080P video implies a horizontal resolution of 1920 pixels, 1920x1080 frame resolution with a total of 2,073,600 pixels. 

Though this is a blog on Linux video editing, I heartily welcome good information on the often confusing subject of video compression. Here is an article on Apple's site that conveys the basic information you'll need to understand about encoding H264 videos: http://www.apple.com/quicktime/tutorials/h264.html 

As I work to produce higher quality video, one of the things I've thought about is the possibility of getting my material aired on cable TV. So the Broadcast Standards discussion in the above Wikipedia article was very interesting. Also, it occurred to me that I've never properly understood the differences between fields and frames, in the context of telecine, or how film is transferred to video. The Wiki article above clarified it for me and is highly recommended. 

Fields and frames are also useful in the context of how Cinelerra processes video.  

Rendering High Quality H264 video 

It is important to understand aspect ratio in the context of rendering high quality video. Lately, I've been encoding H264 video; specifically, I've been reducing the size of my videos to load onto an iPhone/iTouch. For this task, one of the easiest ways to assure best output quality is to make sure that both the height and width of the rendered output are divisible by 16. 

Without going into the highly technical details of the H.264/MPEG-4 AVC standard or how video compression works, here is a somewhat simplistic analysis: "..it's slightly better to have dimensions divisible by 16, but only because H.264 divides up a picture into 16x16 blocks and if you have a partial block it still has to expend time and bandwidth on it. A size that is an exact multiple of 16 H & V will compress a tiny bit more efficiently, or look slightly better at the same bitrate." -extracted from this conversation that no longer exists.

To make sure the dimensions of my videos are always divisible by 16, you can do the calculations yourself, or take a look at a couple nice charts from Andrew Armstrong's site to help you choose dimensions where the height and width are both divisible by 16. 

To make it easy for you, there are only a few choices: 1536x864 1280x720 768x432 512x288 256x144 This will avoid the dread "width or height not divisible by 16, compression will suffer" error you would see in many H264 encoders.  

Robert Swain's blog (again, no longer exists) was very helpful in determining x264 parameters that yield great looking video. Especially the page regarding ffmpeg presets, though I haven't yet determined what preset is best for my content. The presets listed on Robert's page need to be put into a .ffmpeg directory under your user's home directory. 

Finally, this bitrate calculator for was something useful I stumbled up while researching this post.

-- the Mule --

 
PS 2023/04/16 - Sven from videoproc.com was kind enough to point out that Kino has been discontinued and not actively maintained since 2009, and its official website - Kinodv.org, was also completely shut down and out of service since April, 2021.

Sven recently published a guide talking about what happened to Kino and its official website, and you can check it here,
https://www.videoproc.com/resource/what-happened-to-kinodv.htm
 
Thanks again, Sven!

PS 2021/05/31 - Sven from videoproc.org wrote a fantastic piece on H.264 and H.265/HEVC encoding, I learned a lot from it.  Here's the link:

Sunday, January 25, 2009

stock footage, encoding H264 and the iPod

I had a bit of a rough day yesterday. I started early, about 8am, upgrading my MacBook Pro to Leopard. That process went more or less smoothly and finished around noon. Next, I had taken some video the night before and wanted to create a video that would serve as a table of contents to my archive. Also, this short video might enable me to market some of my source material as stock footage. So it might be a fun little project that shouldn't take long. I should know to never say "shouldn't take too long", because things have a way of blowing up in your face when you don't expect them to.

Converting 1080P directly to an iPod-ready format
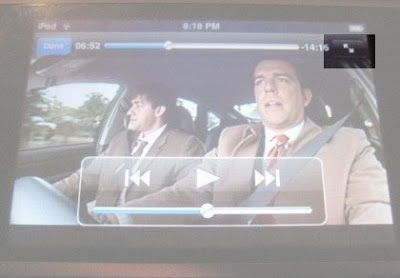
The goal was to convert some 1080P video from my Canon 5D directly into an iPod readable format. However, as I was overly tired on this day, my mind defeated me. Essentially what happened was that after I rendered out the video and loaded it to the iPod, I kept seeing only three quarters of the video. Flummoxed, I thought it must be a rendering problem. Long story short, I found that the problem was not with my rendering parameters, but the fact that my iTouch has a zoom/scaling feature that I forgot about, but had enabled. Here is the little bugger:


So I had spent about three hours until 2am fighting with encoding parameters, re-encoding video, transferring many test files to my Mac and then loading them to the iPod, only to find that the source of the problem was this little stupid icon on the iTouch.

Boy, am I dense.

A Learning Experience
I did learn a few things through my travails this weekend:
1) The el cheapo haze filter on my camera shows a lot of lens flare and needs to be replaced.

2) Don't merge a longer audio stream with a shorter video stream or else you'll be wondering why your 1m45s video is suddenly 9m30s. Duh.

3) When encoding videos to H264 format, always try to use resolutions where the height and width are divisible by 16. This will make the level of compression and quality of the resulting video better. I will post separately about resolutions that are divisible by 16.

4) A dvd video encoded by ffmpeg using -target ntsc-dvd and then downrezzed using the following command syntax will NOT have the proper aspect ratio once loaded onto the iPod:
ffmpeg -y -i ${NAME}.mpg -an -v 1 -threads 8 -vcodec h264 -b 250k -bt 175k -refs 1 -loop 1 -deblockalpha 0 -deblockbeta 0 -parti4x4 1 -partp8x8 1 -me full -subq 1 -me_range 21 -chroma 1 -slice 2 -bf 0 -level 30 -g 300 -keyint_min 30 -sc_threshold 40 -rc_eq 'blurCplx^(1-qComp)' -qcomp 0.7 -qmax 51 -qdiff 4 -i_qfactor 0.71428572 -maxrate 450k -bufsize 2M -cmp 1 -s 720x480 -f mp4 -pass 1 /dev/null

ffmpeg -y -i ${NAME}.mpg -v 1 -threads 8 -vcodec h264 -b 250k -bt 175k -refs 1 -loop 1 -deblockalpha 0 -deblockbeta 0 -parti4x4 1 -partp8x8 1 -me full -subq 6 -me_range 21 -chroma 1 -slice 2 -bf 0 -level 30 -g 300 -keyint_min 30 -sc_threshold 40 -rc_eq 'blurCplx^(1-qComp)' -qcomp 0.7 -qmax 51 -qdiff 4 -i_qfactor 0.71428572 -maxrate 450k -bufsize 2M -cmp 1 -s 720x480 -acodec aac -ab 160k -ar 48000 -ac 2 -f mp4 -pass 2 -threads 8 ${NAME}.mp4


So don't try that at home, kids.

I had previously been using this string of encoding parameters to encode a video of my band rehearsals. The encode was from a DVD source file, so perhaps I will just use the 1080P as source going forward. I will have to test this out first. Strangely, the conversion of the audio from AC3 format had audible hiccups from time to time. Since this process was working fine on Fedora 7, perhaps this is just an issue with Fedora 10.

Downrezzed 1080P Video Ready for the iPod
The following two pass Cinelerra encoding parameters via yuv4mpeg stream worked well to produce a high quality video from 1080P source. In short, you will do two renders from a YUV4MPEG stream:
render 1: the pipe to /dev/null in order to create the optimization log
render 2: the pipe to create the file

#CINELERRA YUV4MPEG RENDER 1
ffmpeg -f yuv4mpegpipe -y -i - -an -v 1 -threads 8 -vcodec libx264 -b 1000k -bt 775k -refs 1 -loop 1 -deblockalpha 0 -deblockbeta 0 -parti4x4 1 -partp8x8 1 -me full -subq 1 -me_range 21 -chroma 1 -slice 2 -bf 0 -level 30 -g 300 -keyint_min 30 -sc_threshold 40 -rc_eq 'blurCplx^(1-qComp)' -qcomp 0.7 -qmax 51 -qdiff 4 -i_qfactor 0.71428572 -maxrate 1000k -bufsize 2M -cmp 1 -s 512x288 -f mp4 -pass 1 /dev/null

#CINELERRA YUV4MPEG RENDER 2

ffmpeg -f yuv4mpegpipe -y -i - -i /mnt/videos/projects/2009_01_23/nightUrbanIndustrialIpod.mp3 -v 1 -threads 8 -vcodec libx264 -b 1000k -bt 775k -refs 1 -loop 1 -deblockalpha 0 -deblockbeta 0 -parti4x4 1 -partp8x8 1 -me full -subq 6 -me_range 21 -chroma 1 -slice 2 -bf 0 -level 30 -g 300 -keyint_min 30 -sc_threshold 40 -rc_eq 'blurCplx^(1-qComp)' -qcomp 0.7 -qmax 51 -qdiff 4 -i_qfactor 0.71428572 -maxrate 1000k -bufsize 2M -cmp 1 -s 512x288 -acodec libfaac -ab 160k -ar 48000 -ac 2 -f mp4 -pass 2 -threads 8 %

I chose a resolution of 512x288 because:
1) the aspect ratio is the same as my 1080P source video, 16:9 (1.777)
2) both the height and width are divisible by 16
3) there were no errors and it comes out looking great on the iPod

Rendering Parameters for a High Quality Vimeo Upload
Finally, I was able to output an H264 video at 1920x1080 that looks great in Vimeo. Psych! I was able to remove the ugly bottom bar seen in Vimeo from my previous post. Here is the two-pass encoding method that I used from Cinelerra. Two notes:
1) the two passes are YUV4MPEG stream renders from Cinelerra using FFMPEG and will need to be run as individual renders in Cinelerra.
2) the second pass muxes (combines) a pre-rendered audio stream with the video stream. So you'll need to render that audio file first.

Here is your first render command string (the first pass of the two-pass) that will create the optimization log:
#CINELERRA RENDER PASS1
ffmpeg -f yuv4mpegpipe -y -i - -an -v 1 -threads 8 -vcodec libx264 -aspect 1.7777 -b 9000k -bt 7775k -refs 1 -loop 1 -deblockalpha 0 -deblockbeta 0 -parti4x4 1 -partp8x8 1 -me full -subq 1 -me_range 21 -chroma 1 -slice 2 -bf 0 -level 30 -g 300 -keyint_min 30 -sc_threshold 40 -rc_eq 'blurCplx^(1-qComp)' -qcomp 0.7 -qmax 51 -qdiff 4 -i_qfactor 0.71428572 -maxrate 10000k -bufsize 2M -cmp 1 -f mp4 -pass 1 /dev/null


Here is the second render command that takes advantage of the optimization log created in the first-pass render. I rendered an audio file of my project earlier, so this second command also combines that audio file with the video for my final result:
#CINELERRA RENDER PASS2
ffmpeg -f yuv4mpegpipe -y -i - -i /mnt/videos/projects/blog/waterSmall.mp3 -v 1 -threads 8 -vcodec libx264 -aspect 1.7777 -b 9000k -bt 7775k -refs 1 -loop 1 -deblockalpha 0 -deblockbeta 0 -parti4x4 1 -partp8x8 1 -me full -subq 1 -me_range 21 -chroma 1 -slice 2 -bf 0 -level 30 -g 300 -keyint_min 30 -sc_threshold 40 -rc_eq 'blurCplx^(1-qComp)' -qcomp 0.7 -qmax 51 -qdiff 4 -i_qfactor 0.71428572 -maxrate 10000k -bufsize 2M -acodec libfaac -ab 160k -ar 48000 -ac 2 -cmp 1 -f mp4 -pass 2 %


I think the quality is bloody AWESOME! Take a gander:

2009/01/23: night, urban, industrial from crazed mule on Vimeo.

Conclusion
Through pain, there can sometimes be the brighter side. In this case, I learned a few things. In retrospect, I may have chosen my production company's name correctly. A mule is one stubborn beast.

Related to crazed mules, here is a story I stumbled upon the other day you might find funny:
The Day the Mules Went Crazy

The Mule

Reference
H264 Encoding
FFMPEG HowTo

Monday, January 12, 2009

Water, a new Canon 5D video

After a couple of weeks of gathering content, I completed my first real Cinelerra project using the 1080P output from my brand new Canon EOS 5D Mark II.

This camera outputs some gorgeous video as I showed in my last post. Now I have to learn how to shoot with it!

The Project
My goal with this short production was:
1) to show the capabilities of the camera
2) to prove that Cinelerra was up to the task of editing 1080P content
3) to output the final results to different output formats (media player, Vimeo, back into Cinelerra)

I'm a hobbyist, so I don't have a budget and "script" like Vincent Laforet. However, I like to compile scenes and organize them with musical accompaniment in thoughtful ways that are (hopefully) enjoyable to the viewer.

The Images
Since I am not a professional photographer, I did not have a slew of lenses before I bought the cam. I only used two lenses that I recently bought for this video:
Canon EF 24-105mm f/4 L IS USM Lens
Canon EF 50mm f1.4 USM Lens

In regards to the imagery, about half of the shots were taken with a tripod. Where you see shakey video is obviously where I held the cam by hand. You definetly do NOT want to shoot high definition video by hand. It serves to amplify any wobbling present and looks terrible when presented on a high definition television. One thing that saved me was the stabilization provided by the Canon L series zoom lens. It is very effective in dampening bounces, though the stabilization mechanism is loud and is picked up by the camera's poor quality, but usable internal stereo microphone.

I used the 50mm mainly for the indoor shots and the zoom for the outdoor shots. I shot some of the outdoor night shots with the zoom, but then realized that the zoom doesn't do well in low light conditions since it has such a long zoom barrel. So just last week, I bought the 50mm. The 50mm fixed length (prime) lens really makes night shots clear with none of the spotty, dappled artifacts that you see with high ISO night shots. During the video, you'll notice those artifacts on the shot of the ferry.

Note that I used no filters on the shots..what you see in the video is truly what you get with the camera. As I gain expertise with the camera, I look forward to acquiring lenses over the next few years.

The Editing Process
The editing process has been a bit of a challenge, as the native output from the camera does not import cleanly into Cinelerra. Hence, I needed to transcode the native output into something more Cinelerra friendly, which I discuss in earlier posts:
/2009/01/first-edit-canon-5d-mark-ii.html
/2008/11/playing-tokyo-reality-in-1080p.html

I didn't want to revisit the conversion process, so I opted to use the MJPEG conversion command I previously discovered:
ffmpeg -i input.mov -b 3000k -vcodec mjpeg -ab 256k -ar 44100 -acodec libfaac -coder 1 -flags +loop -cmp +chroma -partitions +parti4x4+partp8x8+partb8x8 -subq 5 -me_range 16 -g 250 -keyint_min 25 -sc_threshold 40 -i_qfactor 0.71 output.mov

Once loaded in Cinelerra, I found I had quite a few assets from the last couple weeks of shooting.


If I could have one improvement made to the software, it would be to add folders to the Media bin in order to better manage assets.

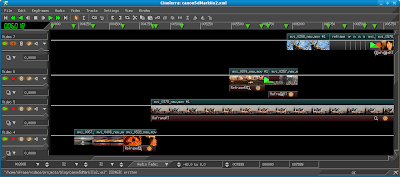
I went about editing the video as normal. I applied only time-based effects, like speeding up or slowing down the video, and transitions. The time-based effects were accomplished by attaching the ReframeRT video effect:


Output
I needed to output files from the project for different purposes:
1) to reimport back into Cinelerra (JPEG or MJPEG Quicktime video)
2) to export/render a format usable with my MG-350HD Media Player
(1080I/1080P MPEG2 video)
3) to export/render a format usable for Vimeo (720P MPEG2)

For #1, I exported a Quicktime for Linux container, using MJPEG compression. I just needed the video, so I had no audio on the export. I was able to reimport the resulting file easily into Cinelerra.

For #2, I rendered the video using a YUV4MPEG pipe. I needed to adjust the pipe command to export a different format and higher video bitrate.
mpeg2enc --verbose 0 --aspect 3 --format 13 --frame-rate 4 --video-bitrate 24000 --nonvideo-bitrate 384 --interlace-mode 0 --force-b-b-p --video-buffer 448 --video-norm n --keep-hf --no-constraints --sequence-header-every-gop --min-gop-size 6 --max-gop-size 6 -o %

Using mplex, I then combined the video stream with an existing audio track to an MPEG2 Program Stream:
mplex -f 3 -b 2000 canon5d.m2a canon5d.m2v -o canon5d.ps

Finally, I converted the program stream to an MPEG2 Transport Stream using vlc:
cvlc canon5d.ps --sout '#duplicate{dst=std{access=file,mux=ts,dst="canon5d.m2t"}}' vlc:quit

For #3, I reduced the 1080i/p output to 720P using FFMPEG:
ffmpeg -i canon5d.m2t -target ntsc-dvd -s 1280x720 -qscale 1 -threads 8 canon5d.mpg

Update 2008/01/13
I hadn't noticed before, but after I uploaded the 720P file to Vimeo, there was a little bit of a line on the bottom of the video. I am going to have to revisit the edit to make sure I didn't mess something up.
*** end update ***

I think the quality of the output can definitely be improved. However, I am glad that I was able to output to formats usable across different platforms (HDTV/Internet/Linux-Cinelerra).

Update 2008/02/08
I've been working on improving the quality of the output from Cinelerra. Specifically, instead of using MJPEG source files (the first conversion from the cam), I'm converting the Canon's video to MPEG2-TS. The MPEG2-TS format has very nice quality and edits quickly in Cinelerra. Here's the full skinny:
/2009/02/dark-of-winter-has-me-in-its-grasp.html
*** end update ***

In Sum
Dealing with a new media format in Linux and Cinelerra is never easy. But if you have patience, it is very satisfying to get a project done that makes your friends say "Wow" or have a laugh.

the mule

Saturday, January 03, 2009

Canon 5D Mark II video: Cinelerra edit

Well folks, I got myself quite a present for Christmas: the Canon EOS 5D Mark II:
http://www.usa.canon.com/consumer/controller?act=ModelInfoAct&fcategoryid=139&modelid=17662
Amazon: Canon EOS 5D Mark II

I've acquired a bit of video over the first few days with the cam. Now let's make sure I can edit the bloody stuff in Cinelerra! :)

Update 1/14/2009
I've done a full edit session with the output of the 5D. Lovely!
*** end update ***

I've found the following process works pretty well.

1) Convert video to a Cinelerra-usable format
As I explained in one of my earlier posts, mjpeg seems a good format to convert the H264 output of the cam:
[mule@ogre 2008_12_26]$ ffmpeg -i MVI_0072.MOV -b 3000k -vcodec mjpeg -ab 256k -ar 44100 -acodec libfaac -coder 1 -flags +loop -cmp +chroma -partitions +parti4x4+partp8x8+partb8x8 -subq 5 -me_range 16 -g 250 -keyint_min 25 -sc_threshold 40 -i_qfactor 0.71 mvi_0072.mov

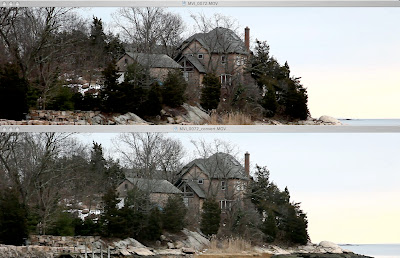
Here's an image that compares the original, Canon saved H264 video to the MJPEG conversion:


Pretty close, eh? The MJPEG video seems a little lighter and you can see more detail, though the colors are a little washed out.

2) Import into Cinelerra
Unlike the H264 format the Canon saves, the MJPEG conversion imports cleanly into Cinelerra without error messages. Also, on my dual, quad core Dell running Fedora 10, I get about 18fps playing back the raw video. Nice.

3) Render to YUV4MPEG stream as H264 video
I do this step in two parts:

a. Render the audio
The Canon stores its audio in 44Khz, 16-bit PCM format. I rendered out an MPEGI, Layer2 audio file:
--------------------------------------------
Input File : 'stdin' 44.1 kHz

Output File: '/mnt/videos/projects/2008_12_26/audioTrack.m2a'

256 kbps MPEG-1 Layer II j-stereo Psy model 1

[De-emph:Off Copyright:No Original:No CRC:Off]
[Padding:Normal Byte-swap:Off Chanswap:Off DAB:Off]
ATH adjustment 0.000000
--------------------------------------------
encode_init: using tablenum 0 with sblimit 27
Hit end of audio data

Avg slots/frame = 768.000; b/smp = 5.33; bitrate = 256.000 kbps
Render::run: Session finished.


b. Render a YUV4MPEG stream. Using the following pipe, I combine the audio track that was output in the previous step with the video that is being rendered:
ffmpeg -f yuv4mpegpipe -y -i - -i /mnt/videos/projects/2008_12_26/audioTrack.m2a -b 3000k -vcodec libx264 -ab 256k -ar 44100 -acodec libfaac -coder 1 -flags +loop -cmp +chroma -partitions +parti4x4+partp8x8+partb8x8 -subq 5 -me_range 16 -g 250 -keyint_min 25 -sc_threshold 40 -i_qfactor 0.71 %

Step B is very similar to the advanced rendering technique I showed you in the Beginner's Guide to Exporting Video from Cinelerra. Here's how the render looks in a terminal window:
Input #0, yuv4mpegpipe, from 'pipe:':
Duration: N/A, bitrate: N/A
Stream #0.0: Video: rawvideo, yuv420p, 1920x1080, 30.00 tb(r)
Input #1, mp3, from '/mnt/videos/projects/2008_12_26/audioTrack.m2a':
Duration: 00:00:28.42, start: 0.000000, bitrate: 255 kb/s
Stream #1.0: Audio: mp2, 44100 Hz, stereo, s16, 256 kb/s
Output #0, mp4, to '/mnt/videos/projects/2008_12_26/mvi_0072_h264.mp4':
Stream #0.0: Video: libx264, yuv420p, 1920x1080 [PAR 1:1 DAR 16:9], q=2-31, 3000 kb/s, 30.00 tb(c)
Stream #0.1: Audio: libfaac, 44100 Hz, stereo, s16, 256 kb/s
Stream mapping:
Stream #0.0 -> #0.0
Stream #1.0 -> #0.1
[libx264 @ 0x1ec6200]using SAR=1/1
[libx264 @ 0x1ec6200]using cpu capabilities: MMX2 SSE2Fast SSSE3 Cache64
frame= 852 fps= 5 q=5.0 Lsize= 18223kB time=28.35 bitrate=5265.6kbits/s
video:17680kB audio:526kB global headers:0kB muxing overhead 0.092246%
[libx264 @ 0x1ec6200]slice I:4 Avg QP:27.33 size: 74266
[libx264 @ 0x1ec6200]slice P:848 Avg QP:28.42 size: 21000
[libx264 @ 0x1ec6200]mb I I16..4: 61.4% 0.0% 38.6%
[libx264 @ 0x1ec6200]mb P I16..4: 16.9% 0.0% 2.2% P16..4: 28.4% 8.9% 1.0% 0.0% 0.0% skip:42.6%
[libx264 @ 0x1ec6200]final ratefactor: 35.54
[libx264 @ 0x1ec6200]SSIM Mean Y:0.9495821
[libx264 @ 0x1ec6200]kb/s:5099.9
Render::run: Session finished.


The Result
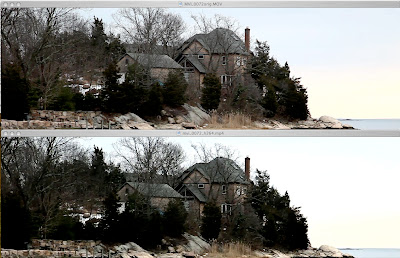
Comparing the resulting video, the quality seems acceptable, though a bit dark and drained of color in comparison to the original. Notice the removal of the color bands in the sky:


That's a bit of a bummer. I am going to have to investigate how to improve the quality, especially the color.

However, you can't argue with the efficiency of the file size of the H264. Here's a comparison of all three files:
-rw-r--r--    1 mule  ogre       138M Jan  3 16:04 MVI_0072orig.MOV (ORIGINAL)
-rw-r--r-- 1 mule ogre 164M Jan 3 16:02 MVI_0072_convert.MOV (MJPEG CONVERSION)
-rw-r--r-- 1 mule ogre 17M Jan 3 20:02 mvi_0072_h264.mp4 (H264 FINAL)

All in all, its still pretty cool.

Here is the video on Vimeo:
http://vimeo.com/2711794

Since I'm on Fedora, the Vimeo uploader seems to hang. So for Fedora (and I'm sure other Linux distributions) uploads seem to work better using the Basic Uploader:
http://www.vimeo.com/upload/video/basic
Thanks Raffa!

Keep you posted,
The Mule

Saturday, December 20, 2008

Cinelerra render compatibility on Fedora 10, x86-64

I spent the last four days building a new Fedora 10, x86-64 server for video editing based on programs available through the RPM Fusion repository. I'll post something soon about that whole process, which required more work and frustration than expected. However, my primary goal was to create a flexible and solid Cinelerra video editing rig.

Update 2009/02/15
Here's a post on how to build Cinelerra from source on Fedora 10, x86-64
*** end update ***

Testing the New System
In order to verify my new build, I needed to test high quality, rendered output from Cinelerra. More specifically, I wanted to test formats that required no external multiplexing (muxing). This will save me time in the future.

Assumptions
Also, note the test will be conducted against a larger resolution, 720P project. This will influence the playback ability of some of the programs.

Testing Procedure
During the testing phase, I was able to put Cinelerra's batch processing feature to use. This is very nice if you need to render large masses of files. Especially nice if you want to repeat or standardize that process across different Linux distributions.

Thinking more about this, it might be a boon to the cvs.cinelerra.org community if I made the XML of the batch list available to the community. That way, we could standardize the testing of output on different Linux distributions. At the end of the day, we could say things like "mplayer on SUSE 11 doesn't playback a 720P Quicktime rendered from Cinelerra that uses MPEG4 video compression with AAC audio encoding. However, that same file does work in mplayer on Fedora 10." So, it would be helpful to the QA process. I will bring this up as an idea to the community. Here is my latest effort at making the batch render feature part of the Cinelerra testing process:
http://crazedmuleproductions.blogspot.com/2010/01/batch-render-redux.html

Source File
The original video is 21 seconds long and is in 720P format, 1280x720 at 29.97fps.

In order to test the new operating system, I exported various combinations of audio and video formats, choosing fixed bitrates that seemed appropriate given the resolution of the source project:


I tested the output in standard Linux media players (vlc/mplayer/ffplay/totem), as well as reimported them into Cinelerra.

Results
In order to make it easy for people to comprehend the results, I've put together this graphic:

Using a stop light analogy, green means that the file plays with no problem. So, if you want to know the "best" or "good", compatible formats to use in Linux media players and Cinelerra, go for the green. Red means the file doesn't play at all. And yellow means that the file plays, but plays with some problem. For instance, the audio may be out of sync or stutters, or the video plays but maybe at the wrong resolution. Be advised that my system is fairly powerful, so your mileage may vary:
* Dell SC1430, dual quad core, 1.6Ghz, 2GB RAM
* RAID0 sys/working drive, RAID1 storage drive
* NVidia 8800GT video card

Observations
JPEG and MPEG-4 Quicktimes seem to work well and have the side benefit of being re-usable within Cinelerra. MPEG-4 rendering is unbelievably quick. H264 direct out of Cinelerra seems not to work at all in most cases. There was a tie for the file type with the widest compatibility among the chosen media players: Ogg/Vorbis and surprisingly, Microsoft MPEG4 using twos complement audio.

It is interesting to note the varying file sizes of the output from Cinelerra: Besides the uncompressed formats, Motion JPEG A creates the largest file sizes, while either of the MPEG4 formats are the most space efficient. Given the chart above, this is an important data point that video editors will be able to consider when selecting a particular format.

Conclusion
Though it is powerful, Cinelerra has been somewhat crippled by new users' ability to get usable content out of Cinelerra. I think this chart will improve that situation, even if it has only been proven out on Fedora 10, 64-bit. In that light, it would be interesting to see the same chart from an alternate Linux distribution. With my source Cinelerra and batch process EDL files, it should be easy to replicate the procedure on another system. I'd be happy to share them if an interested party wants to drop me a line.

Finally, I realize there are some missing file types like avi container, MPEG2 program and transport stream formats. The MPEG2 formates generally require external muxing and thus, were off the list for this test. However, I will try to test the at some point.

enjoy,
The Mule

Friday, December 12, 2008

Fedora 9 Cinelerra deps, ATrpms note

Some people have complained of incompatibilities with Fedora and ATrpms. Instead, they recommend using the better supported RPMFusion, the repository that has merged all the other repositories for Fedora. This is a good idea; however, I have not yet had a chance to test the Fusion RPMs.

Update 2009/02/15
Here's a post on how to build Cinelerra from source on Fedora 10, x86-64
*** end update ***

I'm using ATrpms for a small number of Cinelerra dependencies, sixteen programs in all (listed below). I've given my new Fedora 9 system a fairly good break in test and have not found any issues arising from my use of ATrpms.

12/17/2008 Note regarding my use of ATrpms
So often in this topsy-turvy world of new distributions and funky repositories, the moment you write that an install is without problems, that old devil fate creeps up on you and proves you wrong.

Such is the case with my recent Cinelerra build from source using ATrpms dependencies. The whole day last Sunday was shot with a nasty Cinelerra hang that was only resolved when I removed the ATrpms repo programs, installed the RPM Fusion repository and recompiled Cinelerra. I'll follow up with a more detailed explanation but for now, The Mule would like to humbly apologize to anyone he led astray by recommending ATrpms.

On the positive side, unexpected problems usually lead one to find new solutions and better ways of doing things. So that's the upside of this mess.
end note

Here are the packages that I installed from ATrpms (and subsequently removed) on my Fedora 9, x86-64 system:

Name : ffmpeg
Version : 0.4.9
Release : 28_r15845.fc9
--
Name : fftw
Version : 3.1.2
Release : 11.fc9
--
Name : fftw-devel
Version : 3.1.2
Release : 11.fc9
--
Name : freetype-static
Version : 2.3.5
Release : 4.fc9.cubbi2
--
Name : lame
Version : 3.98.2
Release : 19.1.fc9
--
Name : libdvdcss
Version : 1.2.10
Release : 5.fc9
--
Name : libdvdcss-devel
Version : 1.2.10
Release : 5.fc9
--
Name : libdvdcss2
Version : 1.2.10
Release : 5.fc9
--
Name : libdvdnav4
Version : 0.1.10
Release : 2.fc9
--
Name : libraw1394
Version : 1.3.0
Release : 8_11.fc9
--
Name : libraw1394
Version : 1.3.0
Release : 8_11.fc9
--
Name : libraw1394-devel
Version : 1.3.0
Release : 8_11.fc9
--
Name : libraw1394_8
Version : 1.3.0
Release : 8_11.fc9
--
Name : libraw1394_8
Version : 1.3.0
Release : 8_11.fc9
--
Name : x264
Version : 0.65
Release : 8_20081108.2245.fc9
--
Name : x264-devel
Version : 0.65
Release : 8_20081108.2245.fc9


I've put my system through the following tests:
-edit 720P project in Cinelerra
-via Cinelerra's YUV4MPEG streamer and mpeg2enc, export 720P resolution MPEG2 video
-from Cinelerra, export MPEG, Layer II audio
-using mplex, combine MPEG2 video and MPEG Layer II audio stream into MPEG-PS
-using VLC, convert program stream into MPEG-TS
-using FFMPEG, convert transport stream into DVD
-using FFMPEG, convert DVD file into iTunes compatible format

This is my normal workflow. Nothing seems to have broken in this workflow, so I think ATrpms has not effected my particular install.

Again, my apologies if anyone had tried using ATrpms based on my advice.
the mule

Sunday, November 23, 2008

minor problems from new Fedora 9

I'm glad I took the time to rerun my main encoding script, as it showed a number of errors due to changes between Fedora 7 and Fedora 9. The first four I've encountered are specific to VLC; the last couple are problems with the latest FFMPEG install.

VLC Problems
1) permissions issue
This is not necessarily a problem with a change in Fedora, just a problem with how I've reorganized some of my videos to be owned by a different user. When I ran VLC to convert one of the files, I got this error:
[00000436] access_output_file access out error: cannot open `20081123.m2t' (Permission denied)
[00000434] stream_out_standard stream out error: no suitable sout access module for `file/ts://20081123.m2t'


At least the text of the error was not ambiguous..Permission Denied! :) Once I identified the permissions problem and granted appropriate privileges to the file, this message went away. A good option when running VLC is to run it with the -vvv verbose switch in order to get full debug stream on what is going on.

2) command line VLC doesn't accept quit anymore
VLC used to quit properly when my old script used to look like this:
vlc input.ps --sout '#duplicate{dst=std{access=file,mux=ts,dst="output.m2t"}}' vlc:quit

VLC's authors must now be enforcing command line syntax, as there now needs to be two slashes after the colon in the quit directive. So the following works again:
vlc input.ps --sout '#duplicate{dst=std{access=file,mux=ts,dst="output.m2t"}}' vlc://quit

Update 12/13/2008
3) Can't run VLC as root anymore
When I tried to run VLC from a script as root, I got this error:
VLC is not supposed to be run as root. Sorry.
If you need to use real-time priorities and/or privileged TCP ports
you can use vlc-wrapper (make sure it is Set-UID root first and
cannot be run by non-trusted users first).


For security reasons, it is probably better that VLC enforces this. I addressed the issue in two ways:
1) login as a non-privileged user to run VLC
2) if I need to run VLC as root, I will use the "su" command to run the command using a different user's privileges. Using my non-privileged "mule" user, the syntax of the command is something like the below. I am using command line VLC, which is started by "cvlc":
su mule -c "cvlc input.ps --sout '#duplicate{dst=std{access=file,mux=ts,dst=output.mp4}}' vlc://quit"

In either case, I made sure that all my files are owned by or at least accessible by the user that runs VLC.
end update

4) Some obscure dbus error
[00000415] inhibit interface error: Failed to connect to the D-Bus session daemon: Did not receive a reply. Possible causes include: the remote application did not send a reply, the message bus security policy blocked the reply, the reply timeout expired, or the network connection was broken.

Looking up this error in Google points to a number of threads regarding the reinstall of dbus message bus. However, this error doesn't inhibit my ability to convert video, so I'm not going to do anything about this error right now.

5) a bunch of other GUI related errors
[00000415] main interface error: no suitable interface module [00000001] main libvlc error: interface "inhibit,none" initialization failed
[00000001] main libvlc: Running vlc with the default interface. Use 'cvlc' to use vlc without interface.
No protocol specified
[00000421] qt4 interface error: Could not connect to X server
No protocol specified
[00000421] skins2 interface error: Cannot open display
[00000421] skins2 interface error: cannot initialize OSFactory


Even with these errors, VLC does start, though in remote control mode only. You can quit out of this mode by typing "quit" after the line that reads:
Remote control interface initialized. Type `help' for help.

Since I am running VLC as part of a command script, I changed the script to use the command-line version of VLC, CVLC as below:
cvlc input.ps --sout '#duplicate{dst=std{access=file,mux=ts,dst="output.m2t"}}' vlc://quit

Note that the quit directive is still "vlc://quit". Eventually, I do want to run VLC's GUI mode, so I will have to return to fixing this error.

FFMPEG Problems: library naming
Running this FFMPEG command on my shiny new Fedora 9 system:
ffmpeg -i input.mpg -threads 8 -f mov -vcodec mpeg4 -qscale 3 -s 320x180 -r 29.97 -aspect 16:9 -acodec aac -ac 2 -ar 48000 -ab 448k output.mov

Gave me this error:
Unknown encoder 'aac'

Researching on Google led me to this thread, which stated that the proper syntax is to now using the name of the library, libfaac:
http://bbs.archlinux.org/viewtopic.php?id=46958.

The version of FFMPEG that I had been using with Fedora 7 was SVN version 9975. With Fedora 9, that is revised to SVN version 12135. During the interim between the two versions, command syntax now requires full library names.

So using the proper library name 'libfaac' fixed the issue and allowed ffmpeg to continue:
ffmpeg -i input.mpg -threads 8 -f mov -vcodec mpeg4 -qscale 3 -s 320x180 -r 29.97 -aspect 16:9 -acodec libfaac -ac 2 -ar 48000 -ab 448k output.mov

The same error occurred with my command to encode a file to h264 format:
ffmpeg -y -i input.mpg -v 1 -threads 8 -vcodec h264 -b 250k -bt 175k -refs 1 -loop 1 -deblockalpha 0 -deblockbeta 0 -parti4x4 1 -partp8x8 1 -me full -subq 6 -me_range 21 -chroma 1 -slice 2 -bf 0 -level 30 -g 300 -keyint_min 30 -sc_threshold 40 -rc_eq 'blurCplx^(1-qComp)' -qcomp 0.7 -qmax 51 -qdiff 4 -i_qfactor 0.71428572 -maxrate 450k -bufsize 2M -cmp 1 -s 720x480 -acodec libfaac -ab 160k -ar 48000 -ac 2 -f mp4 -pass 2 -threads 8 output.mp4

I received this error:
Unknown encoder 'h264'

The solution was to simply replace 'h264' with 'libx264' in the command line:

Silliness!
the mule

Saturday, November 22, 2008

video distribution and the blogosphere

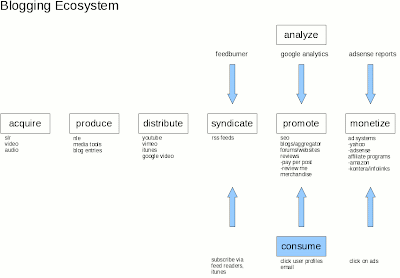
After having this blog for a few years now, I've been thinking about the entire chain of events that occur when producing a video. So I mapped out the different components of this production workflow in relation to distribution and marketing via the blogosphere.

The Blogging Ecosystem
In the clickable map below, I've listed the major steps in the production chain, as well as specific subjects within each step. Go ahead and click on anything in the picture and it will take you to a summary of that particular topic or a direct resource on the web. Some of this is old hat for readers, but it was helpful to see it holistically, as an ecosystem of sorts. The flow represents a way to distribute one's video creations (content) over the web and get some eyes looking at that content.


(the graphic is hotlinked, so click on a subject for further investigation)

Summary
In general, the white boxes represent steps that the producer is responsible for; the blue box represent actions taken by the consumers of the content. The main steps are:
-having an idea for a video and storyboarding (not shown)
-acquiring source content (video/audio/imagery)
-bringing the idea to life via a production workflow
-distributing that video via the web
-syndicating the content via rss feed
-having individuals consume that feed
-monitoring and analyzing the consumption
-promoting and marketing of content
-perhaps making some money one day

Detail
If you click on any part of the graph, you'll be able to dig down further into the resources I've provided. As it will require some explaining, I'll probably do a follow up video to this graphic.

Enjoy!

Friday, November 21, 2008

burning blu-ray discs on Linux

If I actually get a camera that can do 1080p, I'm going to have to have some means of distribution.
Update 2009/01/11
Gosh darnit, I DID get a new cam! Hooray!
*** end update ***

Blu ray seems the best bet. For testing, I'd opt to use the Blu ray rewriteable format, BD-RE.

From a few hours of research, these facts appear:
1) It IS possible to write blu ray data discs via the dvd+rw-tools. See Technical discussion and Burning links below
2) The burning of blu ray video discs to be played in consumer players may be possible in the dvd+rw-tools, but should be definetly possible in the Nero 3 product for Linux (around $25). This bears testing.

*** Update 2010/11/04 ***
Dark Shakiri has created the world's first free blu-ray encoder:
http://x264dev.multimedia.cx/archives/328

From the comments, I hear tell that it actually WORKS too!
*** end update ***

Final Thoughts
Prices are still high: $300-$400 for an internal burner and roughly $10 per disc. Testing these options out will be essential.

the mule

Update 2011/02/27
AVS HD 709 - Blu-ray & MP4 Calibration
*** end update ***

Update 2011/01/04
http://www.x264bluray.com/

Allowed Resolutions/Framerates
*** end update ***

Blu Ray US site
http://www.blu-raydisc.com/bluray_site.htm

Technical discussion of dvd+rw-tools methodology
http://fy.chalmers.se/~appro/linux/DVD+RW/

Burning BD-RE disks with dvd+rw-tools
http://forums.aliensoup.com/showthread.php?t=24180

Untested open source blu ray authoring tools *
http://linux.softpedia.com/get/Multimedia/Video/Blu-ray-video-authoring-tools-28112.shtml
* UDF generator, does not generate ISO9660 structures
Update 1/23/2009
Looks like these tools compile under 32-bit systems, but not 64-bit systems. A user (E Chalaron) got this to work under 32-bit Ubuntu Feisty. Thanks E!
*** end update ***

Nero 3 Linux product
http://club.cdfreaks.com/f104/blu-ray-burning-hw-support-236218/
http://www.burnworld.com/software/cdrburning/linux.htm
http://www.nero.com/enu/linux3.html?NeroSID=75c7543438b27626c11913f2ed0c329e


Recent prices
http://club.cdfreaks.com/f142/blu-ray-blank-media-player-recorder-prices-japan-254787/

Hardware
http://www.addonics.com/support/application_notes/app_hd.asp
LG BE06LU11 Blu-ray
LG GGW-H10N Blu-ray/HD-DVD
LG GBW-H10N Blu-ray
Panasonic SW-5582 Blu-ray

Playing BluRay/HDDVD under Ubuntu
https://help.ubuntu.com/community/RestrictedFormats/BluRayAndHDDVD

Other Options
Perhaps run HD DVD Fab under Wine
http://ubuntuforums.org/showthread.php?t=763837

Google, dammit
http://www.google.com/search?num=100&hl=en&rls=com.microsoft%3Aen-us&q=burn+blu+ray+video+in+linux

Other BluRay references
http://sourceforge.net/projects/blurayauthor/