After about six months in a disabled state, I spent most of yesterday resurrecting my digital audio workstation. It is a 1.8Ghz Pentium IV running Win2K and a host of audio apps, mainly Cubase SX and Reason 2. My main SCSI hard drive, a Western Digital 18300 connected via an Adaptec 29160N PCI card, was a bit flakey and gave me errors on bootup. I resolved them by going into the Adaptec BIOS configuration menu (CTRL-A on boot) and checking the drive for errors. Thankfully, this procedure resolved the errors and I was able to boot successfully into the system.
The next task was to reinstall my M-Audio Delta 66 card. I couldn't find my driver disk, so I downloaded the latest off of their site (http://www.m-audio.com). M-Audio's site is very easy to navigate and I was able to find and install the drivers within a few minutes. The drivers required two reboots, which was somewhat of a pain.
I am going to do a favor for a friend by capturing some old video from VCR, so I installed my old ATI All-in-Wonder Radeon 8500DV. This will allow me to grab video via a composite source, my old VCR. Normally, I'd try this task in Fedora, but I really need to get the capture completed quickly and Win2K seems the quickest route. However, when I put the card in, the box booted, but just gave me a blinking prompt without any BIOS information appearing. Uh boy. I went through the laborious task of yanking all the other cards out of the machine, reconnecting all the IDE cables and trying a different card just to get the BIOS screen to appear. Once this was done, I put the Radeon 8500DV back in, checked the seating of the card and booted up. Thankfully, the machine booted properly this time. But these steps wasted about 45 minutes.
Once the machine booted into Windows, it seemed that I already had the Catalyst drivers installed (http://ati.amd.com/products/catalyst.html ), so the card was recognized right off the bat. This was a nicety after the other problems I've had so far.
With the audio and video hardware finally installed and working, I tried running a basic test of audio input via the Delta 66. When I did this, I found that Cubase SX selected the onboard audio drivers of my ASUS P4S333 motherboard (http://usa.asus.com/products1.aspx?l1=3&l2=0&l3=0&modelmenu=0&share=txt/60), the C-Media CMI8738. Cubase seems to get the primary audio card information from Windows, so I needed to go into the Sound settings in Control Panel to select the Delta 66 as the main audio interface. Once this is done, Cubase then recognizes the card and assigns it to the project. I was very happy to hear noise out of the card and see audio levels flickering in the M-Audio software Monitor-Mixer!
Next step is to get MIDI running with my M-Audio MIDISport 2x2 MIDI interface, with input from the electronic drums and Handsonic and keyboard. I'll try this one tonight. If I have anything interesting to say about this task, I'll let you know, but I'm hoping it will be uneventful.
cheers,
the mule
Monday, August 27, 2007
bringing the digital audio workstation back to life
If this post was useful to you..consider buying me a beer via PayPal!
Even a $1 Draft will keep the Mule happily working..and help pay for equipment upgrades!
Tuesday, August 21, 2007
Hello from On Holiday!
If this post was useful to you..consider buying me a beer via PayPal!
Even a $1 Draft will keep the Mule happily working..and help pay for equipment upgrades!
Sunday, August 05, 2007
screen capture using Cinelerra
Unfortunately, capturing video live into Cinelerra CVS is broken, as of 1/21/2009. However! I tested it out and Cinelerra CAN capture screen activity directly to the timeline! This is a really nice feature.
The basic steps are:
1) go into Preferences -> Recording
2) select the destination File Format and whether you want to capture audio, video or both
3) set Audio In prefs (TwosComplement and keep your sample rate low!)
4) set Video In prefs (MPEG4 worked for me)
5) set Record Driver to Screencapture (set size of captured frame here and FPS)
6) apply your changes
7) press "r" for record and you'll see the Cinelerra Video In box popup with the active display
8) click the record button, which is the red, round button next to Transport: and you'll start recording as noted by the Position
9) click the stop button, which is the white square button next to Transport:
10) select your insertion strategy (I left mine at "Paste at insertion point"
11) click the green checkmark or just hit enter to accept and paste your captured video
If you click the "Monitor Video" radio button, you'll see the part of the screen to be captured. If you have dual monitors, note that you can pan the area of the desktop that you can record by click-dragging the desktop area within the "Monitor Video" window. I stumbled upon that undocumented feature.
The resolution of captured video is proportionate to the speed of your system overall. Thus, faster CPU, high-speed memory and striped hard drives help get you screen captures that are larger in resolution and smoother in playback. But there are other things than hardware upgrades that you can change in Cinelerra in order to increase the relative smoothness of your video capture. By "relative smoothness", I mean decreasing video frame drops and clipped audio samples.
For better performance, do the following:
- record using a lower audio sample rate (22Khz or below)
- record to an uncompressed video format. RGB/RGBA works well for me. I do this because compressed video formats like MPEG4 tend to hog CPU power and thus contribute to video frame drops. Your final output will most likely be a compressed format, so the uncompressed format will only be an intermediary that you will discard. Be careful with uncompressed formats, though! Five minutes of video sucked up about a gigabyte of disk! :)
- limit your mouse movements while recording. Try to use keyboard shortcuts to open, close and move windows
Here's a video of the process:
If this post was useful to you..consider buying me a beer via PayPal!
Even a $1 Draft will keep the Mule happily working..and help pay for equipment upgrades!
Saturday, June 09, 2007
xine: no demuxer plugin available to handle file
I recently installed xine on my Fedora Core 6 virtual machine. Trying to view a file, I get this error:
There is no demuxer plugin available to handle "file xxx"
Usually this means that the file format was not recognized.

After a bit of googling, I found that this error can be caused by a couple things:
1) a corrupted .xine/catalog.cache file
2) a bad xine-libs install
I also learned that you can run "xine-check" to check out your xine installation. Here's the result of my xine-check before fixing things:
[root@localhost ~]# xine-check
Please be patient, this script may take a while to run...
[ good ] you're using Linux, doing specific tests
[ good ] looks like you have a /proc filesystem mounted.
[ good ] You seem to have a reasonable kernel version (2.6.18-1.2798.fc6)
[ good ] intel compatible processor, checking MTRR support
[ good ] you have MTRR support and there are some ranges set.
[ good ] found the player at /usr/bin/xine
[ good ] /usr/bin/xine is in your PATH
[ hint ] No xine-config found. Assuming xine from RPMs
The xine-config script can be used to determine some file locations
used by xine-lib, but you don't have such a script on your system.
However, it looks like you installed xine from the RedHat packages.
So I'll just guess that you are using the standard locations.
If you want me to be sure about those file locations, you can install
the 'xine-lib-devel' package (or 'xine-devel', depend on what packages
you're using, which contains xine-config. However, this package is
not really needed to run xine...
pressto continue...
[ good ] plugin directory /usr/lib/xine/plugins exists.
[ good ] found unknown plugin: *.so
[OUCH!!] There are no input plugins.
xine needs at least one input plugin, but none is installed.
You should probably reinstall xine-lib...
pressto continue...
[OUCH!!] There are no demux plugins.
xine needs at least one demux plugin, but none is installed.
You should probably reinstall xine-lib...
pressto continue...
[OUCH!!] There are no decoder plugins.
xine needs at least one decoder plugin, but none is installed.
You should probably reinstall xine-lib...
pressto continue...
[OUCH!!] There are no video_out plugins.
xine needs at least one video_out plugin, but none is installed.
You should probably reinstall xine-lib...
pressto continue...
[OUCH!!] There are no audio_out plugins.
xine needs at least one audio_out plugin, but none is installed.
You should probably reinstall xine-lib...
pressto continue...
OK! So it looks like I have a few problems. But now, at least, I had two avenues to pursue:
1) delete .xine/catalog.cache
2) reinstall xine and xine-libs
I tried the first option, but to no avail. I got the same error.
Secondly, I reinstalled xine-libs, but still received the same error. Since I've had some yum repository conflicts this weekend, I started thinking that Livna or Dries might be at fault here, as they are my main repositories.
So then, I decided to:
1) remove xine and xine-libs
2) try to install xine without the Livna repos online.
Doing this, I got this error with only the Fedora and Dries repos online:
Error: Missing Dependency: xine-lib = 1.1.4 is needed by package xine-lib-moles
Hmmm. OK, so that didn't work. Let me try the next option:
1) remove xine and xine libs
2) install the Freshrpms repositories
3) rerun the install without Livna, but with Dries and Freshrpms
I installed the Freshrpms repos by using the below URL to start the yum graphical installer widget on the Core 6 desktop:
http://ftp.freshrpms.net/pub/freshrpms/fedora/linux/6/freshrpms-release/freshrpms-release-1.1-1.fc.noarch.rpm
After Freshrpms repos were online, I disabled Livna in my yum install request:
[root@localhost ~]# yum install --disablerepo=livna xine
Loading "installonlyn" plugin
Setting up Install Process
Setting up repositories
freshrpms 100% ========================= 2.1 kB 00:00
Reading repository metadata in from local files
primary.xml.gz 100% ========================= 62 kB 00:00
################################################## 168/168
Parsing package install arguments
...
Dependencies Resolved
=======================================
Package Arch Version Repository Size
=======================================
Installing:
xine i386 0.99.5-1.fc6 freshrpms 2.2 M
Installing for dependencies:
libfame i386 0.9.1-12.fc6.rf dries 227 k
xine-lib-moles i386 1.1.6-1.fc6 freshrpms 1.8 M
Transaction Summary
=======================================
Install 3 Package(s)
Update 0 Package(s)
Remove 0 Package(s)
Total download size: 4.3 M
Is this ok [y/N]: y
Downloading Packages:
(1/3): xine-0.99.5-1.fc6. 100% ========================= 2.2 MB 00:21
(2/3): libfame-0.9.1-12.f 100% ========================= 227 kB 00:01
(3/3): xine-lib-moles-1.1 100% ========================= 1.8 MB 00:17
Running Transaction Test
Finished Transaction Test
Transaction Test Succeeded
Running Transaction
Installing: libfame ######################### [1/3]
Installing: xine-lib-moles ######################### [2/3]
Installing: xine ######################### [3/3]
Installed: xine.i386 0:0.99.5-1.fc6
Dependency Installed: libfame.i386 0:0.9.1-12.fc6.rf xine-lib-moles.i386 0:1.1.6-1.fc6
Complete!
This time, no missing dependency! Looks like Freshrpms had the necessary files! Sweet! Now for the final test, to play a video. Sure enough, my videos played and xine-check found my plugins. Hooray. But yeesh..what a headache!
So, the lesson here is that Fedora dependency resolution can be a tricky thing and that you should keep as few repos in your yum repository list as possible. This will minimize your pain. Though I must admit that, on the whole, the repos are doing a better job than they used to.
Finally, if the options above don't work, try compiling from source:
http://www.xinehq.de/index.php/download
May you all be blessed to work with just one repository. Ha!
Update 2/25/2008
This latest post provides further troubleshooting steps. It lists specific information regarding Xine installs on Fedora 7, x86-64:
/2008/02/xine-install-on-fedora-7-x86-64.html
There is no demuxer plugin available to handle "file xxx"
Usually this means that the file format was not recognized.

After a bit of googling, I found that this error can be caused by a couple things:
1) a corrupted .xine/catalog.cache file
2) a bad xine-libs install
I also learned that you can run "xine-check" to check out your xine installation. Here's the result of my xine-check before fixing things:
[root@localhost ~]# xine-check
Please be patient, this script may take a while to run...
[ good ] you're using Linux, doing specific tests
[ good ] looks like you have a /proc filesystem mounted.
[ good ] You seem to have a reasonable kernel version (2.6.18-1.2798.fc6)
[ good ] intel compatible processor, checking MTRR support
[ good ] you have MTRR support and there are some ranges set.
[ good ] found the player at /usr/bin/xine
[ good ] /usr/bin/xine is in your PATH
[ hint ] No xine-config found. Assuming xine from RPMs
The xine-config script can be used to determine some file locations
used by xine-lib, but you don't have such a script on your system.
However, it looks like you installed xine from the RedHat packages.
So I'll just guess that you are using the standard locations.
If you want me to be sure about those file locations, you can install
the 'xine-lib-devel' package (or 'xine-devel', depend on what packages
you're using, which contains xine-config. However, this package is
not really needed to run xine...
press
[ good ] plugin directory /usr/lib/xine/plugins exists.
[ good ] found unknown plugin: *.so
[OUCH!!] There are no input plugins.
xine needs at least one input plugin, but none is installed.
You should probably reinstall xine-lib...
press
[OUCH!!] There are no demux plugins.
xine needs at least one demux plugin, but none is installed.
You should probably reinstall xine-lib...
press
[OUCH!!] There are no decoder plugins.
xine needs at least one decoder plugin, but none is installed.
You should probably reinstall xine-lib...
press
[OUCH!!] There are no video_out plugins.
xine needs at least one video_out plugin, but none is installed.
You should probably reinstall xine-lib...
press
[OUCH!!] There are no audio_out plugins.
xine needs at least one audio_out plugin, but none is installed.
You should probably reinstall xine-lib...
press
OK! So it looks like I have a few problems. But now, at least, I had two avenues to pursue:
1) delete .xine/catalog.cache
2) reinstall xine and xine-libs
I tried the first option, but to no avail. I got the same error.
Secondly, I reinstalled xine-libs, but still received the same error. Since I've had some yum repository conflicts this weekend, I started thinking that Livna or Dries might be at fault here, as they are my main repositories.
So then, I decided to:
1) remove xine and xine-libs
2) try to install xine without the Livna repos online.
Doing this, I got this error with only the Fedora and Dries repos online:
Error: Missing Dependency: xine-lib = 1.1.4 is needed by package xine-lib-moles
Hmmm. OK, so that didn't work. Let me try the next option:
1) remove xine and xine libs
2) install the Freshrpms repositories
3) rerun the install without Livna, but with Dries and Freshrpms
I installed the Freshrpms repos by using the below URL to start the yum graphical installer widget on the Core 6 desktop:
http://ftp.freshrpms.net/pub/freshrpms/fedora/linux/6/freshrpms-release/freshrpms-release-1.1-1.fc.noarch.rpm
After Freshrpms repos were online, I disabled Livna in my yum install request:
[root@localhost ~]# yum install --disablerepo=livna xine
Loading "installonlyn" plugin
Setting up Install Process
Setting up repositories
freshrpms 100% ========================= 2.1 kB 00:00
Reading repository metadata in from local files
primary.xml.gz 100% ========================= 62 kB 00:00
################################################## 168/168
Parsing package install arguments
...
Dependencies Resolved
=======================================
Package Arch Version Repository Size
=======================================
Installing:
xine i386 0.99.5-1.fc6 freshrpms 2.2 M
Installing for dependencies:
libfame i386 0.9.1-12.fc6.rf dries 227 k
xine-lib-moles i386 1.1.6-1.fc6 freshrpms 1.8 M
Transaction Summary
=======================================
Install 3 Package(s)
Update 0 Package(s)
Remove 0 Package(s)
Total download size: 4.3 M
Is this ok [y/N]: y
Downloading Packages:
(1/3): xine-0.99.5-1.fc6. 100% ========================= 2.2 MB 00:21
(2/3): libfame-0.9.1-12.f 100% ========================= 227 kB 00:01
(3/3): xine-lib-moles-1.1 100% ========================= 1.8 MB 00:17
Running Transaction Test
Finished Transaction Test
Transaction Test Succeeded
Running Transaction
Installing: libfame ######################### [1/3]
Installing: xine-lib-moles ######################### [2/3]
Installing: xine ######################### [3/3]
Installed: xine.i386 0:0.99.5-1.fc6
Dependency Installed: libfame.i386 0:0.9.1-12.fc6.rf xine-lib-moles.i386 0:1.1.6-1.fc6
Complete!
This time, no missing dependency! Looks like Freshrpms had the necessary files! Sweet! Now for the final test, to play a video. Sure enough, my videos played and xine-check found my plugins. Hooray. But yeesh..what a headache!
So, the lesson here is that Fedora dependency resolution can be a tricky thing and that you should keep as few repos in your yum repository list as possible. This will minimize your pain. Though I must admit that, on the whole, the repos are doing a better job than they used to.
Finally, if the options above don't work, try compiling from source:
http://www.xinehq.de/index.php/download
May you all be blessed to work with just one repository. Ha!
Update 2/25/2008
This latest post provides further troubleshooting steps. It lists specific information regarding Xine installs on Fedora 7, x86-64:
/2008/02/xine-install-on-fedora-7-x86-64.html
If this post was useful to you..consider buying me a beer via PayPal!
Even a $1 Draft will keep the Mule happily working..and help pay for equipment upgrades!
Fedora Core 6 virtual Cinelerra machine for VMware
I got a wild hair yesterday and decided to create a Fedora Core 6 VMware virtual machine for VMware Player. This virtual machine (vm) has the latest Cinelerra CVS version 1009 compiled and installed on it, of course, along with a bunch of supporting applications:
avidemux2 flash mplayer vlc xine
I'm thinking the main use for this vm is for render farms. So that someone who has access to a large number of PCs can setup VMware Player or Server.
Here are some instructions on how to install VMware Player on Linux:
http://www.techanswerguy.com/2007/06/vmware-player-install-on-linux-fedora.html
By the way, I believe audio only works using VMware Player, rather than VMware Server. Also, if you try this vm for actual editing, you'll probably get a lot of audio drops unless the machine hosting the virtual guest is very, very powerful (greater than 3.0Ghz single core).
In case you try this vm and get no audio, here's a solution:
http://www.techanswerguy.com/2007/06/vmware-player-no-sound-bad-directsound.html
Also, I've left the default display at 1024x768.
The virtual machine is gzipped and is about a gigabyte in size (1,151,131,294 bytes). Have fun downloading it!
http://www.stormpigs.com/vm/fc6cinelerra.tar.gz
Root password is crazedmule
The nonroot user is "cinelerra" with the password cinelerra
Update 2009/04/03
Update:
I've superceded this VM with a 64-bit version. This vm uses Fedora 10, x86-64 and will only play on Intel machines that support 64-bit OSs:
http://www.stormpigs.com/fedora10Vm.html
*** end update *** ~3GB
Hopefully, someone will find this useful. Please drop me a line..love to hear from you.
The Mule!
If this post was useful to you..consider buying me a beer via PayPal!
Even a $1 Draft will keep the Mule happily working..and help pay for equipment upgrades!
dreaded x264 compile error: 'struct ' has no member named 'b_cbr'
For fun, I built out a virtual Fedora Core 6 machine with Cinelerra and all supporting apps installed to share with the world (fedora-core-6-virtual-cinelerra-machine.html). During the process, however, I received an error while compiling the package:
Good Lord! What is this? When I did my first Cinelerra CVS install back in April (fedora-core-6-cinelerra-dependencies.html), I didn't encounter this error. And I was only using the same dries, livna and standard Fedora repositories. So something must have changed with the repositories between the beginning of April and now, early June. But what gives with the compile failure?
No sense complaining about it. Let's just see if someone else has encountered it and we'll fix it. Sure enough, folks on the Ubuntu boards had seen it:
http://ubuntuforums.org/showthread.php?t=215252
Essentially, the problem is that the version of Cinelerra is incompatible with the version of x264. The x264 from Livna is rev. 537 and Cinelerra is version 2.1 (at this time, rev. 1009). We'll use x264 rev. 536 to alleviate the problem.
The solution is hard to pick through on that forum posting, so I will condense the steps to fixing it here:
1) uninstall x264
2) download x264 revision 537
3) compile x264 with specific options
4) reinstall packages that were removed when we uninstalled x264
5) install x264 program files
6) patch directories in the Cinelerra source tree
7) configure Cinelerra with specific options
8) compile Cinlerra and hopefully, install!
1) uninstall x264
yum remove x264
This will remove a bunch of other packages:
Running Transaction
Removing : mjpegtools ####################### [ 1/10]
Removing : mjpegtools-devel ####################### [ 2/10]
Removing : mjpegtools-libs ####################### [ 3/10]
Removing : ffmpeg ####################### [ 4/10]
Removing : ffmpeg-libs ####################### [ 5/10]
Removing : x264 ####################### [ 6/10]
Removing : mencoder ####################### [ 7/10]
Removing : x264-devel ####################### [ 8/10]
Removing : libquicktime ####################### [ 9/10]
Removing : mjpegtools-gui ####################### [10/10]
Don't worry, we'll replace them in Step 4.
2) download x264 revision 537
Assuming you have subversion installed, go get rev 536 of x264:
svn checkout svn://svn.videolan.org/x264/trunk x264 -r536
3) compile x264 with specific options and make the x264 program files
From the directory in which you downloaded the x264 source code, run:
./configure --extra-cflags=-fPIC --extra-asflags=-D__PIC__
make
4) reinstall packages that were removed when we uninstalled x264
yum --disablerepo=dries install ffmpeg libquicktime mencoder mjpegtools*
Note that I have the Fedora Core, Extras, Updates, Livna and Dries repositories only listed in yum when I run the install.
Here we see the final result of the install:
Running Transaction
Installing: x264 ######################### [1/9]
Installing: ffmpeg-libs ######################### [2/9]
Installing: ffmpeg ######################### [3/9]
Installing: libquicktime ######################### [4/9]
Installing: mjpegtools-libs ######################### [5/9]
Installing: mencoder ######################### [6/9]
Installing: mjpegtools ######################### [7/9]
Installing: mjpegtools-devel ######################### [8/9]
Installing: mjpegtools-gui ######################### [9/9]
Notice that installing the programs will also the bad version of x264. In the next step, I will overwrite the program files of the conflicting version of x264 with the working, rev. 536 version.
5) install x264 program files
In the directory you compiled x264, run:
make install
Doing this, I have overwritten the conflicting version of x264 with the one that works with Cinelerra.
6) patch directories in the Cinelerra source tree
In the Cinelerra source tree directory, hvirtual, create these missing directories and fill with appropriate files:
mkdir plugins/chromakey-hsv && cp plugins/chromakeyhsv/* plugins/chromakey-hsv
mkdir plugins/seltempavg && cp plugins/denoiseseltempavg/* plugins/seltempavg/
Take a look at them to make sure they exist and have files in them:
[root@localhost hvirtual]# ls plugins/chromakey-hsv/
chromakey.C chromakey.h Makefile Makefile.am Makefile.in picon.png picon_png.h
[root@localhost hvirtual]# ls plugins/seltempavg/
Makefile Makefile.in picon_png.h seltempavg.C seltempavgwindow.C
Makefile.am picon.png restart_marker.png seltempavg.h seltempavgwindow.h
7) configure Cinelerra with specific compiler options
./configure --with-pic
for Ubuntu 64-bit users, this configure syntax may need to change to this:
./configure --with-pic --disable-shared --enable-static
I cannot confirm this as I am not an Ubuntu user.
To explain: as a general rule, Cinelerra themes and plugins are loaded dynamically as modules. If static linking is defined (the --enable-static part of the command), the SUV theme will not get built as it is not designed for static linking in the CVS tree. A corrolary to this is that if you disable shared libraries (the --disable-shared part of the command), the SUV theme also doesn't get built. My testing on FC6 bears this out.
The unfortunate thing is that if the SUV theme is not built, you'll get this nasty error when you try to startup Cinelerra and the program won't start for love or money:
MWindow::init_theme: theme S.U.V not found
I have not found a workaround, so if at all possible, do not use those two switches in your configure command.
8) compile Cinlerra and hopefully, install!
make
make install
These steps fixed my problem. Hopefully, they will fix it on your system.
Good luck!
gcc -DHAVE_CONFIG_H -I. -I. -I../../.. -D_LARGEFILE_SOURCE -D_LARGEFILE64_SOURCE -D_FILE_OFFSET_BITS=64 -D_GNU_SOURCE -DHAVE_AV_CONFIG_H -I./.. -g -O2 -MT x264.lo -MD -MP -MF .deps/x264.Tpo -c x264.c -fPIC -DPIC -o .libs/x264.o
x264.c: In function 'X264_init':
x264.c:139: error: 'struct' has no member named 'b_cbr'
make[5]: *** [x264.lo] Error 1
make[5]: Leaving directory `/opt/hvirtual/quicktime/ffmpeg/libavcodec'
make[4]: *** [all-recursive] Error 1
make[4]: Leaving directory `/opt/hvirtual/quicktime/ffmpeg/libavcodec'
make[3]: *** [all-recursive] Error 1
make[3]: Leaving directory `/opt/hvirtual/quicktime/ffmpeg'
make[2]: *** [all-recursive] Error 1
make[2]: Leaving directory `/opt/hvirtual/quicktime'
make[1]: *** [all-recursive] Error 1
make[1]: Leaving directory `/opt/hvirtual'
make: *** [all] Error 2
Good Lord! What is this? When I did my first Cinelerra CVS install back in April (fedora-core-6-cinelerra-dependencies.html), I didn't encounter this error. And I was only using the same dries, livna and standard Fedora repositories. So something must have changed with the repositories between the beginning of April and now, early June. But what gives with the compile failure?
No sense complaining about it. Let's just see if someone else has encountered it and we'll fix it. Sure enough, folks on the Ubuntu boards had seen it:
http://ubuntuforums.org/showthread.php?t=215252
Essentially, the problem is that the version of Cinelerra is incompatible with the version of x264. The x264 from Livna is rev. 537 and Cinelerra is version 2.1 (at this time, rev. 1009). We'll use x264 rev. 536 to alleviate the problem.
The solution is hard to pick through on that forum posting, so I will condense the steps to fixing it here:
1) uninstall x264
2) download x264 revision 537
3) compile x264 with specific options
4) reinstall packages that were removed when we uninstalled x264
5) install x264 program files
6) patch directories in the Cinelerra source tree
7) configure Cinelerra with specific options
8) compile Cinlerra and hopefully, install!
1) uninstall x264
yum remove x264
This will remove a bunch of other packages:
Running Transaction
Removing : mjpegtools ####################### [ 1/10]
Removing : mjpegtools-devel ####################### [ 2/10]
Removing : mjpegtools-libs ####################### [ 3/10]
Removing : ffmpeg ####################### [ 4/10]
Removing : ffmpeg-libs ####################### [ 5/10]
Removing : x264 ####################### [ 6/10]
Removing : mencoder ####################### [ 7/10]
Removing : x264-devel ####################### [ 8/10]
Removing : libquicktime ####################### [ 9/10]
Removing : mjpegtools-gui ####################### [10/10]
Don't worry, we'll replace them in Step 4.
2) download x264 revision 537
Assuming you have subversion installed, go get rev 536 of x264:
svn checkout svn://svn.videolan.org/x264/trunk x264 -r536
3) compile x264 with specific options and make the x264 program files
From the directory in which you downloaded the x264 source code, run:
./configure --extra-cflags=-fPIC --extra-asflags=-D__PIC__
make
4) reinstall packages that were removed when we uninstalled x264
yum --disablerepo=dries install ffmpeg libquicktime mencoder mjpegtools*
Note that I have the Fedora Core, Extras, Updates, Livna and Dries repositories only listed in yum when I run the install.
Here we see the final result of the install:
Running Transaction
Installing: x264 ######################### [1/9]
Installing: ffmpeg-libs ######################### [2/9]
Installing: ffmpeg ######################### [3/9]
Installing: libquicktime ######################### [4/9]
Installing: mjpegtools-libs ######################### [5/9]
Installing: mencoder ######################### [6/9]
Installing: mjpegtools ######################### [7/9]
Installing: mjpegtools-devel ######################### [8/9]
Installing: mjpegtools-gui ######################### [9/9]
Notice that installing the programs will also the bad version of x264. In the next step, I will overwrite the program files of the conflicting version of x264 with the working, rev. 536 version.
5) install x264 program files
In the directory you compiled x264, run:
make install
Doing this, I have overwritten the conflicting version of x264 with the one that works with Cinelerra.
6) patch directories in the Cinelerra source tree
In the Cinelerra source tree directory, hvirtual, create these missing directories and fill with appropriate files:
mkdir plugins/chromakey-hsv && cp plugins/chromakeyhsv/* plugins/chromakey-hsv
mkdir plugins/seltempavg && cp plugins/denoiseseltempavg/* plugins/seltempavg/
Take a look at them to make sure they exist and have files in them:
[root@localhost hvirtual]# ls plugins/chromakey-hsv/
chromakey.C chromakey.h Makefile Makefile.am Makefile.in picon.png picon_png.h
[root@localhost hvirtual]# ls plugins/seltempavg/
Makefile Makefile.in picon_png.h seltempavg.C seltempavgwindow.C
Makefile.am picon.png restart_marker.png seltempavg.h seltempavgwindow.h
7) configure Cinelerra with specific compiler options
./configure --with-pic
for Ubuntu 64-bit users, this configure syntax may need to change to this:
./configure --with-pic --disable-shared --enable-static
I cannot confirm this as I am not an Ubuntu user.
To explain: as a general rule, Cinelerra themes and plugins are loaded dynamically as modules. If static linking is defined (the --enable-static part of the command), the SUV theme will not get built as it is not designed for static linking in the CVS tree. A corrolary to this is that if you disable shared libraries (the --disable-shared part of the command), the SUV theme also doesn't get built. My testing on FC6 bears this out.
The unfortunate thing is that if the SUV theme is not built, you'll get this nasty error when you try to startup Cinelerra and the program won't start for love or money:
MWindow::init_theme: theme S.U.V not found
I have not found a workaround, so if at all possible, do not use those two switches in your configure command.
8) compile Cinlerra and hopefully, install!
make
make install
These steps fixed my problem. Hopefully, they will fix it on your system.
Good luck!
If this post was useful to you..consider buying me a beer via PayPal!
Even a $1 Draft will keep the Mule happily working..and help pay for equipment upgrades!
Sunday, June 03, 2007
how to backup a LVM volume
excellent tutorial on LVM:
http://www.howtoforge.com/linux_lvm
how to back them up
http://www.howtoforge.com/linux_lvm_snapshots
http://www.howtoforge.com/linux_lvm
how to back them up
http://www.howtoforge.com/linux_lvm_snapshots
If this post was useful to you..consider buying me a beer via PayPal!
Even a $1 Draft will keep the Mule happily working..and help pay for equipment upgrades!
Wednesday, May 30, 2007
good article on Creating and Using Optical Media
Following up on my recent posts regarding archiving, here is an excellent summary of optical media and what you can do with it using dvdrtools and cdwrite for Linux:
http://www.freebsd.org/doc/en_US.ISO8859-1/books/handbook/creating-dvds.html
http://www.freebsd.org/doc/en_US.ISO8859-1/books/handbook/creating-dvds.html
If this post was useful to you..consider buying me a beer via PayPal!
Even a $1 Draft will keep the Mule happily working..and help pay for equipment upgrades!
Sunday, May 27, 2007
dar: a solution to archiving video
Like myself, you may have gigs and gigs of video sitting on your hard drive, taking up space that should be used for live projects or new media. And you've filled up your 500GB drive, so that you are constantly having to do piecemeal copies of older material to DVD+R. I have the same problem. But as I get older, I try to be a little wiser and actually solve my problems instead of living with them.
I will make the distinction that you should be using DVD+R for your archives. I have found +Rs to be more reliable for data archival that -Rs.
Here's the problem with doing a straight copy of media files to DVD+R. Look at the directory listing below:
[root@computer ~]# ll /mnt/videos/20050721/
total 20871112
-rwxr-xr-x 1 root root 1469679848 Oct 18 2006 1.m2t-rwxr-xr-x 1 root root 58916 Oct 21 2006 20050721b.xml-rwxr-xr-x 1 root root 3877924864 Oct 22 2006 20050721dvd.mpg-rwxr-xr-x 1 root root 1130843124 Oct 29 2006 20050721.m2t
-rwxr-xr-x 1 root root 45197 Oct 20 2006 20050721.xml
-rwxr-xr-x 1 root root 70478 Oct 21 2006 20060721c.xml
-rwxr-xr-x 1 root root 70431 Oct 24 2006 20060721d.xml
-rwxr-xr-x 1 root root 71543 Oct 24 2006 20060721e.xml
-rwxr-xr-x 1 root root 8549 Oct 25 2006 20060721small.xml
-rwxr-xr-x 1 root root 2065588524 Oct 18 2006 2.m2t
-rwxr-xr-x 1 root root 1755983168 Oct 18 2006 3.m2t
-rwxr-xr-x 1 root root 902360332 Oct 18 2006 4.m2t
-rwxr-xr-x 1 root root 1491412084 Oct 18 2006 5.m2t
-rwxr-xr-x 1 root root 2865367596 Oct 18 2006 6.m2t
-rwxr-xr-x 1 root root 5461152404 Oct 18 2006 7.m2t
Here we see the typical mess of Cinelerra project files, source material (HDV MPEGTS files), and final renders (MPEGs). Now, totaling up the space used for these file, you get about 21GB. Ugh. And given the odd file sizes, you'd end up using about 7 DVDs just to backup what you've got. This is because HDV files are huge, ranging from 1.5GB to 5GB and DVDs only hold about 4.38GB usable space on each. So you're forced to do a statistical combinations balancing act in order to fit as many files on a DVD in the most efficient manner possible. We who live in the land of video production are all living and breathing this headache. What a pain in the ass. But what is the alternative?
The alternative is to find a program that can compress and archive files over multiple DVDs, grouping these files of different sizes and compacting them together. Most importantly, the software should then evenly divide the compressed file archive across multiple DVDs in the most efficient and space conscious manner possible.
Well, lucky for us, the Linux Gods have brought down "dar" from the heavens. Dar (disk archive), available at http://dar.linux.free.fr/, is a command line backup and restore tool that can compress files using the bz2 algorithm, put files into a single archive and divide that archive into manageable chunks destined for backup media of one type or another. For the file listing you see above, dar was able to take it and turn it into this:
[root@computer ~]# ll /mnt/videos/2007-05-27_data.*
-rw-r--r-- 1 root root 4194304000 May 27 2007-05-27_data.1.dar
-rw-r--r-- 1 root root 4194304000 May 27 2007-05-27_data.2.dar
-rw-r--r-- 1 root root 4194304000 May 27 2007-05-27_data.3.dar
-rw-r--r-- 1 root root 4194304000 May 27 2007-05-27_data.4.dar
-rw-r--r-- 1 root root 3912021642 May 27 2007-05-27_data.5.dar
Nice! Easily digestible chunks for a single layer DVD to handle!
Now, the compression that dar acheived was not very much. Total file size went from 2.135GB to about 2.06GB. This is because the MPEGTS files are already compressed, so I'm not going to gain much from bz2. My 3.2Ghz, 2GB, PC3200, RAID0 (stripe set of two IDE drives), Dell 400SC took about three hours and twenty minutes to compress that 21GB. So it's not fast.
Before you get too excited, here are some known limitations of dar:
http://dar.linux.free.fr/doc/Limitations.html
I made sure to give dar a full system test using the steps below.
1) archive the above directory of files
TIME: about three hours and twenty minutes on the system described above.
dar -m 256 -v -y -s 4000M -D -R /mnt/videos/20050721/ -c `date -I`_data
Adding file to archive: /mnt/videos/20050721/20050721e.xml
Adding file to archive: /mnt/videos/20050721/addSecond.sh
..
Update 2008/12/22
If you have 120 minute, 4.7GB DVD+Rs, you can up the number of bytes in each dar to 4400MB or 4,613,734,400 or (4400 x 1024 x 1024):
dar -m 256 -v -y -s 4400M -D -R /mnt/videos/20050721/ -c `date -I`_data
Note: you made need the latest and greatest version of dvd+rw-tools for this large filesize burning to work! I tested this on Fedora 10 and I was able to store and retrieve a 25GB dar archive using this procedure.
Note that you will need to use the "-allow-limited-size" switch to growisofs when you burn these larger than normal files to dvd:
growisofs -Z /dev/dvd -R -J -allow-limited-size filename.dar
end update
In short, the switches I used mean:
Here's the output of that command:
--------------------------------------------
17 inode(s) saved
with 0 hard link(s) recorded
0 inode(s) changed at the moment of the backup
0 inode(s) not saved (no file change)
0 inode(s) failed to save (filesystem error)
0 files(s) ignored (excluded by filters)
0 files(s) recorded as deleted from reference backup
--------------------------------------------
Total number of file considered: 17
--------------------------------------------
The command line switches I used above are well summarized in this HowTo:
http://dar.linux.free.fr/doc/mini-howto/index.html
Also, for you man page readers, here's the nitty gritty:
http://www.die.net/doc/linux/man/man1/dar.1.html
2) validate that the archive is does not contain errors
TIME: about an hour and a half.
dar -t <archive name>
Here is the output of that command:
--------------------------------------------
17 file(s) treated
0 file(s) with error
0 file(s) ignored (excluded by filters)
--------------------------------------------
Total number of file considered: 17
--------------------------------------------
Also, it is helpful to list out the contents of the created dar in order to verify it matches the files you want archived. Here is sample output from another archive I created:
3) write each output file from dar to DVD
TIME: with a 18x burner running at 16x speed to DVD+R, this takes about an hour.
First, check your media:
dvd+rw-mediainfo /dev/dvd
Then burn your archive to disk:
growisofs -Z /dev/dvd -R -J /root/2007-05-27_data.1.dar
..
If you intend to do a lot of archiving, I suggest you purchase a recent model DVD+R recorder. When I first tested dar this past weekend, I had a mess of problems reading the archive files I had burned successfully to DVD. I figured my DVD was three years old and it was time for an upgrade, so I bought the internal version of this drive, the HP DVD940E External 18x Super Multi DVD Writer for $60 with a $30 rebate from Office Depot. The thing performs like a champ!
4) copy the archive from the DVDs to disk
TIME: with an 18x burner, this takes about twenty minutes.
mount /dev/cdrom /mnt/cdrom
cp /mnt/cdrom/* /mnt/videos/
5) validate that the archive files off the DVD do not contain errors
TIME: about an hour and a half.
dar -t <archive name>
While validating my archives off DVD, I encountered one problem:
[root@computer ~]# dar -t /mnt/videos/2007-05-27_data
ERR/6.m2t : compressed data CRC error
--------------------------------------------
17 file(s) treated
1 file(s) with error
0 file(s) ignored (excluded by filters)
--------------------------------------------
Total number of file considered: 17
--------------------------------------------
Bad news. It looks like the data written to one of the DVDs is corrupt. Since I had the originals files and they tested out correct, I re-wrote the archive to new DVDs and did not encounter this problem again. By the way, the test of my 20GB archives took about an hour.
Here is what a successful validation looks like:
[root@computer ~]# dar -t 20081016_data
--------------------------------------------
17 inode(s) treated
0 inode(s) with error
0 inode(s) ignored (excluded by filters)
--------------------------------------------
Total number of inode considered: 17
--------------------------------------------
6) if no errors, restore original files and verify file sizes
TIME: about three hours.
This step is optional, if you've already run "dar -t" to verify the integrity of the archive coming off the DVD. Here is the output:
dar -x 2007-05-27_data
--------------------------------------------
17 file(s) restored
0 file(s) not restored (not saved in archive)
0 file(s) ignored (excluded by filters)
0 file(s) less recent than the one on filesystem
0 file(s) failed to restore (filesystem error)
0 file(s) deleted
--------------------------------------------
Total number of file considered: 17
--------------------------------------------
There was some slowness copying the archives back from DVD (which took about two hours at 4x speed), but that's just the speed of the DVD player. Aside from that 4GB limit, dar live up to its reputation! So I'm pretty happy.
Review
1) archive your files
TIME: about three hours and twenty minutes on the system described above.
dar -m 256 -v -y -s 4000M -D -R /mnt/videos/20050721/ -c `date -I`_data
2) validate that the archive is does not contain errors
TIME: about an hour and a half.
dar -t <archive name>
3) write each output file from dar to DVD
TIME: with a 18x burner running at 16x speed to DVD+R, this takes about an hour.
growisofs -Z /dev/dvd -R -J /root/2007-05-27_data.1.dar
4) copy the archive from the DVDs to disk
TIME: with an 18x burner, this takes about twenty minutes.
cp /mnt/cdrom/* /mnt/videos/
5) validate that the archive files off the DVD do not contain errors
TIME: about an hour and a half.
dar -t <archive name>
OPTIONAL:
6) if no errors, restore original files and verify file sizes
TIME: about three hours.
dar -x 2007-05-27_data
Summary
If you wish to use dar and want to keep your valuable video data in tact for years to come, I strongly suggest you run through steps 1-5 each time you make an archive! Of course, just the basic steps take a total of eight hours for 20GB of data. The optional step brings that total to eleven hours of your time spent.
Of course, you don't have to archive EVERYTHING. Only archive the source videos and maybe the primary intermediates. For example, I archive all my MPEG-TS files from my cam, plus the MPEG2 video and MP3 audio rendered from my project. I DON'T archive the finals: DVD format, iTunes format and MPEG program streams, as I can always reproduce those from the primary intermediates that are rendered from the project.
In the end, you have to ask yourself "How much do I value the work that I've done?"
Going through these steps everytime you make an archive may seem like a pain, but the pain will be worse if your data goes away! You could opt to store your media on a hard drive, but if that hard drive gets near a speaker or large magnet, your data could be lost. If you are going to archive this data for years, it makes more sense to do it on optical formats that are not susceptible to damage by magnetism.
If you do decide to go the dar route and follow these steps, you'll have the peace of mind that your archives are error free.
Hopefully, dar might fit into your backup and recovery schemes. There are a number of other softwares to do something similar. Partimage on the http://www.sysresccd.org comes to mind, though that is used for entire partitions. Also Duplicity is available, but that's strength is in encryption and network backups. To its strength, dar is a proven solution and is very well documented:
http://dar.linux.free.fr/doc/
As I have time, I will post a bit more technical information about the commands used, but the best idea is to research the documentation at the link above, as well as do a simple "dar -h" at the command line for a listing of all the available features.
Update 1/4/2014
The Extraction Process Redux
I've been restoring dar archives from DVDs. Today, I pulled out a couple five DVD dar archives that I originally created four years ago. Each DVD took about six minutes to copy over to my hard drive. I'm happy to say that dar restored the individual video files that I specified without any problems. Here's a sample command:
dar -x 20090430_data -g 20090430.m2v
However, dar did spit out this message:
File ownership will not be restored as dar is not run as root. to avoid this message use -O option [return = YES | Esc = NO]
Continuing...
Error met while opening the last slice: This is an old archive, it can only be opened starting by the first slice. Trying to open the archive using the first slice...
Even with this message, the archived files restored without error.
The commands above mean:
-x = extract
-g = subdirectory to include in the operation
Also, another good switch is -O, to avoid the "root ownership" message seen above. Be careful of the placement of -O..it has to be the first parameter. Like so:
dar -O -x 20090430_data -g 20090430.m2v
After giving the -O parameter in the above command, all you should see is the "Error met while opening the last slice" message.
Update 10/1/2008
The Extraction Process
I pulled out a 6 DVD dar archive that I originally created more than a year ago and I'm happy to say that dar restored the files without any problems. Specifically, I needed to pull one MPEG video from a dar archive of about 25 files. The dar command to extract one specific file was relatively simple:
dar -x -I *.mpg
-x = extract
-I = include following filespec in operation
So my command ended up looking like this:
dar -x /mule/20060831 -I *.mpg
One thing I noticed is that depending on the archive, wildcards (like *.mpg) may work, but not all the time. In which case, you should remove the wildcard from the include specification and just use the exact syntax; eg:
dar -x /mule/20060831 -I file.mpg
That's it!
Have a good day!
The Video Mule
5/30/07 update - After using dar for the past couple of days and releasing about 50GB, I have to say that I am really starting to like this new process. It is a consistent, repeatable and efficient approach to archiving my material that I can kick off before bedtime.
10/1/08 update - Dargui is a nice, simple graphical front end to dar. For some reason, though, the filter did not work properly, so I reverted to command line. Perhaps someone else will have better luck.
References
http://dargui.sourceforge.net/
http://dar.linux.free.fr/doc/mini-howto/dar-differential-backup-mini-howto.en.html
I will make the distinction that you should be using DVD+R for your archives. I have found +Rs to be more reliable for data archival that -Rs.
Here's the problem with doing a straight copy of media files to DVD+R. Look at the directory listing below:
[root@computer ~]# ll /mnt/videos/20050721/
total 20871112
-rwxr-xr-x 1 root root 1469679848 Oct 18 2006 1.m2t-rwxr-xr-x 1 root root 58916 Oct 21 2006 20050721b.xml-rwxr-xr-x 1 root root 3877924864 Oct 22 2006 20050721dvd.mpg-rwxr-xr-x 1 root root 1130843124 Oct 29 2006 20050721.m2t
-rwxr-xr-x 1 root root 45197 Oct 20 2006 20050721.xml
-rwxr-xr-x 1 root root 70478 Oct 21 2006 20060721c.xml
-rwxr-xr-x 1 root root 70431 Oct 24 2006 20060721d.xml
-rwxr-xr-x 1 root root 71543 Oct 24 2006 20060721e.xml
-rwxr-xr-x 1 root root 8549 Oct 25 2006 20060721small.xml
-rwxr-xr-x 1 root root 2065588524 Oct 18 2006 2.m2t
-rwxr-xr-x 1 root root 1755983168 Oct 18 2006 3.m2t
-rwxr-xr-x 1 root root 902360332 Oct 18 2006 4.m2t
-rwxr-xr-x 1 root root 1491412084 Oct 18 2006 5.m2t
-rwxr-xr-x 1 root root 2865367596 Oct 18 2006 6.m2t
-rwxr-xr-x 1 root root 5461152404 Oct 18 2006 7.m2t
Here we see the typical mess of Cinelerra project files, source material (HDV MPEGTS files), and final renders (MPEGs). Now, totaling up the space used for these file, you get about 21GB. Ugh. And given the odd file sizes, you'd end up using about 7 DVDs just to backup what you've got. This is because HDV files are huge, ranging from 1.5GB to 5GB and DVDs only hold about 4.38GB usable space on each. So you're forced to do a statistical combinations balancing act in order to fit as many files on a DVD in the most efficient manner possible. We who live in the land of video production are all living and breathing this headache. What a pain in the ass. But what is the alternative?
The alternative is to find a program that can compress and archive files over multiple DVDs, grouping these files of different sizes and compacting them together. Most importantly, the software should then evenly divide the compressed file archive across multiple DVDs in the most efficient and space conscious manner possible.
Well, lucky for us, the Linux Gods have brought down "dar" from the heavens. Dar (disk archive), available at http://dar.linux.free.fr/, is a command line backup and restore tool that can compress files using the bz2 algorithm, put files into a single archive and divide that archive into manageable chunks destined for backup media of one type or another. For the file listing you see above, dar was able to take it and turn it into this:
[root@computer ~]# ll /mnt/videos/2007-05-27_data.*
-rw-r--r-- 1 root root 4194304000 May 27 2007-05-27_data.1.dar
-rw-r--r-- 1 root root 4194304000 May 27 2007-05-27_data.2.dar
-rw-r--r-- 1 root root 4194304000 May 27 2007-05-27_data.3.dar
-rw-r--r-- 1 root root 4194304000 May 27 2007-05-27_data.4.dar
-rw-r--r-- 1 root root 3912021642 May 27 2007-05-27_data.5.dar
Nice! Easily digestible chunks for a single layer DVD to handle!
Now, the compression that dar acheived was not very much. Total file size went from 2.135GB to about 2.06GB. This is because the MPEGTS files are already compressed, so I'm not going to gain much from bz2. My 3.2Ghz, 2GB, PC3200, RAID0 (stripe set of two IDE drives), Dell 400SC took about three hours and twenty minutes to compress that 21GB. So it's not fast.
Before you get too excited, here are some known limitations of dar:
http://dar.linux.free.fr/doc/Limitations.html
I made sure to give dar a full system test using the steps below.
1) archive the above directory of files
TIME: about three hours and twenty minutes on the system described above.
dar -m 256 -v -y -s 4000M -D -R /mnt/videos/20050721/ -c `date -I`_data
Adding file to archive: /mnt/videos/20050721/20050721e.xml
Adding file to archive: /mnt/videos/20050721/addSecond.sh
..
Update 2008/12/22
If you have 120 minute, 4.7GB DVD+Rs, you can up the number of bytes in each dar to 4400MB or 4,613,734,400 or (4400 x 1024 x 1024):
dar -m 256 -v -y -s 4400M -D -R /mnt/videos/20050721/ -c `date -I`_data
Note: you made need the latest and greatest version of dvd+rw-tools for this large filesize burning to work! I tested this on Fedora 10 and I was able to store and retrieve a 25GB dar archive using this procedure.
Note that you will need to use the "-allow-limited-size" switch to growisofs when you burn these larger than normal files to dvd:
growisofs -Z /dev/dvd -R -J -allow-limited-size filename.dar
end update
In short, the switches I used mean:
-m 256   = don't compress files less than 256 bytes
-v       = verbose output showing what is being archived
-y       = activate bz2 compression
-s 4000M = create archives 4000MB in size.  4000MB is 1024x1024x4000 bytes or 4,194,304,000 bytes.
    By the way, 4GB is actually 2 to the 32 power or 4,294,967,296 bytes.
-D       = store directories excluded by the -P option or absent from the command line path list as empty directories
-R       = specify the root directory for saving or restoring files
-c       = create the archive with the following name, using the current date
Here's the output of that command:
--------------------------------------------
17 inode(s) saved
with 0 hard link(s) recorded
0 inode(s) changed at the moment of the backup
0 inode(s) not saved (no file change)
0 inode(s) failed to save (filesystem error)
0 files(s) ignored (excluded by filters)
0 files(s) recorded as deleted from reference backup
--------------------------------------------
Total number of file considered: 17
--------------------------------------------
The command line switches I used above are well summarized in this HowTo:
http://dar.linux.free.fr/doc/mini-howto/index.html
Also, for you man page readers, here's the nitty gritty:
http://www.die.net/doc/linux/man/man1/dar.1.html
2) validate that the archive is does not contain errors
TIME: about an hour and a half.
dar -t <archive name>
Here is the output of that command:
--------------------------------------------
17 file(s) treated
0 file(s) with error
0 file(s) ignored (excluded by filters)
--------------------------------------------
Total number of file considered: 17
--------------------------------------------
Also, it is helpful to list out the contents of the created dar in order to verify it matches the files you want archived. Here is sample output from another archive I created:
[root@computer ~]# dar -l 20081016_data
[data ][ EA  ][compr] | permission | user  | group | size  |          date                 |    filename
----------------------+------------+-------+-------+-------+-------------------------------+------------
[Saved]       [  90%]   -rw-r--r--   root       root    46335   Tue Oct 21 22:09:02 2008        20081016e.xml
[Saved]       [  46%]   -rwxr-xr-x   root       root    990     Sat Oct 18 16:56:45 2008        addSecond.sh
[Saved]       [   8%]   -rw-r--r--   root       root    5663820164      Sat Oct 18 09:25:36 2008        20081016_6.m2t
[Saved]       [   2%]   -rw-r--r--   root       root    26411454        Sun Oct 26 16:29:52 2008        test.mov
[Saved]       [  91%]   -rw-r--r--   root       root    55587   Mon Oct 27 08:23:02 2008        20081016i.xml
[Saved]       [  79%]   -rw-r--r--   root       root    13680   Sat Oct 18 15:41:23 2008        20081016a.xml
[Saved]       [  47%]   -rwxr-xr-x   root       root    1408    Sat Oct 18 17:50:51 2008        2songlist.sh
[Saved]       [  51%]   -rw-r--r--   root       root    1688    Wed Oct 22 08:19:37 2008        vodcastNew.xml
[Saved]       [  47%]   -rwxr-xr-x   root       root    2411    Sat Oct 18 19:13:01 2008        1encode.sh.bak
[Saved]       [   8%]   -rw-r--r--   root       root    1143234956      Sat Oct 18 09:11:36 2008        20081016_4.m2t
[Saved]       [   5%]   -rw-r--r--   root       root    3805975877      Mon Oct 27 04:49:50 2008        StormPigs20081016.m2v
[Saved]       [     ]   -rwxr-xr-x   root       root    146     Sat Oct 18 17:56:25 2008        5ftp.sh
[Saved]       [  10%]   -rw-r--r--   root       root    804122436       Sat Oct 18 09:02:08 2008        20081016_1.m2t
[Saved]       [   8%]   -rw-r--r--   root       root    2091780308      Sat Oct 18 09:05:45 2008        20081016_2.m2t
[Saved]       [  88%]   -rw-r--r--   root       root    30648   Tue Oct 21 21:07:01 2008        20081016c.xml
[Saved]       [  89%]   -rw-r--r--   root       root    40105   Tue Oct 21 21:32:46 2008        20081016d.xml
[Saved]       [  79%]   -rw-r--r--   root       root    12197   Sat Oct 18 15:13:20 2008        20081016.xml
..
3) write each output file from dar to DVD
TIME: with a 18x burner running at 16x speed to DVD+R, this takes about an hour.
First, check your media:
dvd+rw-mediainfo /dev/dvd
Then burn your archive to disk:
growisofs -Z /dev/dvd -R -J /root/2007-05-27_data.1.dar
..
If you intend to do a lot of archiving, I suggest you purchase a recent model DVD+R recorder. When I first tested dar this past weekend, I had a mess of problems reading the archive files I had burned successfully to DVD. I figured my DVD was three years old and it was time for an upgrade, so I bought the internal version of this drive, the HP DVD940E External 18x Super Multi DVD Writer
4) copy the archive from the DVDs to disk
TIME: with an 18x burner, this takes about twenty minutes.
mount /dev/cdrom /mnt/cdrom
cp /mnt/cdrom/* /mnt/videos/
5) validate that the archive files off the DVD do not contain errors
TIME: about an hour and a half.
dar -t <archive name>
While validating my archives off DVD, I encountered one problem:
[root@computer ~]# dar -t /mnt/videos/2007-05-27_data
ERR
--------------------------------------------
17 file(s) treated
1 file(s) with error
0 file(s) ignored (excluded by filters)
--------------------------------------------
Total number of file considered: 17
--------------------------------------------
Bad news. It looks like the data written to one of the DVDs is corrupt. Since I had the originals files and they tested out correct, I re-wrote the archive to new DVDs and did not encounter this problem again. By the way, the test of my 20GB archives took about an hour.
Here is what a successful validation looks like:
[root@computer ~]# dar -t 20081016_data
--------------------------------------------
17 inode(s) treated
0 inode(s) with error
0 inode(s) ignored (excluded by filters)
--------------------------------------------
Total number of inode considered: 17
--------------------------------------------
6) if no errors, restore original files and verify file sizes
TIME: about three hours.
This step is optional, if you've already run "dar -t" to verify the integrity of the archive coming off the DVD. Here is the output:
dar -x 2007-05-27_data
--------------------------------------------
17 file(s) restored
0 file(s) not restored (not saved in archive)
0 file(s) ignored (excluded by filters)
0 file(s) less recent than the one on filesystem
0 file(s) failed to restore (filesystem error)
0 file(s) deleted
--------------------------------------------
Total number of file considered: 17
--------------------------------------------
There was some slowness copying the archives back from DVD (which took about two hours at 4x speed), but that's just the speed of the DVD player. Aside from that 4GB limit, dar live up to its reputation! So I'm pretty happy.
Review
1) archive your files
TIME: about three hours and twenty minutes on the system described above.
dar -m 256 -v -y -s 4000M -D -R /mnt/videos/20050721/ -c `date -I`_data
2) validate that the archive is does not contain errors
TIME: about an hour and a half.
dar -t <archive name>
3) write each output file from dar to DVD
TIME: with a 18x burner running at 16x speed to DVD+R, this takes about an hour.
growisofs -Z /dev/dvd -R -J /root/2007-05-27_data.1.dar
4) copy the archive from the DVDs to disk
TIME: with an 18x burner, this takes about twenty minutes.
cp /mnt/cdrom/* /mnt/videos/
5) validate that the archive files off the DVD do not contain errors
TIME: about an hour and a half.
dar -t <archive name>
OPTIONAL:
6) if no errors, restore original files and verify file sizes
TIME: about three hours.
dar -x 2007-05-27_data
Summary
If you wish to use dar and want to keep your valuable video data in tact for years to come, I strongly suggest you run through steps 1-5 each time you make an archive! Of course, just the basic steps take a total of eight hours for 20GB of data. The optional step brings that total to eleven hours of your time spent.
Of course, you don't have to archive EVERYTHING. Only archive the source videos and maybe the primary intermediates. For example, I archive all my MPEG-TS files from my cam, plus the MPEG2 video and MP3 audio rendered from my project. I DON'T archive the finals: DVD format, iTunes format and MPEG program streams, as I can always reproduce those from the primary intermediates that are rendered from the project.
In the end, you have to ask yourself "How much do I value the work that I've done?"
Going through these steps everytime you make an archive may seem like a pain, but the pain will be worse if your data goes away! You could opt to store your media on a hard drive, but if that hard drive gets near a speaker or large magnet, your data could be lost. If you are going to archive this data for years, it makes more sense to do it on optical formats that are not susceptible to damage by magnetism.
If you do decide to go the dar route and follow these steps, you'll have the peace of mind that your archives are error free.
Hopefully, dar might fit into your backup and recovery schemes. There are a number of other softwares to do something similar. Partimage on the http://www.sysresccd.org comes to mind, though that is used for entire partitions. Also Duplicity is available, but that's strength is in encryption and network backups. To its strength, dar is a proven solution and is very well documented:
http://dar.linux.free.fr/doc/
As I have time, I will post a bit more technical information about the commands used, but the best idea is to research the documentation at the link above, as well as do a simple "dar -h" at the command line for a listing of all the available features.
Update 1/4/2014
The Extraction Process Redux
I've been restoring dar archives from DVDs. Today, I pulled out a couple five DVD dar archives that I originally created four years ago. Each DVD took about six minutes to copy over to my hard drive. I'm happy to say that dar restored the individual video files that I specified without any problems. Here's a sample command:
dar -x 20090430_data -g 20090430.m2v
However, dar did spit out this message:
File ownership will not be restored as dar is not run as root. to avoid this message use -O option [return = YES | Esc = NO]
Continuing...
Error met while opening the last slice: This is an old archive, it can only be opened starting by the first slice. Trying to open the archive using the first slice...
Even with this message, the archived files restored without error.
The commands above mean:
-x = extract
-g = subdirectory to include in the operation
Also, another good switch is -O, to avoid the "root ownership" message seen above. Be careful of the placement of -O..it has to be the first parameter. Like so:
dar -O -x 20090430_data -g 20090430.m2v
After giving the -O parameter in the above command, all you should see is the "Error met while opening the last slice" message.
Update 10/1/2008
The Extraction Process
I pulled out a 6 DVD dar archive that I originally created more than a year ago and I'm happy to say that dar restored the files without any problems. Specifically, I needed to pull one MPEG video from a dar archive of about 25 files. The dar command to extract one specific file was relatively simple:
dar -x
-x = extract
-I = include following filespec in operation
So my command ended up looking like this:
dar -x /mule/20060831 -I *.mpg
One thing I noticed is that depending on the archive, wildcards (like *.mpg) may work, but not all the time. In which case, you should remove the wildcard from the include specification and just use the exact syntax; eg:
dar -x /mule/20060831 -I file.mpg
That's it!
Have a good day!
The Video Mule
5/30/07 update - After using dar for the past couple of days and releasing about 50GB, I have to say that I am really starting to like this new process. It is a consistent, repeatable and efficient approach to archiving my material that I can kick off before bedtime.
10/1/08 update - Dargui is a nice, simple graphical front end to dar. For some reason, though, the filter did not work properly, so I reverted to command line. Perhaps someone else will have better luck.
References
http://dargui.sourceforge.net/
http://dar.linux.free.fr/doc/mini-howto/dar-differential-backup-mini-howto.en.html
If this post was useful to you..consider buying me a beer via PayPal!
Even a $1 Draft will keep the Mule happily working..and help pay for equipment upgrades!
using dd to create a 4GB file
I'm in the process of learning how to use to dar (disk archive) to archive my videos in files that will span multiple DVDs. First, though, I want to find out exactly how large a file I can have dar create in order to maximize the utilized space on the DVD. I will use growisofs to copy the file to the DVD, so I will tell dd to create a large file of around 4.7GB and see if growisofs can write that file.
Here is the syntax of the dd command to create the file. I will fill the file with NULL characters.
dd if=/dev/zero of=zerofile.tst bs=1k count=4700000
if = input file
of = output file
bs = block size
count = file size in kb
Woops..file is too big for growisofs!
[root@computer ~]# growisofs -Z /dev/hda -R -J /mnt/videos/zerofile.tst
Executing 'mkisofs -R -J /mnt/videos/zerofile.tst builtin_dd of=/dev/hda obs=32k seek=0'
INFO: UTF-8 character encoding detected by locale settings.
Assuming UTF-8 encoded filenames on source filesystem,
use -input-charset to override.
mkisofs: Value too large for defined data type. File /mnt/videos/zerofile.tst is too large - ignoring
Total translation table size: 0
Total rockridge attributes bytes: 169
Total directory bytes: 0
Path table size(bytes): 10
Max brk space used 0
181 extents written (0 MB)
/dev/hda: "Current Write Speed" is 8.2x1352KBps.
builtin_dd: 192*2KB out @ average 0.0x1352KBps
/dev/hda: flushing cache
/dev/hda: closing track
/dev/hda: closing session
I'd better do some research. According to these two articles:
Cheetah Burner FAQ
http://en.wikipedia.org/wiki/ISO_9660
the maximum file size for a data DVD with IS09660 and Joliet extensions is 4.2GB. dar creates files in chunks of megabytes (1024 x 1024 x a value specified in the thousands). So if use a value of 4100 in dar, dar should create archive files that are 4,194,304,000. This is right under the limit of the usable space on a DVD.
Here's the second test I performed using dd:
[root@computer ~]# dd if=/dev/zero of=/mnt/videos/zerofile.tst bs=1k count=4100000
4100000+0 records in
4100000+0 records out
4198400000 bytes (4.3 GB) copied, 50.7164 seconds, 84.8 MB/s
Success! dar was able to correctly write this 4,198,400,000 byte file to disk:
dar -m 256 -y -s 4000M -D -R /mnt/videos/zerofile.tst -c `date -I`_data
--------------------------------------------
1 inode(s) saved
with 0 hard link(s) recorded
0 inode(s) changed at the moment of the backup
0 inode(s) not saved (no file change)
0 inode(s) failed to save (filesystem error)
0 files(s) ignored (excluded by filters)
0 files(s) recorded as deleted from reference backup
--------------------------------------------
Total number of file considered: 1
--------------------------------------------
I did try a third test using a value of 4100MB, but this yielded a total of 4,299,161,600 bytes. This value exceeded the 32-bit current limitation of ISO9660. As I've read, this specification is under review and may be increased in the near future.
Side Note:
Instead of NULL characters, dd can fill a file with random (/dev/random) characters or less random characters (/dev/urandom). According to the Wiki entry, the difference between the two is that urandom is "less cryptographically secure" and takes a shorter amount of time to use because of this insecurity:
http://en.wikipedia.org/wiki/Dd_(Unix)
dd has been around since the mid-70s and is used for creating and archiving files at a very low level. Be careful using this program, because it's synonym is "destroy data" and you can easily wipe out the data on your hard drive with the wrong syntax.
Here's the man page on dd:
http://www.die.net/doc/linux/man/man1/dd.1.html
UPDATE: Here is how I've decided to backup my HDV material using a combination of dar (disk archive) and growisofs:
http://crazedmuleproductions.blogspot.com/2007/05/problem-of-archivingand-solution.html
UPDATE: Here is another way to create a large file using dd. Try making the block size larger and reduce the number (count) of blocks for the test file! The following command creates a file of zeros one gigabyte in length using a block size of 1,000 megabytes (one Gb):
dd if=/dev/zero of=zerofile.tst bs=1000M count=1
1+0 records in
1+0 records out
1048576000 bytes (1.0 GB) copied, 7.812 s, 134 MB/s
If this post was useful to you..consider buying me a beer via PayPal!
Even a $1 Draft will keep the Mule happily working..and help pay for equipment upgrades!
Saturday, May 26, 2007
Cinelerra on FC6 working well and more YouTube-ness
I spent all day yesterday editing and rendering video using the Cinelerra install on my Fedora Core 6 box. I am happy to report that after about 10 hours, 15 projects and two or three times as many renders, Cinelerra did not crash once! Now, the types of activities I performed did not vary that much:
- open hour long DVD resolution video
- select five or ten minute long sections of video
- compensate for audio sync problems using nudge
- render out to YouTube compatible format (ala my previous post)
My previous Cinelerra install on Core 4 had crash problems as well as strange audio synchronization problems. One major difference between the systems is that my FC4 Cinelerra system had OpenGL enabled. My new FC6 system does not have OpenGL enabled. On FC4, I noticed that enabling OpenGL seemed to cause the instabilities mentioned above, though I was never able to prove it. Also, the more unstable projects tended to be projects that I had previously created. So as a test, I am recompiling Cinelerra on FC6 using OpenGL and will perform some edits on both old and newly created projects to see if the OpenGL version of Cinelerra is as stable as the non-OpenGL, X11 XV version on FC6. I am hoping that the latest NVidia drivers for my 7600GS 512MB card in combination with various bug fixes in FC6 will allow me to run Cinelerra on FC6 without crashes.
I have uploaded the results of yesterday's rendering session to my new YouTube account here:
http://www.youtube.com/profile?user=snufflerstormpig
I'm learning more about YouTube. It is a really rich environment for social interaction. Everybody has seen a YouTube video and peoples comments beneath it. But depending on how the content producer has configured the video, people can comment upon it by using a video response. Pretty cool. Also, most people know that you can embed a YouTube video into any web page simply by selecting the Embed code that appears on every page that displays a YouTube video and integrate that code into your web site. It looks like this:
<object width="425" height="350"><param name="movie" value="http://www.youtube.com/v/cW8EL2RgAEg"></param><param name="wmode" value="transparent"></param><embed src="http://www.youtube.com/v/cW8EL2RgAEg" type="application/x-shockwave-flash" wmode="transparent" width="425" height="350"></embed></object>
Some of the more interesting stuff is not as evident. For example, if you are a content producer, you can create a "Channel", basically a home page of your profile like in the above link so that people can see your accumulated work. As a member (content producer or regular viewer), you can create playlists of your favorite videos and share them with your friends. When someone gets one of your playlists, they can play all the videos in that playlist simply by clicking once. Here is a playlist I created from the videos I rendered yesterday:
http://www.youtube.com/view_play_list?p=021BB1E61A3BFD19
Also, people can subscribe to your Channel (Subscribers) or you can make Friends who also like your videos. The difference between the two seems to be that Subscribers are more passive viewers of your content and Friends are content producers themselves, or at least have a more well defined profile created on YouTube. YouTube can automatically alert both of these two different types of people when you've uploaded new videos.
Anyway, granted I am a little late to the YouTube game, but I think a lot of other content producers are too. They should take advantage of this great experiment in social networking and get their hard work up on YouTube to show the rest of the world.
- open hour long DVD resolution video
- select five or ten minute long sections of video
- compensate for audio sync problems using nudge
- render out to YouTube compatible format (ala my previous post)
My previous Cinelerra install on Core 4 had crash problems as well as strange audio synchronization problems. One major difference between the systems is that my FC4 Cinelerra system had OpenGL enabled. My new FC6 system does not have OpenGL enabled. On FC4, I noticed that enabling OpenGL seemed to cause the instabilities mentioned above, though I was never able to prove it. Also, the more unstable projects tended to be projects that I had previously created. So as a test, I am recompiling Cinelerra on FC6 using OpenGL and will perform some edits on both old and newly created projects to see if the OpenGL version of Cinelerra is as stable as the non-OpenGL, X11 XV version on FC6. I am hoping that the latest NVidia drivers for my 7600GS 512MB card
I have uploaded the results of yesterday's rendering session to my new YouTube account here:
http://www.youtube.com/profile?user=snufflerstormpig
I'm learning more about YouTube. It is a really rich environment for social interaction. Everybody has seen a YouTube video and peoples comments beneath it. But depending on how the content producer has configured the video, people can comment upon it by using a video response. Pretty cool. Also, most people know that you can embed a YouTube video into any web page simply by selecting the Embed code that appears on every page that displays a YouTube video and integrate that code into your web site. It looks like this:
<object width="425" height="350"><param name="movie" value="http://www.youtube.com/v/cW8EL2RgAEg"></param><param name="wmode" value="transparent"></param><embed src="http://www.youtube.com/v/cW8EL2RgAEg" type="application/x-shockwave-flash" wmode="transparent" width="425" height="350"></embed></object>
Some of the more interesting stuff is not as evident. For example, if you are a content producer, you can create a "Channel", basically a home page of your profile like in the above link so that people can see your accumulated work. As a member (content producer or regular viewer), you can create playlists of your favorite videos and share them with your friends. When someone gets one of your playlists, they can play all the videos in that playlist simply by clicking once. Here is a playlist I created from the videos I rendered yesterday:
http://www.youtube.com/view_play_list?p=021BB1E61A3BFD19
Also, people can subscribe to your Channel (Subscribers) or you can make Friends who also like your videos. The difference between the two seems to be that Subscribers are more passive viewers of your content and Friends are content producers themselves, or at least have a more well defined profile created on YouTube. YouTube can automatically alert both of these two different types of people when you've uploaded new videos.
Anyway, granted I am a little late to the YouTube game, but I think a lot of other content producers are too. They should take advantage of this great experiment in social networking and get their hard work up on YouTube to show the rest of the world.
If this post was useful to you..consider buying me a beer via PayPal!
Even a $1 Draft will keep the Mule happily working..and help pay for equipment upgrades!
Friday, May 25, 2007
more automation with Cinelerra
Here's a test video I put together utilizing camera and projector automation, a png image and chroma key, courtesy of Cinelerra.
If this post was useful to you..consider buying me a beer via PayPal!
Even a $1 Draft will keep the Mule happily working..and help pay for equipment upgrades!
convert: linux command line image conversion and processing utility
I needed a quick and dirty command line tool to convert a jpg to a png. Lo and behold, I found the image conversion utility called "convert" on my Fedora Core 6 system from the ImageMagick open source tools, http://www.imagemagick.org/. ImageMagick is now part of the graphics programs packaged with the Core 6 distribution.
Anytime I have a simple task that I can automate or just speedily get done, it usually involves a command line tool. I love command line tools for this reason. I won't belabor describing the software because Linux Journal has already done it for me here:
http://www.linux-mag.com/id/2561/
You can do basic things like resize, crop and convert to different formats. Your command can be as simple as this:
convert [sourceImage] [destinationImage]
example:
convert image.jpg image.png
It is that easy. No opening GIMP just to convert. The program can also do sophisticated image processing using effects. Typing "convert" with no arguments after the command name will give you a full list of the capabilities of the software.
To scale an image, try this command:
convert [sourceImage] -scale [WidthxHeight] [destinationImage]
example:
convert image.jpg -scale 1024x768 newimage.jpg
This is a great utility folks.
Good man page here:
http://linux.about.com/od/commands/l/blcmdl1_convert.htm
Enjoy!
If this post was useful to you..consider buying me a beer via PayPal!
Even a $1 Draft will keep the Mule happily working..and help pay for equipment upgrades!
Wednesday, May 23, 2007
audio sync, nudge, avidemux2 and a reminder about archiving
I spent most of the night trying to debug an audio synchronization problem in Cinelerra. The video was trailing the audio by a little bit. So I used the Nudge feature to slide the audio .5 seconds behind to the right.
A word about nudge:
If the audio is running behind the video, use POSITIVE values for nudge.
If the video is running behind the audio, use NEGATIVE values for nudge.
Another way to put it:
If your audio is lagging and is behind the video (more to the RIGHT on the timeline than the video), push it FORWARD using positive values.
If your audio is running too fast and is ahead of the video (more to the LEFT on the timeline than the video), push it BACKWARD using negative values.
2/17/2008
Since nudge is good for fixing an entire track, one way to fix synchronization problems that occur on only part of a track is to use the Delay Video video effect or the Delay Audio audio effect:
:)
This syncronization problem was after another discovery that Cinelerra on the Fedora Core 6 box I just built is not letting me drag and drop video. So I couldn't manually slide my video around. I'm not sure why this is not working for this particular project, as the Record button is enabled and my editing Preferences seem correct. The funny thing is that it does not happen when I create a new project. My gut feeling is that this version of Cinelerra I am using is SLIGHTLY newer than the one on my main box. So the XML is probably screwed up in some way. Ugh. Tiring.
But not tired enough to write a reminder to everybody that if they want the MOST PORTABLE video files, keep them below 4GB. That way they will fit on a DVD for archiving or transferring, fit on a FAT32 file system and be welcomed on any modern file system. Any larger, and it becomes a nightmare to transfer or archive. As I edit in HDV, file sizes get huge pretty quickly. But keep 'em below 4GB kids! It'll save you much pain in the long run.
Your friend in the battle to trim files down to size is AVIDEMUX2, a wonderful little program I've mentioned before that chops up large video files in no time flat. On my system, a Dell 400SC, 3.2Ghz, 2GB RAM, multiple drives, it took about four minutes total to chop up a 5GB HDV file into two 2.5 chunks. Not bad! One thing I do is to make sure that when you are saving out your file, use Copy for both the Audio and Video tracks and then save to your final format. The Copy feature will save out a new file to the exact same specs as your source file. Very nice feature!
A word about nudge:
If the audio is running behind the video, use POSITIVE values for nudge.
If the video is running behind the audio, use NEGATIVE values for nudge.
Another way to put it:
If your audio is lagging and is behind the video (more to the RIGHT on the timeline than the video), push it FORWARD using positive values.
If your audio is running too fast and is ahead of the video (more to the LEFT on the timeline than the video), push it BACKWARD using negative values.
2/17/2008
Since nudge is good for fixing an entire track, one way to fix synchronization problems that occur on only part of a track is to use the Delay Video video effect or the Delay Audio audio effect:
- The Delay Video track works when audio lags behind the video.
- The Delay Audio track works when the video lags behind the audio.
:)
This syncronization problem was after another discovery that Cinelerra on the Fedora Core 6 box I just built is not letting me drag and drop video. So I couldn't manually slide my video around. I'm not sure why this is not working for this particular project, as the Record button is enabled and my editing Preferences seem correct. The funny thing is that it does not happen when I create a new project. My gut feeling is that this version of Cinelerra I am using is SLIGHTLY newer than the one on my main box. So the XML is probably screwed up in some way. Ugh. Tiring.
But not tired enough to write a reminder to everybody that if they want the MOST PORTABLE video files, keep them below 4GB. That way they will fit on a DVD for archiving or transferring, fit on a FAT32 file system and be welcomed on any modern file system. Any larger, and it becomes a nightmare to transfer or archive. As I edit in HDV, file sizes get huge pretty quickly. But keep 'em below 4GB kids! It'll save you much pain in the long run.
Your friend in the battle to trim files down to size is AVIDEMUX2, a wonderful little program I've mentioned before that chops up large video files in no time flat. On my system, a Dell 400SC, 3.2Ghz, 2GB RAM, multiple drives, it took about four minutes total to chop up a 5GB HDV file into two 2.5 chunks. Not bad! One thing I do is to make sure that when you are saving out your file, use Copy for both the Audio and Video tracks and then save to your final format. The Copy feature will save out a new file to the exact same specs as your source file. Very nice feature!
If this post was useful to you..consider buying me a beer via PayPal!
Even a $1 Draft will keep the Mule happily working..and help pay for equipment upgrades!
Sunday, May 20, 2007
using labels to split rendered video into multiple files
Now that I have my YouTube account, I can go ahead and load it up with a bunch of music videos from the band of miscreants I occasionally play music with. Now, 2006 was a fairly good year for jamming and we had a few stellar sessions at Smash Studios in NYC. The output of these jams usually results in a big video file distributed to my friends. Using Cinelerra, I edit down these three hour sessions into about an hour long video and then distribute that video to my friends via iTunes.
The distributed videos are lower resolution, usually 320x180 MOV files (MPEG4 audio/MPEG4 video) and get pretty big, around 320MB. If you're interested and you have iTunes, you can see some of these monster downloads at itpc://www.stormpigs.com/vodcast.xml.That's really too much to download for any sane person, so my task today was to break up those large videos into small, individual chunks of only the best material from 2006 that I can then upload to YouTube. And hopefully by the end of this post, I'll have some individual songs worth listening to that I can direct you to. With the caveat that the songs were created live, then and there, no rehearsal.
To get back on track, the task is to break up a Cinelerra project into bite size chunks that can then be uploaded to YouTube. This should be fairly simple.
I start with the project that I used to create the one large video. This project has all the audio and video fades and effects that I originally used to create the hour long iTunes video. The good thing about it is that the project has the breaks between video clips delineated clearly. In between the breaks are the actual songs that I'd like to divide up and render out to individual files:
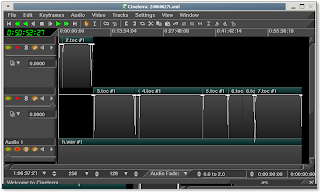
The insertion point will select these breaks very easily, allowing me to set my labels for the render:
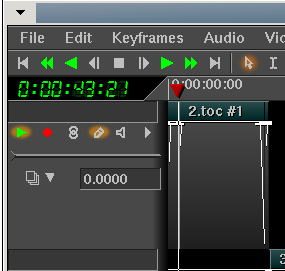
This source project is in HDV format. As I've discussed in previous posts, I edit the high resolution source and then output one final as a DVD resolution file, and then convert that DVD to an iTunes-ready format. This does impose some generational loss in quality, but the source material is not that visually stimulating (a bunch of guys in a dark room), so we're not missing much in the two steps down from HDV to iTunes. So now, I have an HDV source project and an output file rendered to DVD. In my previous post (/2007/05/how-to-upload-video-to-youtube.html, I discuss that YouTube allows me to upload up to 100MB or 10 minutes of video. In that post, I also discovered that YouTube recommends this format file:
- MPEG container
- 320x240 resolution
- MP3 audio
- MPEG I/II video
But can also accept files of this format that I can output directly from Cinelerra:
- MOV container (Quicktime for Linux)
- 720x480 resolution
- MPEG4 audio compression (256,000 constant bitrate, stereo)
- MPEG4 video compression (500,000 constant bitrate)
If I break up my project (the recording session) into videos that are less than 100MB each, I will be able to upload the best parts to YouTube. Now, I'm a pretty lazy person in general, so if I don't have to perform an extra step to convert the files from DVD resolution to the preferred 320x240 resolution, I sure as hell won't bother. The test video that I outputted in the last post (specs above) ended up being about a minute and took up about 6.6MB of space at DVD resolution. Theoretically then, I should be OK as long as my songs are less than 10 minutes long (the YouTube limit). Most are, so we should be good to go.
With the constraints understood, I should now have rougly four steps to perform:
1) append my rendered video to a new track in the original source project
2) create labels at the break points between the songs
3) delete the project's original tracks
4) reduce the project size to 720x480
5) render using labels to indicate the start of a new output file
Let's go through these steps.
1) append my rendered video to a new track in the original source project
First, I make sure to move the Insertion Point to the beginning of the timeline. This is where I want my video to be placed. I then select "o" to load my DVD resolution video. This was the original output I rendered from this HDV resolution project. I make sure to select "Append in New Tracks" as my insertion strategy:
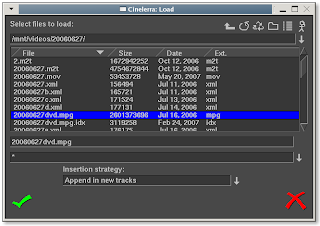
2) create labels at the break points between the songs
Now that I have the source video showing the breaks between songs and the outputting video in another track, I can then move the insertion point to each break between songs and set a label by pressing the "l" key:
3) delete the project's original tracks
In order to avoid confusion, I go ahead and delete the original project tracks by scrolling over the tracks in the timeline and pressing the "d" key or right-clicking on a particular track and select "Delete Track." Deleting the older HDV tracks makes sure that I don't accidentally end up re-rendering the HDV video and wasting hours of CPU cycles.
4) reduce the project size to 720x480
To restate, since my original project was in high definition but my newly appended track is at DVD resolution (720x480), I will need to reduce the size of the output video. So I select Shift-F for the formatting menu and change the project format to 720x480:
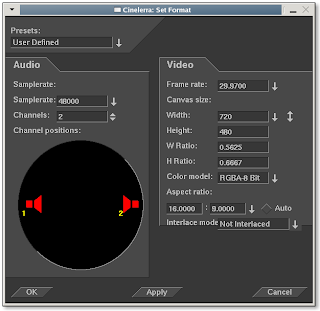
5) render using labels to indicate the start of a new output file
To render a project into separate files with different names, all I need to do is go into the rendering menu (Shift-R) and check the little box that says "Create new file at each label:"

What this useful little option does is given the output file name that you choose, Cinelerra will create a new file at each label with the format <filename>.<extension>##
where the hash marks indicate a sequence of numbers incremented from 01 to NN, the number of your last label. In other words, if you have 40 labels in your project and the file you're creating is called test.mov, Cinelerra will output the following files:
test.mov01
test.mov02
test.mov03
..
all the way to..
..
test.mov40
Pretty neat, huh?
Of course, you'd probably want to rename those files to something more explanatory. But you get the idea.
To make sure I output a small enough file to upload to YouTube, I augment the video compression bitrate to 500,000 and the audio compression to 256,000 as shown below:
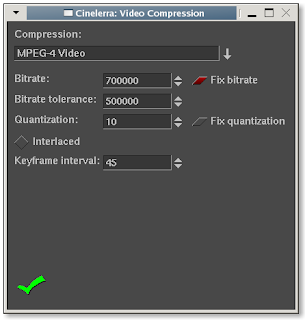
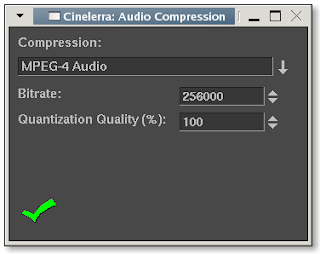
And because I didn't want the first few minutes of introduction to be output, I selected "Selection" for the rendering scope and clicked OK:
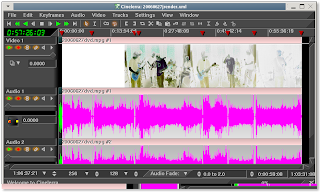
The render process is off and running!
To give you an idea how long this particular video took to render, here are some specs:
Video Length: 1hr 4min
Number of Lables: 7
Resolution: DVD (720x480)
Time to Render: 2hr 10min
Computer: Dell 400SC, 3.2Ghz, 800Mhz FSB, 2GB PC3200RAM, Fedora Core 4 SMP kernel
Post Mortem
Here's a link to a few more I've uploaded since my original post yesterday:
http://www.youtube.com/results?search_query=snufflerstormpig
I hope you enjoyed this discussion of multiple file creation using labels. It is one of the many features of Cinelerra and can be very useful in your editing life.
Be good.
The Crazed Video Mule
If this post was useful to you..consider buying me a beer via PayPal!
Even a $1 Draft will keep the Mule happily working..and help pay for equipment upgrades!
how to upload a video to YouTube
I'm sure this is ground well covered by many already, but I thought I'd frame this discussion of how to upload a video to YouTube with a couple notes for Cinelerra users. I finally got around to uploading a test video on YouTube, and the process is pretty simple:
1) create an account on YouTube (http://www.youtube.com/signup)
2) confirm your account by clicking on the link that will be sent to the email address you specify
3) title, describe, tag and categorize your video to be uploaded
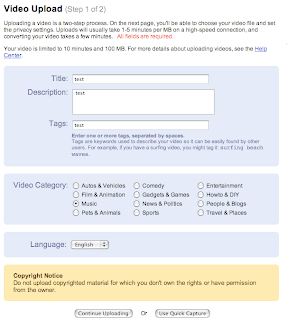
4) choose the file and make it public or private
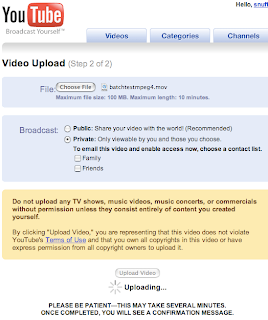
5) click Upload

The list of file types YouTube accepts are .WMV, .AVI, .MOV and .MPG. Though they do specify that the recommended, least problematic file type and specification is:
- MPEG container format
- MPEG 1 or 2 video compression
- 320x240 resolution
- MP3 audio
This first video I uploaded did not conform to the above MPEG specifications. The video I uploaded had the following format:
- QT for Linux (MOV) container format
- 720x480
- MPEG4 video compression
- MPEG4 audio
So it looks like YouTube uploader is pretty forgiving on file types. That will make us Cinelerra users MUCH happier, because we already have enough file format and playability difficulties to worry about! In fact, the second time I uploaded this test video, I had chosen a project format of 1280x720 resolution, rendered that size video and the upload STILL worked. Nice!
The largest video you can upload is 100MB and it cannot be longer than 10 minutes. After you've uploaded the video, it will take a bit of time to be show up and be displayed in your account. This Sunday, it took about 15 minutes for my 59 second, 6.6MB video to be available for viewing. Not bad!
So here's my test video in all its ragged glory:
If this post was useful to you..consider buying me a beer via PayPal!
Even a $1 Draft will keep the Mule happily working..and help pay for equipment upgrades!
Wednesday, May 02, 2007
user agent switcher for older web apps
Perhaps foolishly, I installed the latest version of IE, IE7. I noticed it broke the browser sniffers of some of the older web applications I access. After searching for a plugin for Firefox to simulate any pre-IE7 versions of Internet Explorer, I found this lovely piece of work from the master, Chris Pederick called the User Agent Switcher for Firefox:
http://chrispederick.com/work/useragentswitcher/
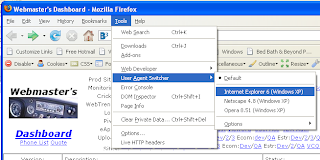
It has saved me on numerous occasions from having to remotely login to another server in order to use an older version of IE.
Thanks Chris! We love ya!
In the opposite vein, I also found a plugin called Mask IE:
http://projectdistributor.net/Projects/Project.aspx?projectId=164
that allows for switching of user agents for IE; however, the .Net framework version that it calls for is obscure (2.0.50727) and I did not want to get into the hassle of tracking down and updating the .Net Framework just for one app.
Update 1/25/2008
For IE7, here's a link I had forgotten about that explains how to tweak your Windows Registry to set your IE user-agent:
http://blogs.msdn.com/ie/archive/2005/04/27/412813.aspx
The reg tweak is here:
http://www.fiddlertool.com/useragent.aspx
This registry update allowed me to view our old WebTrends 6.0 portal. The portal does a browser sniff that precludes the use of any browsers over IE6.0. More importantly, you can easily reverse the registry update.
cheers,
the mule
If this post was useful to you..consider buying me a beer via PayPal!
Even a $1 Draft will keep the Mule happily working..and help pay for equipment upgrades!
Sunday, April 29, 2007
Beginner's Guide to Exporting Video from Cinelerra
In past versions of Cinelerra (pre-2.0), the process of creating content readable by media players across all platforms was cumbersome at best and maddeningly frustrating at worst. Cinelerra 2.0 seems to be much better in this regard, and can produce high-quality video in a variety of formats. However, the newcomer to Cinelerra may still find it difficult to output a simple DVD or web-ready video. This guide addresses this audience by explaining how to get usable content out of Cinelerra quickly and easily.
Disclaimer
This guide doesn't intend to support one particular format or compression method over another, but serves to give the reader a methodology to produce video content that displays properly in as many media players for as many viewers as possible.
Assumptions
The steps described below assume a properly installed version of Cinelerra 2.0. Also, the steps below were tested successfully with NTSC formatted video (thanks to Graham Evans for the clarification).
Test System
The procedures below were tested and certified by a non-independent, first party on the following machine:
Dell SC400, 3.2Ghz Pentium IV, 800Mhz FSB,
1GB PC3200 RAM, 80GB (x2) working drives
Fedora Core 4
FreshRPMs Cinelerra build 2.0-0.3.20051210.2.fc4.i386
http://rpmfind.net/linux/RPM/freshrpms/fedora/4/cinelerra/cinelerra-2.0-0.3.20051210.2.fc4.i386.html
Who is your Audience?
So! You've edited your masterpiece in Cinelerra and now it is time to export or "render" it to a final format. Congratulations! However, you first must consider your audience before you decide how you want to distribute the video. Who is going to watch your video and how are they going to watch it? Are you going to give them a DVD, submit a video feed to iTunes, send them a link to a website or just load the video into your iPod? Given that you have a destination for your video, this document will show you how to produce content ready for all of those options:
* HDV 720P
* a DVD
* a vodcast
* a webpage or web download
* Video iPod
Here is a chart comparing the different distribution methods and file formats:
Once you've rendered your video, don't forget to verify that your video is correctly formatted! And there are sections on advanced techniques for those people who would like to learn more and troubleshooting for folks who may be having problems.
What Operating System Does Your Audience Use?
As in all things Linux, there are a hundred different ways of accomplishing a single task. After much trial and error with file format and compression settings in Cinelerra, I've have had some success using the above formats across operating systems and players. Surprisingly, the QuickTime 7 player on XP is the most consistent media player. As well, MPEG2 is the most compatible format across players of different operating systems.
Here is a chart describing the compatibility of the above test files in major Linux and XP players:
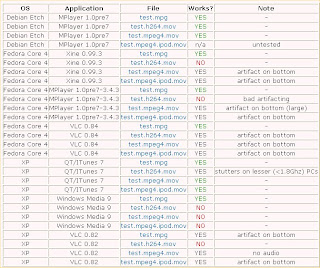
Update 2008/12/24
I've put together a new compatibility chart of Cinelerra export container formats and codecs for Fedora 10, x86-64:
http://crazedmuleproductions.blogspot.com/2008/12/fedora-10-x86-64-compability-chart.html
The chart was created using a 720P resolution Cinelerra project. It is not yet complete.
In a perfect world, this chart should represent the compatibility for all distributions. In reality, your mileage may vary.
end update
Now that we've put some thought into who our audience is and what operating systems and players they use, let's export some video!
Exporting HDV Video
No example yet
For a HDV720P formatted file, we will save the audio and video streams separately. The audio will be saved as MPEG Layer II (384Kbps) and the video will be encoded using mpeg2enc. Once we are done saving the audio and video streams separately, we will then combine (or "mux") the streams together using mplex into a program stream. Finally, we will use VLC to convert the program stream into a MP@HL compliant MPEG transport stream (MPEG-TS).
The general specifications of the combined file are:
File Format: MPEG
Compression Type: MPEG-2
Audio: MPEG Layer II, 384Kbps
Here are the steps. First, render the audio:
* in Cinelerra, press Shift-R for the Render menu.
* under Select a file to render to, choose a destination directory and filename
* under File Format, choose "MPEG Audio"
* under Audio, check the "Render audio tracks" checkbox
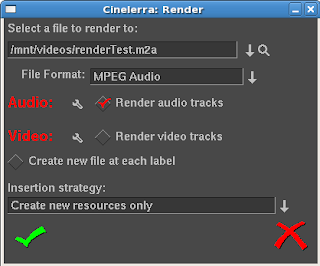
* click the wrench icon next to Audio
* select "II" from the Layer dropdown
* select "384" from the Kbits per second dropdown
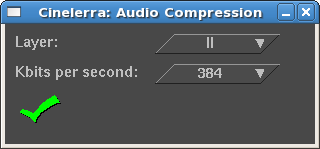
* accept the changes by clicking the checkbox in the lower left hand corner of the dialog box
* under Video, uncheck the "Render video tracks" checkbox
* accept the changes by clicking the checkbox in the lower left hand corner of the dialog box
* make sure that "Create new file at each label" is not checked
* make sure that "Insertion strategy" is set to "Create new resources only"
* To start rendering, click the checkbox in the lower left hand of the dialog.
Audio does not take very long to render. On my machine, a 3.2Ghz Pentium IV with 1GB of PC3200 memory, a 5 minute stream of MPEG Layer II audio takes about a minute to render.
Secondly, render the video:
* in Cinelerra, press Shift-R for the Render menu.
* under Select a file to render to, choose a destination directory and filename for the video (ending in .m2v). This file should go in the same directory as the audio file. This is not a necessity, but will make it easier when we mux (combine) the audio and video in the next and final step.
* under File Format, select "YUV4MPEG Stream"
* under Audio, uncheck the "Render audio tracks" checkbox
* under Video, check the "Render video tracks" checkbox
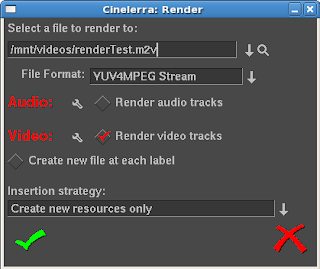
* click the wrench icon next to Video. Choose the following options:
* "Output Path" should have the filename and location you selected in the previous steps with a new extension, .m2v
* "Use Pipe" should be selected. If not, select "Use Pipe"
* enter or cut and paste the following render information into the Use Pipe textbox:
mpeg2enc --verbose 0 --aspect 3 --format 3 --frame-rate 4 --video-bitrate 18300 --nonvideo-bitrate 384 --interlace-mode 0 --force-b-b-p --video-buffer 448 --video-norm n --keep-hf --no-constraints --sequence-header-every-gop --min-gop-size 6 --max-gop-size 6 -o %
* under "Stream Header, Interlacing" will be left as "Unknown"
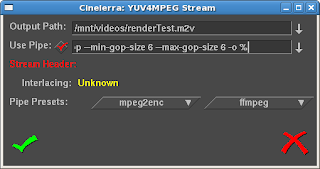
* accept the changes by clicking the checkbox in the lower left hand corner of the dialog box
* make sure that "Create new file at each label" is not checked
* make sure that the "Insertion strategy" is set to "Create new resources only"
* To start rendering, click the checkbox in the lower left hand of the dialog. MPEG2 video at HDV resolution takes a long time to render. If you have a dual, dual core machine, HDV video at 720P resolution takes about two minutes to render per minute of video.
After rendering the audio and video streams, mux (combine) them together into an MPEG program stream (PS) file using mplex. This step should not take that long, perhaps one minute for every 10 minutes of HDV video:
* Go to a terminal/shell prompt
* Navigate to the directory where you put both the separate audio and video files
Use this command:
mplex -f 3 -b 2000 video.m2v audio.m2a -o output.ps
The final step in creating an HDV 720P file is to convert it to a transport stream. Do this using VLC.
(screen shots to come)
Once the MPEG-TS file is output, you should have a proper HDV 720P that matches the MP@HL spec. This file can then be copied to a media player that accepts HDV content or output to an HDV camera that accepts 720P (MP@HL) formatted video.
Exporting Video for a DVD
See example: test.mpg (11.5MB)
For a DVD formatted file, we will save the audio and video streams separately. The audio will be saved as a Microsoft WAV file and the video will be encoded using YUV4MPEG compression. Luckily, as of Cinelerra version 1.2.2, Heroine Warrior replaced the much slower mpeg2enc encoding with fast YUV4MPEG. Hooray! Once we are done saving the audio and video, we will then combine (or "mux") the streams together for the final product using ffmpeg.
The general specifications of the combined file are:
File Format: MPEG
Compression Type: MPEG-2
Audio: Twos complement
Here are the steps. First, render the audio:
* in Cinelerra, press Shift-R for the Render menu.
* under Select a file to render to, choose a destination directory and filename (ending in .wav)
* under File Format, choose "Microsoft WAV"
* under Audio, check the "Render audio tracks" checkbox
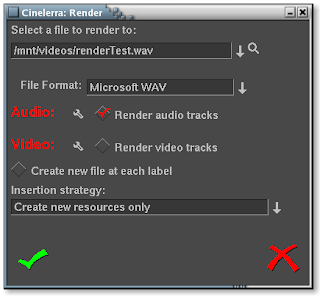
* click the wrench icon next to Audio
* Accept the Compression default of "16 Bit Linear"
* Leave "Dither" unselected
* Accept the changes by clicking the checkbox in the lower left hand corner of the dialog box
* under Video, uncheck the "Render video tracks" checkbox
* accept the changes by clicking the checkbox in the lower left hand corner of the dialog box
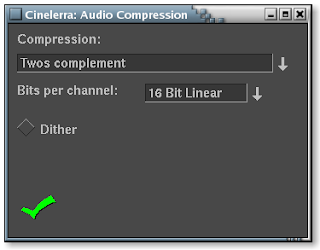
* make sure that "Create new file at each label" is not checked
* make sure that "Insertion strategy" is set to "Create new resources only"
* To start rendering, click the checkbox in the lower left hand of the dialog.
Audio does not take very long to render. On my machine, a 3.2Ghz Pentium IV with 1GB of PC3200 memory, a 5 minute stream of audio takes about thirty seconds to render.
Secondly, render the video:
* in Cinelerra, press Shift-R for the Render menu.
* under Select a file to render to, choose a destination directory and filename for the video (ending in .m2v). This file should go in the same directory as the audio file. This is not a necessity, but will make it easier when we mux (combine) the audio and video in the next and final step.
* under File Format, select "YUV4MPEG Stream"
* under Audio, uncheck the "Render audio tracks" checkbox
* under Video, check the "Render video tracks" checkbox
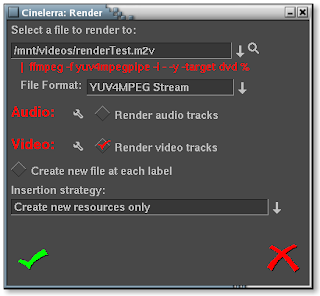
* click the wrench icon next to Video. Choose the following options:
* "Output Path" should have the filename and location you selected in the previous steps
* skip "Use Pipe" for now
* go down to the "Pipe Presets" section and click ffmpeg. There will be two choices here. Select the DVD format. Depending on the version of Cinelerra that you've downloaded or compiled, you may see one of two versions of the ffmpeg DVD pipe:
1) The first should be used for progressive content
ffmpeg -f yuv4mpegpipe -i - -y -target ntsc-dvd %
2) The second should be used for interlaced content:
ffmpeg -f yuv4mpegpipe -i - -y -target ntsc-dvd -ilme -ildct -hq -f mpeg2video %
Note that if you have problems rendering, the -ilme -ildct -hq arguments or just the -hq argument alone should be removed. In addition, some versions of FFMPEG do not support the -hq option and you will get the below error if you try to render video using this pipe:
ffmpeg: unrecognized option '-hq'
Received sigpipe
write_frame() failed: system error (failed read/write)
Unfortunately, FFMPEG is a moving target, as the tool is in a state of continuous development. That is good, as new features and functionality are being implemented, but distressing when the new features or command line switches change and break scripts that previously worked.
* At this point, the "Use Pipe" checkbox above should be checked and the ffmpeg command pipe should populate the text input field. You should not need to edit this command, as the default pipes' output settings yield high quality video.
* under "Stream Header, Interlacing" will be left as "Unknown"
* accept the changes by clicking the checkbox in the lower left hand corner of the dialog box
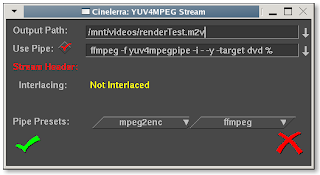
* You will notice that underneath "Select a file to render to", the ffmpeg command is represented as a pipe command.
* make sure that "Create new file at each label" is not checked
* make sure that the "Insertion strategy" is set to "Create new resources only"
* To start rendering, click the checkbox in the lower left hand of the dialog. Heroine Warrior has done an excellent job of enhancing the performance of the MPEG streamer, but it still takes quite a while if you've got more than 10 minutes of video. Again, on my machine (described above), it should take about 10 minutes to render 10 minutes of video as an MPEG stream.
Finally, we will mux (combine) the audio and video streams together into a DVD-ready product. Here's what you do:
* Go to a terminal/shell prompt
* Navigate to the directory where you put both the separate audio and video files
Use this command:
ffmpeg -i filename.wav -i filename.m2v -target dvd destinationFilename.mpg
Here is a description of what the switches I chose for ffmpeg mean:
-i = input (either sound or video file)
-target dvd = specifies standard DVD dimensions for the video (720x480) and default bitrate quality levels of ~7Mbps (other targets: "vcd", "svcd", "dvd", "dv", "pal-vcd", "ntsc-svcd" (see -formats switch below))
When not using -target switch, other useful arguments apply:
-aspect = aspect ratio: choose 4:3, 16:9, 1.3333, 1.7777
-b = bitrate in kbps (default = 200 kbps)
-r = frame rate (default = 25)
-s = size (default 160x128)
-ab = audio bitrate (default = 64 kbps)
-ac = audio channels (default = 1)
-formats = file formats, codecs and protocols that ffmpeg supports
Of course, running "man ffmpeg" in a terminal will tell you more than you ever wanted to know about ffmpeg, but here's a nice tutorial on getting started with ffmpeg:
http://howto-pages.org/ffmpeg/
References:
FFMPEG documentation: http://ffmpeg.org/documentation.html
FFMPEG command line options: http://ffmpeg.mplayerhq.hu/ffmpeg-doc.html
In general, using ffmpeg may take quite a while based upon the resolution and length of your video. And if you haven't guessed it already, we are rendering the file for a second time. Video purists would frown upon such a transgression, but for the sake of simplicity, please excuse. By the way, ffmpeg is a very powerful program and there are many more switches you can use to slice and dice your video in any way possible before or after you get it into Cinelerra. Let it be known that the procedure just described will give you a file that will work well with any DVD authoring software.
Don't forget to verify that your video is correctly formatted!
Exporting Video for a Vodcast
See example: test.h264.mov (5.5MB)
To put your video up as a video podcast or vodcast, we will format the video using H.264 compression, as Heroine Warrior terms "one of the highest quality video codecs around, making HDTV distribution over the Internet almost practical." That may be, but users of lowered powered PCs may have difficulty viewing files of this format. Stuttered playback may occur on Intel P4 systems less than 1.8Ghz. I have not yet tested on Apples.
The general specifications of the file are:
File Format: Quicktime for Linux
Compression Type: H.264
Audio: MPEG-4 Audio
Once you've prepared your video in Cinelerra, follow these instructions to prepare it as a podcast:
* in Cinelerra, press Shift-R for the Render menu.
* under Select a file to render to, choose a destination directory and filename (ending in .mov)
* under File Format, select "Quicktime for Linux"
* under Audio, check the "Render audio tracks" checkbox
* click the wrench icon next to Audio

* change the default Compression default from "Twos complement" to MPEG-4 Audio.
* If you want your video to have very high quality sound, accept the default Bitrate of 256000. Otherwise, change this value to something lower to save space. 128000 is sufficient for stereo music. 64000 or lower for voice.
* leave the Quantization Quality at 100%.
* accept the changes by clicking the checkbox in the lower left hand corner of the dialog box.
* under Video, check the "Render video tracks" checkbox
* click the wrench icon next to Video. Choose the following options:
* use H.264 compression. This is Apple's preferred format for iTunes, so let's all bow down to Mr.Jobs. Kidding aside, this format does do an excellent job of saving space with limited reduction in quality.
* keep the default bitrate of 1000000. I've noticed that changing the default bitrate does not change the file size or quality of the output file.
* change the quantization from 5 to 20. This level of quantization will reduce the size of the file by a factor of 66%!
* leave "Fix quantization" checked
* accept the changes by clicking the checkbox in the lower left hand corner of the dialog box
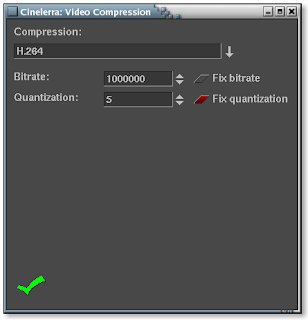
* make sure that Create new file at each label is not checked
* make sure that the Insertion strategy is set to "Create new resources only"
* To start rendering, click the checkbox in the lower left hand of the dialog. If you're video is less than 15 minutes long, read your mail or do some research on that new iPod you're lusting after. If your video is longer than a half hour, go out and paint the town red, because it's gonna take a long time.
Don't forget to verify that your video is correctly formatted!
Exporting Video for a Web Page or a Web Download
See example: test.mpeg4.mov (7.8MB)
Lastly, to prep your video for a web audience, we will format the video using MPEG-4 compression. Using this format results in the smallest file of the three options chosen.
The general specifications of this file are:
File Format: Quicktime for Linux
Compression Type: MPEG-4 Video
Audio: Twos complement
Once your video is set to be put on a webpage, follow these instructions:
* in Cinelerra, press Shift-R for the Render menu.
* under Select a file to render to, choose a destination directory and filename (ending in .mov)
* under File Format, select "Quicktime for Linux"
* under Audio, check the "Render audio tracks" checkbox
* click the wrench icon next to Audio
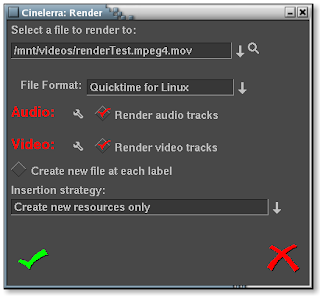
* accept the Compression default of "Twos complement" and Bits per channel of "16 Bit Linear".
* leave "Dither" unselected
* accept the changes by clicking the checkbox in the lower left hand corner of the dialog box
* under Video, check the "Render video tracks" checkbox
* click the wrench icon next to Video. Choose the following options:
* use MPEG-4 Video compression. This saves quite a bit of space, with limited reduction in quality
* keep the default bitrate of 1000000, bitrate tolerance of 500000, quantization of 10 and interlaced keyframe interval of 45.
* leave "Fix bitrate" checked
* accept the changes by clicking the checkbox in the lower left hand corner of the dialog box
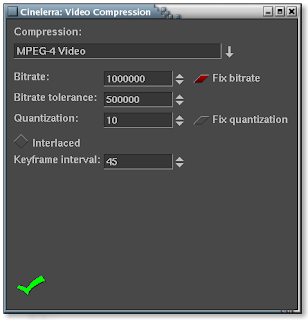
* make sure that "Create new file at each label" is not checked
* make sure that the "Insertion strategy" is set to "Create new resources only"
* To start rendering, click the checkbox in the lower left hand of the dialog. Go get a cup of coffee if you're video is less than 15 minutes long or take a nice long nap if the video is longer than 30 minutes.
Rendering takes mucho processing power, but Cinelerra can handle it! Now if I only had that Dual Opteron box..
:)
Don't forget to verify that your video is correctly formatted!
Exporting Video for a Video iPod
See example: test.mpeg4.ipod.mov (1.4MB)
Update 09/29/2008
Due to updates in FFMPEG and iTunes, the directions herein will only allow you to encode a video that can be replayed in iTunes. However, the file will NOT play in your iPod. I have found a workaround:
http://crazedmuleproductions.blogspot.com/2008/09/h264-encoding-for-video-ipod.html
end update
Update 10/16/2008
Making a Podcast, by Apple
The test file from the above Web Download portion of this document (test.mpeg4.mov) loads and plays in iTunes. However, when I went to upload it, iTunes gave me the message:
"Some of the songs in the iTunes music library, including the song "(Video name)", were not copied to your iPod because they cannot be played on this iPod."
Luckily, Apple provides a feature called "Convert Selection for iPod" when you right-click on the file. But geez! I already rendered this thing. I've have to re-render it? Ugh. OK then. But, oh no, the conversion utility takes too much time! Even on a very fast machine like mine, a 3.2Ghz P4 with 1GB of PC3200 memory, the conversion speed is roughly 1.5 minutes per minute of video. That is way TOO slow. But I went ahead and did the conversion with my short test video. On the bright side, once the video was converted, I could then update my iPod and the video was on my iPod. Yes!
I continued playing around and loading many different videos into iTunes. In my travels, I stumbled upon one that did not require a conversion. I was shocked! I then reasoned that I'd save much time if I just produced the videos in the format that iTunes expects in the first place. But how to do that? So, my next course of action was to research why that one file worked in iTunes without a conversion and why mine needed the conversion.
To do this, I analyzed the output of MPlayer to determine the differences between files. I learned quite a bit about audio and video formats by reviewing the output of MPlayer. It helps to have the text of both files displayed in two windows next to each other in order to more easily compare the files line by line. I've done this for you in the image below. On the left appears the file that is in the correct format; on the right, my file not in the correct iTunes format:
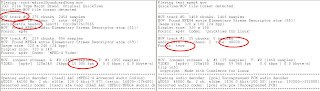
Reviewing the diffences, I noticed the following:
* iTunes compatible file had the audio track as the first track in the MOV container; my file had the video as the first track
* iTunes compatible file was 44.1Khz audio; my file was 48000Khz
* iTunes compatible file included an extra audio header; my file did not have the extra header
* iTunes compatible file audio compression method was MPEG-4; my file was twos complement
* iTunes compatible file FPS rate was 15; my file was 59.97
After way too many hours of trial and error, I found that it was the audio sampling rate and compression type that broke my file in iTunes. Here are the settings in Cinelerra that will make an MPEG-4 video totally compatible with iTunes so that iTunes does not need to re-render (the "Convert Selection for iPod" feature) the video! These settings are a slight variation on the Web Download procedures (MPEG-4 format).
Here are the specs I used:
H.264 video:
* up to 768 Kbps, 320 x 240, 30 frames per sec., Baseline Profile up to Level 1.3 with AAC-LC up to 160 Kbps, 48 Khz, stereo audio in .m4v, .mp4 and .mov file formats
MPEG-4 video:
* up to 2.5 mbps, 480 x 480, 30 frames per sec., Simple Profile with AAC-LC up to 160 Kbps, 48 Khz, stereo audio in .m4v, .mp4 and .mov file formats
If you expect to upload into iTunes without needing a re-render, DO NOT deviate from ANY of these settings.
iTunes Specific Information
When you drag and drop a video into the iTunes Library, the software will first evaluate the video to see if it can read the video file. If you drag and drop your newly created video onto iTunes, right-click and select "Convert Selection for iPod". If you have followed my directions, you should receive the following message:
"One or more videos were not converted because they are already in the correct format."
Once you see this message, you know you've been successful in creating a video file in compliance with the iTunes format specifications. Wonderful!!
Don't forget to verify that your video is correctly formatted!
References:
http://www.apple.com/ipod/specs.html
http://www.ipodwizard.net/showthread.php?t=4413
http://members.shaw.ca/Kyle-Rogers/
Verifying Your Settings Are Correct
Once your render is complete for any of the formats above, use your favorite media player to view your masterpiece. After doing this though, you probably want to double-check that the bitrates and compression settings you've chosen for your rendered file are indeed correct. Below, I've listed the following switches of popular players that will display the audio and video settings of your video:
mplayer -identify
ffplay -stats
xine: ALT-i for detailed info, CTRL-i for a brief summary of video stats
qtinfo: displays the settings of any QuickTime video
Advanced Techniques
Reducing the resolution of your source video
I own a high definition video cam, the JVC HD10U. This camera outputs some beautiful HDV footage in MPEG2-TS (transport stream) format; however, the native 720P format is overkill for most applications, especially the three listed at the top of this document. Often then, I will need to decrease the resolution of my videos from 720P to a more manageable dimension. Normally, you'd need to reduce your videos' resolution outside of Cinelerra. This advanced technique will show you that you can save time by doing the resize within Cinelerra!
For example, I will reduce my source video to 480P in order to produce a good looking DVD. Therefore, this advanced technique begins from where we left off earlier in the document, Exporting Video for a DVD, so please refresh your memory before we start.
To reduce the resolution of your source video, you can remove the "-target dvd" switch from the YUV4MPEG Stream settings and replace it with the following switches to FFMPEG:
-aspect = aspect ratio: choose 4:3, 16:9, 1.3333, 1.7777
-b = bitrate in kbps (default = 200 kbps)
-r = frame rate (default = 25)
-s = size (default 160x128)
For example, when I reduced the resolution of the original video used earlier in this tutorial from 720x480 to 320x180, I used these FFMPEG switches when exporting the YUV4MPEG Stream:
-aspect 16:9 -b 7000 -r 29.97 -s 320x180
Here's what the YUV4MPEG Stream dialog looked like while I made these changes:
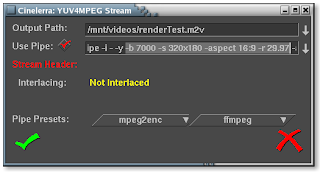
Here's what the Render dialog looked like after I made my changes:
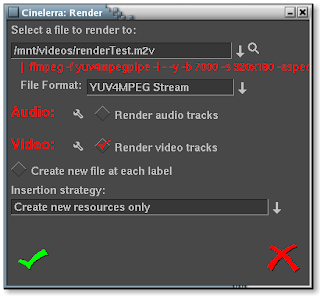
Notice the absence of the "-target dvd" switch after the "-y". Now you've resized your video all within Cinelerra. Awesome!
Combining a pre-existing audio file with a new video stream
In the previous example, I wanted to reduce the resolution of my video. In like fashion, I want to reduce the resolution, but I also want to keep the same audio stream. To do this, you'd normally have to combine the audio and video streams outside of Cinelerra. But again, we can save time by doing the mux within Cinelerra using this advanced technique!
In my case, I have a pre-existing audio file that I will combine with a newly rendered video stream. Because the duration of the audio matched the larger resolution version, the audio file will be the same length as my video track. In practice, this does not necessarily have to be so, but if your goal is to reduce the resolution of a specific video, most likely you will have an audio file that is the same length as the video. So, just like the previous advanced technique, I edited the commands after the pipe symbol to include the full path of the audio file. I added the following directly before the last character, a "%", in the FFMPEG pipe command:
-ab 320 -ac 2 -i "audio file path/audio file name"
Here's what the YUV4MPEG Stream dialog looked like while I made these changes:
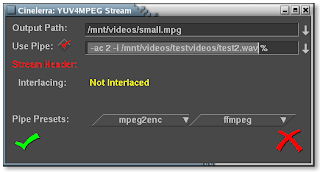
It bears repeating that the full path MUST be specified in the -i switch. If you see errors such as these:
test2.wav: I/O error occured
Usually that means that input file is truncated and/or corrupted.
Received sigpipe
write_frame() failed: system error (failed read/write)
This usually means that your path to the file is incorrect and you'll need to fix it.
Finally, you'll notice two other switches in the pipe command I gave you. Recall these switches to FFMPEG:
-aspect = aspect ratio: choose 4:3, 16:9, 1.3333, 1.7777
-b = bitrate in kbps (default = 200 kbps)
-r = frame rate (default = 25)
-s = size (default 160x128)
-ab = audio bitrate (default = 64 kbps)
-ac = audio channels (default = 1)
As the audio was a high quality stereo mix, I opted for an audio bitrate of 320kbps and a two channel mix. The very nice thing about this advanced technique is that you don't have to mux the video outside of Cinelerra. You can do it within the program itself!
A word about bitrates
A detailed discussion on selecting an appropriate bitrate for your video is out of the scope of this article. So, in the spirit of my guide, I just let Cinelerra's bitrate defaults stand for the beginner who would rather not worry about the details just yet and render something that works the first time out of the box. That being said, I do use a quick-and-dirty method of determining bitrates for my videos.
To determine the bitrate for a video with high quality output, I use the following calculation:
bitrate in kbps = FPS * WIDTH * HEIGHT * QUALITY FACTOR
So, if I have a 320x240 video at 30FPS ready for iTunes, I would substitute in the following values:
= 30 * 320 * 240 * .255
= 587kbps
The final "Quality Factor" varies, but a value of .255 would yield good quality output. The higher the factor, the higher the bitrate and thus, better quality. Experiment with this quality factor to see if it works for you.
Here are some reference links to help you get an idea of what is involved in order to calculate the right bitrate for your video:
Understanding Bit Rates
DVD bitrate calculator
http://www.videohelp.com/calc
http://www.signvideo.com/bt-rts.htm
http://dvd-hq.info/Calculator.html
http://neuron2.net/LVG/ratesandsizes.html
http://www.cs.unc.edu/~hensley/zaurus/encode.html
Troubleshooting
Improper Audio Synchronization
I've had trouble with audio synchronization in a case where I rendered a file from a video track that did not start at zero on the timeline, but started a couple hundred frames after the audio. When I combined the rendered video and audio outside of Cinelerra in FFMPEG, the audio synchronization was off. To make your life easier, keep the start and end of your video and audio tracks perfectly aligned. Make sure to zoom in to less than five frames to verify this.
Truncated Video Track
Also, another difficulty I've had is when I open a just-rendered YUV4MPEG stream (.M2V video file) back into a project, the video is truncated and is shorter than the companion audio track. You can read about my troubles here: https://init.linpro.no/pipermail/skolelinux.no/cinelerra/2006-March/005760.html.
I resolved this using two methods:
Don't re-import a YUV4MPEG video after rendering it. In other words, do all of your editing within Cinelerra and then render ONE TIME ONLY when you are done with all of your edits. This may not be feasible on large projects, though.
Use QuickTime for Linux container format to render to and re-import back into Cinelerra. This container does not have the same strange behavior as YUV4MPEG. In other words, when bringing a recently rendered video back into Cinelerra, the audio and video tracks are of the same length and perfectly in sync.
--------------------------------------------------------------------------------
I hope you enjoyed this evolving document. The developers of Cinelerra were kind enough to provide us with a very powerful product that would normally cost thousands of dollars. So I'd like to thank the folks at Heroine Warrior for doing such a fine job programming and all the people at http://cvs.cinelerra.org/ who commit countless hours of their free time and energy on the software. As such, I felt it necessary to give back something to this community who has given us such a gift.
Please let me know of any new topics or improvements you'd like to see in this doc or maybe a new doc! Thanks!
Disclaimer
This guide doesn't intend to support one particular format or compression method over another, but serves to give the reader a methodology to produce video content that displays properly in as many media players for as many viewers as possible.
Assumptions
The steps described below assume a properly installed version of Cinelerra 2.0. Also, the steps below were tested successfully with NTSC formatted video (thanks to Graham Evans for the clarification).
Test System
The procedures below were tested and certified by a non-independent, first party on the following machine:
Dell SC400, 3.2Ghz Pentium IV, 800Mhz FSB,
1GB PC3200 RAM, 80GB (x2) working drives
Fedora Core 4
FreshRPMs Cinelerra build 2.0-0.3.20051210.2.fc4.i386
http://rpmfind.net/linux/RPM/freshrpms/fedora/4/cinelerra/cinelerra-2.0-0.3.20051210.2.fc4.i386.html
Who is your Audience?
So! You've edited your masterpiece in Cinelerra and now it is time to export or "render" it to a final format. Congratulations! However, you first must consider your audience before you decide how you want to distribute the video. Who is going to watch your video and how are they going to watch it? Are you going to give them a DVD, submit a video feed to iTunes, send them a link to a website or just load the video into your iPod? Given that you have a destination for your video, this document will show you how to produce content ready for all of those options:
* HDV 720P
* a DVD
* a vodcast
* a webpage or web download
* Video iPod
Here is a chart comparing the different distribution methods and file formats:
Distribution File Format         Video Compression Audio Format
HDV720P      MPEG2               YUV4MPEG          MPEG, Layer II (384Kbps)
DVD          MPEG2               YUV4MPEG          Twos Comp'mnt
Vodcast      Quicktime for Linux H.264             MPEG-4 Audio
Web Download Quicktime for Linux MPEG-4 Video      Twos Comp'mnt
Video iPod   Quicktime for Linux MPEG-4 Video      MPEG-4 Audio

Distribution Test Video          Size   Render Time
HDV720P      no example yet
DVD          test.mpg            11.5MB      15 sec
Vodcast      test.h264.mov        5.5MB      50 sec
Web Download test.mpeg4.mov       7.8MB      30 sec
Video iPod   test.mpeg4.ipod.mov  1.4MB      30 sec
Note: the dimensions of the test videos were reduced from DVD resolution (720x480) to a lower resolution (320x180) in order to make it easier for readers to download. Also, the only way to reduce the resolution of your video is to render it to a different resolution (described in advanced techniques below). You can resize or crop your video, but in doing so, you would lose some part of the viewable picture.
Once you've rendered your video, don't forget to verify that your video is correctly formatted! And there are sections on advanced techniques for those people who would like to learn more and troubleshooting for folks who may be having problems.
What Operating System Does Your Audience Use?
As in all things Linux, there are a hundred different ways of accomplishing a single task. After much trial and error with file format and compression settings in Cinelerra, I've have had some success using the above formats across operating systems and players. Surprisingly, the QuickTime 7 player on XP is the most consistent media player. As well, MPEG2 is the most compatible format across players of different operating systems.
Here is a chart describing the compatibility of the above test files in major Linux and XP players:

Update 2008/12/24
I've put together a new compatibility chart of Cinelerra export container formats and codecs for Fedora 10, x86-64:
http://crazedmuleproductions.blogspot.com/2008/12/fedora-10-x86-64-compability-chart.html
The chart was created using a 720P resolution Cinelerra project. It is not yet complete.
In a perfect world, this chart should represent the compatibility for all distributions. In reality, your mileage may vary.
end update
Now that we've put some thought into who our audience is and what operating systems and players they use, let's export some video!
Exporting HDV Video
No example yet
For a HDV720P formatted file, we will save the audio and video streams separately. The audio will be saved as MPEG Layer II (384Kbps) and the video will be encoded using mpeg2enc. Once we are done saving the audio and video streams separately, we will then combine (or "mux") the streams together using mplex into a program stream. Finally, we will use VLC to convert the program stream into a MP@HL compliant MPEG transport stream (MPEG-TS).
The general specifications of the combined file are:
File Format: MPEG
Compression Type: MPEG-2
Audio: MPEG Layer II, 384Kbps
Here are the steps. First, render the audio:
* in Cinelerra, press Shift-R for the Render menu.
* under Select a file to render to, choose a destination directory and filename
* under File Format, choose "MPEG Audio"
* under Audio, check the "Render audio tracks" checkbox

* click the wrench icon next to Audio
* select "II" from the Layer dropdown
* select "384" from the Kbits per second dropdown

* accept the changes by clicking the checkbox in the lower left hand corner of the dialog box
* under Video, uncheck the "Render video tracks" checkbox
* accept the changes by clicking the checkbox in the lower left hand corner of the dialog box
* make sure that "Create new file at each label" is not checked
* make sure that "Insertion strategy" is set to "Create new resources only"
* To start rendering, click the checkbox in the lower left hand of the dialog.
Audio does not take very long to render. On my machine, a 3.2Ghz Pentium IV with 1GB of PC3200 memory, a 5 minute stream of MPEG Layer II audio takes about a minute to render.
Secondly, render the video:
* in Cinelerra, press Shift-R for the Render menu.
* under Select a file to render to, choose a destination directory and filename for the video (ending in .m2v). This file should go in the same directory as the audio file. This is not a necessity, but will make it easier when we mux (combine) the audio and video in the next and final step.
* under File Format, select "YUV4MPEG Stream"
* under Audio, uncheck the "Render audio tracks" checkbox
* under Video, check the "Render video tracks" checkbox

* click the wrench icon next to Video. Choose the following options:
* "Output Path" should have the filename and location you selected in the previous steps with a new extension, .m2v
* "Use Pipe" should be selected. If not, select "Use Pipe"
* enter or cut and paste the following render information into the Use Pipe textbox:
mpeg2enc --verbose 0 --aspect 3 --format 3 --frame-rate 4 --video-bitrate 18300 --nonvideo-bitrate 384 --interlace-mode 0 --force-b-b-p --video-buffer 448 --video-norm n --keep-hf --no-constraints --sequence-header-every-gop --min-gop-size 6 --max-gop-size 6 -o %
* under "Stream Header, Interlacing" will be left as "Unknown"

* accept the changes by clicking the checkbox in the lower left hand corner of the dialog box
* make sure that "Create new file at each label" is not checked
* make sure that the "Insertion strategy" is set to "Create new resources only"
* To start rendering, click the checkbox in the lower left hand of the dialog. MPEG2 video at HDV resolution takes a long time to render. If you have a dual, dual core machine, HDV video at 720P resolution takes about two minutes to render per minute of video.
After rendering the audio and video streams, mux (combine) them together into an MPEG program stream (PS) file using mplex. This step should not take that long, perhaps one minute for every 10 minutes of HDV video:
* Go to a terminal/shell prompt
* Navigate to the directory where you put both the separate audio and video files
Use this command:
mplex -f 3 -b 2000 video.m2v audio.m2a -o output.ps
The final step in creating an HDV 720P file is to convert it to a transport stream. Do this using VLC.
(screen shots to come)
Once the MPEG-TS file is output, you should have a proper HDV 720P that matches the MP@HL spec. This file can then be copied to a media player that accepts HDV content or output to an HDV camera that accepts 720P (MP@HL) formatted video.
Exporting Video for a DVD
See example: test.mpg (11.5MB)
For a DVD formatted file, we will save the audio and video streams separately. The audio will be saved as a Microsoft WAV file and the video will be encoded using YUV4MPEG compression. Luckily, as of Cinelerra version 1.2.2, Heroine Warrior replaced the much slower mpeg2enc encoding with fast YUV4MPEG. Hooray! Once we are done saving the audio and video, we will then combine (or "mux") the streams together for the final product using ffmpeg.
The general specifications of the combined file are:
File Format: MPEG
Compression Type: MPEG-2
Audio: Twos complement
Here are the steps. First, render the audio:
* in Cinelerra, press Shift-R for the Render menu.
* under Select a file to render to, choose a destination directory and filename (ending in .wav)
* under File Format, choose "Microsoft WAV"
* under Audio, check the "Render audio tracks" checkbox

* click the wrench icon next to Audio
* Accept the Compression default of "16 Bit Linear"
* Leave "Dither" unselected
* Accept the changes by clicking the checkbox in the lower left hand corner of the dialog box
* under Video, uncheck the "Render video tracks" checkbox
* accept the changes by clicking the checkbox in the lower left hand corner of the dialog box

* make sure that "Create new file at each label" is not checked
* make sure that "Insertion strategy" is set to "Create new resources only"
* To start rendering, click the checkbox in the lower left hand of the dialog.
Audio does not take very long to render. On my machine, a 3.2Ghz Pentium IV with 1GB of PC3200 memory, a 5 minute stream of audio takes about thirty seconds to render.
Secondly, render the video:
* in Cinelerra, press Shift-R for the Render menu.
* under Select a file to render to, choose a destination directory and filename for the video (ending in .m2v). This file should go in the same directory as the audio file. This is not a necessity, but will make it easier when we mux (combine) the audio and video in the next and final step.
* under File Format, select "YUV4MPEG Stream"
* under Audio, uncheck the "Render audio tracks" checkbox
* under Video, check the "Render video tracks" checkbox

* click the wrench icon next to Video. Choose the following options:
* "Output Path" should have the filename and location you selected in the previous steps
* skip "Use Pipe" for now
* go down to the "Pipe Presets" section and click ffmpeg. There will be two choices here. Select the DVD format. Depending on the version of Cinelerra that you've downloaded or compiled, you may see one of two versions of the ffmpeg DVD pipe:
1) The first should be used for progressive content
ffmpeg -f yuv4mpegpipe -i - -y -target ntsc-dvd %
2) The second should be used for interlaced content:
ffmpeg -f yuv4mpegpipe -i - -y -target ntsc-dvd -ilme -ildct -hq -f mpeg2video %
Note that if you have problems rendering, the -ilme -ildct -hq arguments or just the -hq argument alone should be removed. In addition, some versions of FFMPEG do not support the -hq option and you will get the below error if you try to render video using this pipe:
ffmpeg: unrecognized option '-hq'
Received sigpipe
write_frame() failed: system error (failed read/write)
Unfortunately, FFMPEG is a moving target, as the tool is in a state of continuous development. That is good, as new features and functionality are being implemented, but distressing when the new features or command line switches change and break scripts that previously worked.
* At this point, the "Use Pipe" checkbox above should be checked and the ffmpeg command pipe should populate the text input field. You should not need to edit this command, as the default pipes' output settings yield high quality video.
* under "Stream Header, Interlacing" will be left as "Unknown"
* accept the changes by clicking the checkbox in the lower left hand corner of the dialog box

* You will notice that underneath "Select a file to render to", the ffmpeg command is represented as a pipe command.
* make sure that "Create new file at each label" is not checked
* make sure that the "Insertion strategy" is set to "Create new resources only"
* To start rendering, click the checkbox in the lower left hand of the dialog. Heroine Warrior has done an excellent job of enhancing the performance of the MPEG streamer, but it still takes quite a while if you've got more than 10 minutes of video. Again, on my machine (described above), it should take about 10 minutes to render 10 minutes of video as an MPEG stream.
Finally, we will mux (combine) the audio and video streams together into a DVD-ready product. Here's what you do:
* Go to a terminal/shell prompt
* Navigate to the directory where you put both the separate audio and video files
Use this command:
ffmpeg -i filename.wav -i filename.m2v -target dvd destinationFilename.mpg
Here is a description of what the switches I chose for ffmpeg mean:
-i = input (either sound or video file)
-target dvd = specifies standard DVD dimensions for the video (720x480) and default bitrate quality levels of ~7Mbps (other targets: "vcd", "svcd", "dvd", "dv", "pal-vcd", "ntsc-svcd" (see -formats switch below))
When not using -target switch, other useful arguments apply:
-aspect = aspect ratio: choose 4:3, 16:9, 1.3333, 1.7777
-b = bitrate in kbps (default = 200 kbps)
-r = frame rate (default = 25)
-s = size (default 160x128)
-ab = audio bitrate (default = 64 kbps)
-ac = audio channels (default = 1)
-formats = file formats, codecs and protocols that ffmpeg supports
Of course, running "man ffmpeg" in a terminal will tell you more than you ever wanted to know about ffmpeg, but here's a nice tutorial on getting started with ffmpeg:
http://howto-pages.org/ffmpeg/
References:
FFMPEG documentation: http://ffmpeg.org/documentation.html
FFMPEG command line options: http://ffmpeg.mplayerhq.hu/ffmpeg-doc.html
In general, using ffmpeg may take quite a while based upon the resolution and length of your video. And if you haven't guessed it already, we are rendering the file for a second time. Video purists would frown upon such a transgression, but for the sake of simplicity, please excuse. By the way, ffmpeg is a very powerful program and there are many more switches you can use to slice and dice your video in any way possible before or after you get it into Cinelerra. Let it be known that the procedure just described will give you a file that will work well with any DVD authoring software.
Don't forget to verify that your video is correctly formatted!
Exporting Video for a Vodcast
See example: test.h264.mov (5.5MB)
To put your video up as a video podcast or vodcast, we will format the video using H.264 compression, as Heroine Warrior terms "one of the highest quality video codecs around, making HDTV distribution over the Internet almost practical." That may be, but users of lowered powered PCs may have difficulty viewing files of this format. Stuttered playback may occur on Intel P4 systems less than 1.8Ghz. I have not yet tested on Apples.
The general specifications of the file are:
File Format: Quicktime for Linux
Compression Type: H.264
Audio: MPEG-4 Audio
Once you've prepared your video in Cinelerra, follow these instructions to prepare it as a podcast:
* in Cinelerra, press Shift-R for the Render menu.
* under Select a file to render to, choose a destination directory and filename (ending in .mov)
* under File Format, select "Quicktime for Linux"
* under Audio, check the "Render audio tracks" checkbox
* click the wrench icon next to Audio

* change the default Compression default from "Twos complement" to MPEG-4 Audio.
* If you want your video to have very high quality sound, accept the default Bitrate of 256000. Otherwise, change this value to something lower to save space. 128000 is sufficient for stereo music. 64000 or lower for voice.
* leave the Quantization Quality at 100%.
* accept the changes by clicking the checkbox in the lower left hand corner of the dialog box.
* under Video, check the "Render video tracks" checkbox
* click the wrench icon next to Video. Choose the following options:
* use H.264 compression. This is Apple's preferred format for iTunes, so let's all bow down to Mr.Jobs. Kidding aside, this format does do an excellent job of saving space with limited reduction in quality.
* keep the default bitrate of 1000000. I've noticed that changing the default bitrate does not change the file size or quality of the output file.
* change the quantization from 5 to 20. This level of quantization will reduce the size of the file by a factor of 66%!
* leave "Fix quantization" checked
* accept the changes by clicking the checkbox in the lower left hand corner of the dialog box

* make sure that Create new file at each label is not checked
* make sure that the Insertion strategy is set to "Create new resources only"
* To start rendering, click the checkbox in the lower left hand of the dialog. If you're video is less than 15 minutes long, read your mail or do some research on that new iPod you're lusting after. If your video is longer than a half hour, go out and paint the town red, because it's gonna take a long time.
Don't forget to verify that your video is correctly formatted!
Exporting Video for a Web Page or a Web Download
See example: test.mpeg4.mov (7.8MB)
Lastly, to prep your video for a web audience, we will format the video using MPEG-4 compression. Using this format results in the smallest file of the three options chosen.
The general specifications of this file are:
File Format: Quicktime for Linux
Compression Type: MPEG-4 Video
Audio: Twos complement
Once your video is set to be put on a webpage, follow these instructions:
* in Cinelerra, press Shift-R for the Render menu.
* under Select a file to render to, choose a destination directory and filename (ending in .mov)
* under File Format, select "Quicktime for Linux"
* under Audio, check the "Render audio tracks" checkbox
* click the wrench icon next to Audio

* accept the Compression default of "Twos complement" and Bits per channel of "16 Bit Linear".
* leave "Dither" unselected
* accept the changes by clicking the checkbox in the lower left hand corner of the dialog box
* under Video, check the "Render video tracks" checkbox
* click the wrench icon next to Video. Choose the following options:
* use MPEG-4 Video compression. This saves quite a bit of space, with limited reduction in quality
* keep the default bitrate of 1000000, bitrate tolerance of 500000, quantization of 10 and interlaced keyframe interval of 45.
* leave "Fix bitrate" checked
* accept the changes by clicking the checkbox in the lower left hand corner of the dialog box

* make sure that "Create new file at each label" is not checked
* make sure that the "Insertion strategy" is set to "Create new resources only"
* To start rendering, click the checkbox in the lower left hand of the dialog. Go get a cup of coffee if you're video is less than 15 minutes long or take a nice long nap if the video is longer than 30 minutes.
Rendering takes mucho processing power, but Cinelerra can handle it! Now if I only had that Dual Opteron box..
:)
Don't forget to verify that your video is correctly formatted!
Exporting Video for a Video iPod
See example: test.mpeg4.ipod.mov (1.4MB)
Update 09/29/2008
Due to updates in FFMPEG and iTunes, the directions herein will only allow you to encode a video that can be replayed in iTunes. However, the file will NOT play in your iPod. I have found a workaround:
http://crazedmuleproductions.blogspot.com/2008/09/h264-encoding-for-video-ipod.html
end update
Update 10/16/2008
Making a Podcast, by Apple
The test file from the above Web Download portion of this document (test.mpeg4.mov) loads and plays in iTunes. However, when I went to upload it, iTunes gave me the message:
"Some of the songs in the iTunes music library, including the song "(Video name)", were not copied to your iPod because they cannot be played on this iPod."
Luckily, Apple provides a feature called "Convert Selection for iPod" when you right-click on the file. But geez! I already rendered this thing. I've have to re-render it? Ugh. OK then. But, oh no, the conversion utility takes too much time! Even on a very fast machine like mine, a 3.2Ghz P4 with 1GB of PC3200 memory, the conversion speed is roughly 1.5 minutes per minute of video. That is way TOO slow. But I went ahead and did the conversion with my short test video. On the bright side, once the video was converted, I could then update my iPod and the video was on my iPod. Yes!
I continued playing around and loading many different videos into iTunes. In my travels, I stumbled upon one that did not require a conversion. I was shocked! I then reasoned that I'd save much time if I just produced the videos in the format that iTunes expects in the first place. But how to do that? So, my next course of action was to research why that one file worked in iTunes without a conversion and why mine needed the conversion.
To do this, I analyzed the output of MPlayer to determine the differences between files. I learned quite a bit about audio and video formats by reviewing the output of MPlayer. It helps to have the text of both files displayed in two windows next to each other in order to more easily compare the files line by line. I've done this for you in the image below. On the left appears the file that is in the correct format; on the right, my file not in the correct iTunes format:

Reviewing the diffences, I noticed the following:
* iTunes compatible file had the audio track as the first track in the MOV container; my file had the video as the first track
* iTunes compatible file was 44.1Khz audio; my file was 48000Khz
* iTunes compatible file included an extra audio header; my file did not have the extra header
* iTunes compatible file audio compression method was MPEG-4; my file was twos complement
* iTunes compatible file FPS rate was 15; my file was 59.97
After way too many hours of trial and error, I found that it was the audio sampling rate and compression type that broke my file in iTunes. Here are the settings in Cinelerra that will make an MPEG-4 video totally compatible with iTunes so that iTunes does not need to re-render (the "Convert Selection for iPod" feature) the video! These settings are a slight variation on the Web Download procedures (MPEG-4 format).
Here are the specs I used:
For the project:
Set Format
Sample Rate to 44100khz
Number of Channels to two
FPS can be the FPS of your source video
Width 320
Height 240My video happened to be 320x180 because my source video was 16x9 hidef, which worked fine as well.

For the render:
Audio
MPEG-4 Audio
Bitrate 128000
Quantization of 100
Video
MPEG-4 Video
The rest of the parameters are Cinelerra's defaults, but I will reiterate here:
Bitrate 7000000
Tolerance 500000
Fixed Quantization selected
Quantization 10
Keyframe Interval 45
You need to abide by this format because iTunes is VERY STRICT when it comes to these settings! Also, the value for bitrate should be calculated based on the height, width, frames per second and quality requirements of your video product. More on this later. Here are Apple's specifications for iPod compliant videos (from http://www.apple.com/ipod/specs.html):
H.264 video:
* up to 768 Kbps, 320 x 240, 30 frames per sec., Baseline Profile up to Level 1.3 with AAC-LC up to 160 Kbps, 48 Khz, stereo audio in .m4v, .mp4 and .mov file formats
MPEG-4 video:
* up to 2.5 mbps, 480 x 480, 30 frames per sec., Simple Profile with AAC-LC up to 160 Kbps, 48 Khz, stereo audio in .m4v, .mp4 and .mov file formats
If you expect to upload into iTunes without needing a re-render, DO NOT deviate from ANY of these settings.
iTunes Specific Information
When you drag and drop a video into the iTunes Library, the software will first evaluate the video to see if it can read the video file. If you drag and drop your newly created video onto iTunes, right-click and select "Convert Selection for iPod". If you have followed my directions, you should receive the following message:
"One or more videos were not converted because they are already in the correct format."
Once you see this message, you know you've been successful in creating a video file in compliance with the iTunes format specifications. Wonderful!!
Don't forget to verify that your video is correctly formatted!
References:
http://www.apple.com/ipod/specs.html
http://www.ipodwizard.net/showthread.php?t=4413
http://members.shaw.ca/Kyle-Rogers/
Verifying Your Settings Are Correct
Once your render is complete for any of the formats above, use your favorite media player to view your masterpiece. After doing this though, you probably want to double-check that the bitrates and compression settings you've chosen for your rendered file are indeed correct. Below, I've listed the following switches of popular players that will display the audio and video settings of your video:
mplayer -identify
ffplay -stats
xine: ALT-i for detailed info, CTRL-i for a brief summary of video stats
qtinfo: displays the settings of any QuickTime video
Advanced Techniques
Reducing the resolution of your source video
I own a high definition video cam, the JVC HD10U. This camera outputs some beautiful HDV footage in MPEG2-TS (transport stream) format; however, the native 720P format is overkill for most applications, especially the three listed at the top of this document. Often then, I will need to decrease the resolution of my videos from 720P to a more manageable dimension. Normally, you'd need to reduce your videos' resolution outside of Cinelerra. This advanced technique will show you that you can save time by doing the resize within Cinelerra!
For example, I will reduce my source video to 480P in order to produce a good looking DVD. Therefore, this advanced technique begins from where we left off earlier in the document, Exporting Video for a DVD, so please refresh your memory before we start.
To reduce the resolution of your source video, you can remove the "-target dvd" switch from the YUV4MPEG Stream settings and replace it with the following switches to FFMPEG:
-aspect = aspect ratio: choose 4:3, 16:9, 1.3333, 1.7777
-b = bitrate in kbps (default = 200 kbps)
-r = frame rate (default = 25)
-s = size (default 160x128)
For example, when I reduced the resolution of the original video used earlier in this tutorial from 720x480 to 320x180, I used these FFMPEG switches when exporting the YUV4MPEG Stream:
-aspect 16:9 -b 7000 -r 29.97 -s 320x180
Here's what the YUV4MPEG Stream dialog looked like while I made these changes:

Here's what the Render dialog looked like after I made my changes:

Notice the absence of the "-target dvd" switch after the "-y". Now you've resized your video all within Cinelerra. Awesome!
Combining a pre-existing audio file with a new video stream
In the previous example, I wanted to reduce the resolution of my video. In like fashion, I want to reduce the resolution, but I also want to keep the same audio stream. To do this, you'd normally have to combine the audio and video streams outside of Cinelerra. But again, we can save time by doing the mux within Cinelerra using this advanced technique!
In my case, I have a pre-existing audio file that I will combine with a newly rendered video stream. Because the duration of the audio matched the larger resolution version, the audio file will be the same length as my video track. In practice, this does not necessarily have to be so, but if your goal is to reduce the resolution of a specific video, most likely you will have an audio file that is the same length as the video. So, just like the previous advanced technique, I edited the commands after the pipe symbol to include the full path of the audio file. I added the following directly before the last character, a "%", in the FFMPEG pipe command:
-ab 320 -ac 2 -i "audio file path/audio file name"
Here's what the YUV4MPEG Stream dialog looked like while I made these changes:

It bears repeating that the full path MUST be specified in the -i switch. If you see errors such as these:
test2.wav: I/O error occured
Usually that means that input file is truncated and/or corrupted.
Received sigpipe
write_frame() failed: system error (failed read/write)
This usually means that your path to the file is incorrect and you'll need to fix it.
Finally, you'll notice two other switches in the pipe command I gave you. Recall these switches to FFMPEG:
-aspect = aspect ratio: choose 4:3, 16:9, 1.3333, 1.7777
-b = bitrate in kbps (default = 200 kbps)
-r = frame rate (default = 25)
-s = size (default 160x128)
-ab = audio bitrate (default = 64 kbps)
-ac = audio channels (default = 1)
As the audio was a high quality stereo mix, I opted for an audio bitrate of 320kbps and a two channel mix. The very nice thing about this advanced technique is that you don't have to mux the video outside of Cinelerra. You can do it within the program itself!
A word about bitrates
A detailed discussion on selecting an appropriate bitrate for your video is out of the scope of this article. So, in the spirit of my guide, I just let Cinelerra's bitrate defaults stand for the beginner who would rather not worry about the details just yet and render something that works the first time out of the box. That being said, I do use a quick-and-dirty method of determining bitrates for my videos.
To determine the bitrate for a video with high quality output, I use the following calculation:
bitrate in kbps = FPS * WIDTH * HEIGHT * QUALITY FACTOR
So, if I have a 320x240 video at 30FPS ready for iTunes, I would substitute in the following values:
= 30 * 320 * 240 * .255
= 587kbps
The final "Quality Factor" varies, but a value of .255 would yield good quality output. The higher the factor, the higher the bitrate and thus, better quality. Experiment with this quality factor to see if it works for you.
Here are some reference links to help you get an idea of what is involved in order to calculate the right bitrate for your video:
Understanding Bit Rates
DVD bitrate calculator
http://www.videohelp.com/calc
http://www.signvideo.com/bt-rts.htm
http://dvd-hq.info/Calculator.html
http://neuron2.net/LVG/ratesandsizes.html
http://www.cs.unc.edu/~hensley/zaurus/encode.html
Troubleshooting
Improper Audio Synchronization
I've had trouble with audio synchronization in a case where I rendered a file from a video track that did not start at zero on the timeline, but started a couple hundred frames after the audio. When I combined the rendered video and audio outside of Cinelerra in FFMPEG, the audio synchronization was off. To make your life easier, keep the start and end of your video and audio tracks perfectly aligned. Make sure to zoom in to less than five frames to verify this.
Types of Rendering Problems
First, confirm if the crash is a result of a problem in the timeline or your rendering parameters.
Crashes Due to Timeline Problems
I've had crashes due to problems in the timeline when rendering hour plus video out of Cinelerra for the following reasons:
-a bug while stacking video effects (specifically, when the Sharpen effect was at the bottom of a stack of six other effects on a video track)
-there were frames of no video between clips on a video track that was being rendered out (if you zoom in all the way on a track, make sure the clips are aligned next to each other)
- I've gotten crashes if I have a transition that overlaps a very short bit of empty space between two adjacent segments of audio or video. To stop this, I will go to the end of a segment, zoom in all the way, and make sure that the video and audio tracks end at the exact same time. If they don't end at the exact same time, I clip off a bit of whatever track is dangling by using the mark in/mark out indicators and doing a "cut". I can then be assured that when I paste a new segment to the end of this recently snipped one that the segments will align perfectly. Once the segments are aligned, I then apply the transition.
Crashes Due to Bad Rendering Parameters
As well, renders sometime bomb out due to parameters I've selected for the render. For instance, when I added the -ilme -ildct -hq arguments to the DVD render in the above example.
Troubleshooting Render Problems
Try to find the exact moment in the timeline where the render breaks. I found the Sharpen effect problem by rendering the first half of the video in the timeline and then successively rendering smaller sections of the timeline until I found the exact place in the timeline where the render is breaking. At which point, it is a matter of either finding a hole in the video or turning off effects/transitions until your render tests work without crashing.
This time consuming; however, if you've spend a lot of time editing, it is the only way to salvage all your hard editing work.
Truncated Video Track
Also, another difficulty I've had is when I open a just-rendered YUV4MPEG stream (.M2V video file) back into a project, the video is truncated and is shorter than the companion audio track. You can read about my troubles here: https://init.linpro.no/pipermail/skolelinux.no/cinelerra/2006-March/005760.html.
I resolved this using two methods:
Don't re-import a YUV4MPEG video after rendering it. In other words, do all of your editing within Cinelerra and then render ONE TIME ONLY when you are done with all of your edits. This may not be feasible on large projects, though.
Use QuickTime for Linux container format to render to and re-import back into Cinelerra. This container does not have the same strange behavior as YUV4MPEG. In other words, when bringing a recently rendered video back into Cinelerra, the audio and video tracks are of the same length and perfectly in sync.
--------------------------------------------------------------------------------
I hope you enjoyed this evolving document. The developers of Cinelerra were kind enough to provide us with a very powerful product that would normally cost thousands of dollars. So I'd like to thank the folks at Heroine Warrior for doing such a fine job programming and all the people at http://cvs.cinelerra.org/ who commit countless hours of their free time and energy on the software. As such, I felt it necessary to give back something to this community who has given us such a gift.
Please let me know of any new topics or improvements you'd like to see in this doc or maybe a new doc! Thanks!
***the mule***
If this post was useful to you..consider buying me a beer via PayPal!
Even a $1 Draft will keep the Mule happily working..and help pay for equipment upgrades!
Subscribe to:
Posts (Atom)

