I'm preparing to upgrade my Fedora Core 4 system to Fedora Core 6 and have figured out how to install the source dependencies for Cinelerra in Core 6 relatively painlessly in an instance of a VMware virtual machine.
I use yum to install the dependent packages.
I needed to do the installation in a number of separate steps, due to some repository conflicts for ffmpeg-devel sources between the fedora base and livna repos, as well as some trickiness with mjpegtools.
Here are the steps:
1) make sure you have the correct repositories in yum.
2) install the dependencies using the shell script below
- this script includes everything except mjpegtools
3) remove the livna repositories from yum and install mjpegtools (ffmpeg-devel, optional)
4) get the source code
5) compile Cinelerra from source
Step 1: Make sure yum repositories are available
In order to install Cinelerra from source, you will need to have the following repositories in yum:
1) fedora core, extras and updates
2) dries
3) livna
3/31/07 Note: do NOT have the freshrpms repository listed in yum when you do the install.
The Cinelerra CVS source code will not compile against the ffmpeg in Freshrpms. Reference: https://init.linpro.no/pipermail/skolelinux.no/cinelerra/2007-March/010361.html
Here's a nice rpm that installs the livna repositories into yum for you: rpm -ivh http://rpm.livna.org/livna-release-6.rpm
And don't forget the RPM key imports for each repository, such as the dries key: rpm -ivh http://dries.ulyssis.org/rpm/RPM-GPG-KEY.dries.txt
Step 2: Install dependent files
Here is the list of dependencies needed, already in the form of a shell script ready for you to cut-and-paste into your favorite text editor:
yum install \
libquicktime \
gsm-devel \
xvidcore* \
lame \
lame-devel \
libvorbis* \
libogg* \
libtool* \
a52* \
libtheora* \
libpng* \
libjpeg* \
libtiff* \
esound* \
audiofile* \
libraw1394* \
libavc1394* \
freetype* \
fontconfig* \
nasm \
e2fsprogs* \
faad2-dev* \
OpenEXR* \
fftw3* \
libsndfile* \
libiec61883* \
x264 \
x264-d* \
faac* \
libdv*
Don't forget to chmod a+x the file!
Steps 3: Install mjpegtools
Remove the livna repositories from yum and install ffmpeg-devel and mjpegtools:
4/3/07 addition (thanks Roland!)
yum --disablerepo=livna install mjpegtools*
If you wish, you may install ffmpeg-devel. But it is not essential for Cinelerra compilation.
Step 4: Get Cinelerra source code
Getting the source files assumes that you have subversion installed:
yum install subversion
Then checkout the Cinelerra CVS trunk:
svn checkout svn://svn.skolelinux.org/cinelerra/trunk/hvirtual
Step 5: Build from source
Build the source from the hvirtual directory:
./autogen.sh
./configure
make
make install
Here are some scripts that show the different portions of the installation process. You'll see the ffmpeg-libs and -devel conflicts at the bottom of script 1. In script 2, I've removed ffmpeg-devel from the initial install. Script 3 shows the successful install of ffmpeg-devel from the dries and fedora extras repositories. Script 4 shows the successful install of mjpegtools. Script 5/6 show the configure and make/make install processes.
typescript.1
typescript.2no_ffmpeg
typescript.3ffmpeg-devel
typescript.4mjpeg
typescript.5configure
typescript.6makeinstall
enjoy!
ALERT!
ALERT!
Just in case you follow these steps and get the dreaded x264 compile error: 'struct ' has no member named 'b_cbr' error, here are the steps to fix it:
http://crazedmuleproductions.blogspot.com/2007/06/dreaded-compilation-error-x264c139.html
Thursday, March 29, 2007
Fedora Core 6 on x86 Cinelerra dependencies
If this post was useful to you..consider buying me a beer via PayPal!
Even a $1 Draft will keep the Mule happily working..and help pay for equipment upgrades!
Friday, March 16, 2007
grungy, grainy video effect
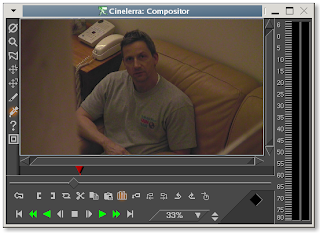
I wanted to degrade a video to black and white and give it a grainy effect. Here's what I started with:
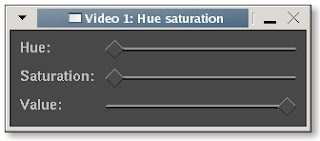
I then used the following settings to extract the color from the image:
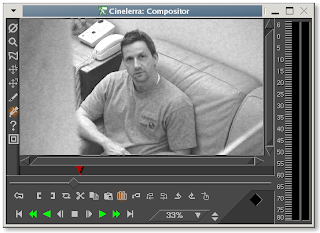
The image then looked like this:
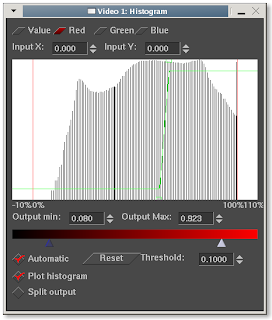
I then applied a histogram effect, tweaking the red/blue/green channels only allowing the higher frequencies:
To give the image a grainy look:
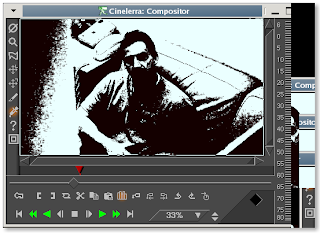
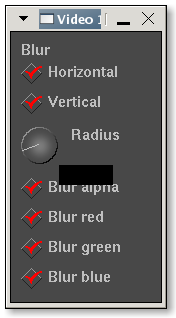
However, the grains looked too sharp, so I applied a blur using a pixel width of 8:
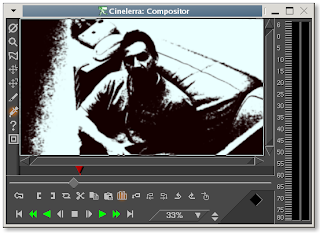
To this result:
Here's a test video (4.7MB):
test video
The next experiment will tweak the audio for additional weirdness.

I then used the following settings to extract the color from the image:

The image then looked like this:

I then applied a histogram effect, tweaking the red/blue/green channels only allowing the higher frequencies:

To give the image a grainy look:

However, the grains looked too sharp, so I applied a blur using a pixel width of 8:

To this result:

Here's a test video (4.7MB):
test video
The next experiment will tweak the audio for additional weirdness.
If this post was useful to you..consider buying me a beer via PayPal!
Even a $1 Draft will keep the Mule happily working..and help pay for equipment upgrades!
Sunday, March 04, 2007
perspective effect used for titles
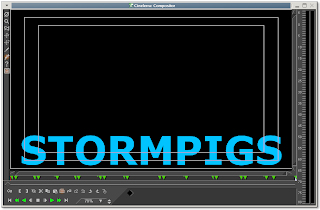
To begin a recent video, I wanted to simulate the Star Wars introductory title trick, where the titles start close and then fade off into the distance. To do this, I used the Perspective effect. I began with a very simple scrolling title. Note that a Motion Type of "Bottom to Top" is selected, as well as a speed to provide the motion:
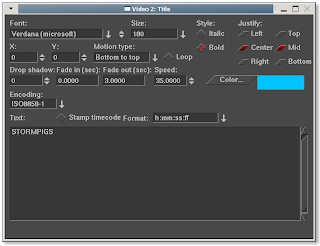
I began the experiment with a very plain title:
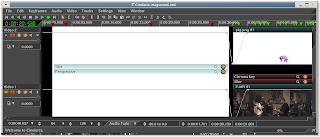
I then applied the Perspective effect to the title:
And clicked on the magnifying glass to start playing around with the parameters of the effect:
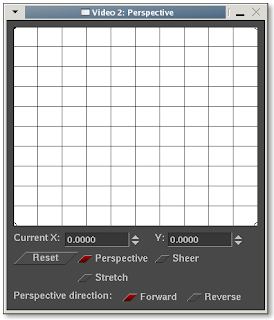
The grid shown represents a flat, two-dimensional space, but grabbing and moving each of the four corners of the grid will create the illusion of three-dimensional space:

Note in the above image that the lower grid corners have been pulled and stretched wider than the dialog box in order for the titles to be really stretched. This enhances the perception of depth, as shown below:
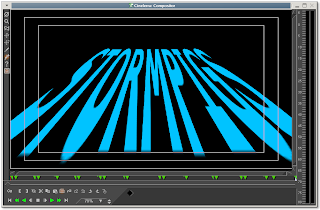
It is extremely effective to apply the perspective effect in combination with some motion. Here is the final result:
perspective_test.mpg
23MB

I began the experiment with a very plain title:

I then applied the Perspective effect to the title:

And clicked on the magnifying glass to start playing around with the parameters of the effect:

The grid shown represents a flat, two-dimensional space, but grabbing and moving each of the four corners of the grid will create the illusion of three-dimensional space:

Note in the above image that the lower grid corners have been pulled and stretched wider than the dialog box in order for the titles to be really stretched. This enhances the perception of depth, as shown below:

It is extremely effective to apply the perspective effect in combination with some motion. Here is the final result:
perspective_test.mpg
23MB
If this post was useful to you..consider buying me a beer via PayPal!
Even a $1 Draft will keep the Mule happily working..and help pay for equipment upgrades!
Monday, February 12, 2007
the big picture
With the dualdvd archive piece and scripted workflow, I was able to optimize a couple of pieces of the video production lifecycle:
idea creation -> storyboard -> production -> distribution -> marketing -> archive
Update 2008/11/22
I've added a few more details to my workflow in a new post here.
end update
I fear I'm spending too much time on the production piece and all the associated technical details. However, from a business perspective, the devil is in the details and if you have a good workflow, that means that you can do more in less time and be able to dedicated more time to the more creative/marketing aspects. So I don't think it is for nothing that I am doing this. Too bad I can't get those darn Ximeta NDAS drivers to work on Linux!!
If this post was useful to you..consider buying me a beer via PayPal!
Even a $1 Draft will keep the Mule happily working..and help pay for equipment upgrades!
Sunday, February 11, 2007
MediaGate - Ximeta NDAS troubles with Linux
The MediaGate MG-350HD is a little wireless device that allows me to view my Cinelerra creations on my HDTV.


So, I'm trying to get it to work smoothly with Linux, as that's where my HD source files are. However, HD files will only play on the MediaGate if the files are either:
1) accessed via network share over wired connection or
2) copied via NDAS drivers to the hard drive installed in the thing
Ximeta (http://www.ximeta.com/) are the makers of the network direct attached storage (NDAS) that the MediaGate uses. I don't have a hard run down to my entertainment center, so I've been pulling my hair out in order to get the NDAS drivers working. The problem with this is that the drivers seem to work on XP only. The Linux drivers on Ximeta's site don't work worth a damn. They fail on my fedora and redhat enterprise boxes and on the two Ubuntu installs (6.0.6/6.1.0) that I did this morning. Yarg. In addition, I've tried upgrading the firmware to no avail. The frustrating thing is that the firmware is supposed to fix a problem where the MG can't do wired and wireless connections at the same time. In point of fact, the firmware upgrade has BROKEN wireless. Double YARG!!
2/11 Update: I've since fixed the wireless by first doing an AP (access point) scan of the enviroment first, and then changing the wireless mode to Ad Hoc to configure the security settings of my specific router. Gads!
So I think I'm just going to leave it wired upstairs for now, copy over the HD content when its ready and bring it back down to the HDTV. What a waste of time..I'm going to send the bozos an email.
2/19/2007 Update: A wirelessly mounted MediaGate is now working!!
If this post was useful to you..consider buying me a beer via PayPal!
Even a $1 Draft will keep the Mule happily working..and help pay for equipment upgrades!
Saturday, February 10, 2007
scripted rendering!
I am very happy to say that I've been able to script a couple pieces of the rendering process. Once I've edited my HDV masterpiece, I export out an .m2v file and an mp3, layer 2 file, according to my previous post:
http://crazedmuleproductions.blogspot.com/2006/11/cam-compatible-hdv-edit-chain-part-ii.html
I then use the following script to:
1) combine the .m2v and .m2a as a program stream (using mplex)
2) convert the program stream to a transport stream, MPEG-TS file (using VLC)
3) convert the MPEG-TS to a DVD compatible mpg (using ffmpeg)
4) lastly, convert the DVD to an iTunes compatible format (again, using ffmpeg)
Obviously, their is inherent quality loss in each step. I tried to eliminate one conversion step by rendering to the iTunes format direct from the HDV source, but for some reason, ffmpeg gave me errors. So, I saved time and just converted from the DVD source. I will revisit this problem in a later post.
I can say that scripting VLC kicks ass! No more GUI!! Yay!
Here is the script. Don't forget to "chmod a+x" in order to run it.
Note that when run, the script will ask for a filename. That filename must be common to the .m2v and .m2a files. For example, start with two files called test.m2v and test.m2a. The script will prompt you for the filename, at which point you will enter "test" and hit enter. After that, the script will chug away and render each of the files to the filename test., where format will vary by the destination type (.ps/.m2t/.mpg/.mov).
Good luck!
#!/bin/bash -v
#
# This script converts HDV content
echo "Type in the name of the m2a/m2v files for mplex'ing"
read NAME
echo "Mplex'ing $NAME"
mplex -f 3 -b 2000 ${NAME}.m2a ${NAME}.m2v -o ${NAME}.ps
echo "VLC'ing $NAME"
vlc $NAME.ps --sout '#duplicate{dst=std{access=file,mux=ts,dst="'$NAME'.m2t"}}' vlc:quit
echo "FFMPEG convert to DVD"
ffmpeg -i ${NAME}.m2t -target dvd ${NAME}.mpg
echo "FFMPEG convert to MOV"
ffmpeg -i ${NAME}.m2t -f mov -vcodec mpeg4 -qscale 7 -s 320x180 -r 29.97 -aspect 16:9 -acodec aac -ac 2 -ab 128 ${NAME}.mov
echo "Done"
http://crazedmuleproductions.blogspot.com/2006/11/cam-compatible-hdv-edit-chain-part-ii.html
I then use the following script to:
1) combine the .m2v and .m2a as a program stream (using mplex)
2) convert the program stream to a transport stream, MPEG-TS file (using VLC)
3) convert the MPEG-TS to a DVD compatible mpg (using ffmpeg)
4) lastly, convert the DVD to an iTunes compatible format (again, using ffmpeg)
Obviously, their is inherent quality loss in each step. I tried to eliminate one conversion step by rendering to the iTunes format direct from the HDV source, but for some reason, ffmpeg gave me errors. So, I saved time and just converted from the DVD source. I will revisit this problem in a later post.
I can say that scripting VLC kicks ass! No more GUI!! Yay!
Here is the script. Don't forget to "chmod a+x
Note that when run, the script will ask for a filename. That filename must be common to the .m2v and .m2a files. For example, start with two files called test.m2v and test.m2a. The script will prompt you for the filename, at which point you will enter "test" and hit enter. After that, the script will chug away and render each of the files to the filename test.
Good luck!
#!/bin/bash -v
#
# This script converts HDV content
echo "Type in the name of the m2a/m2v files for mplex'ing"
read NAME
echo "Mplex'ing $NAME"
mplex -f 3 -b 2000 ${NAME}.m2a ${NAME}.m2v -o ${NAME}.ps
echo "VLC'ing $NAME"
vlc $NAME.ps --sout '#duplicate{dst=std{access=file,mux=ts,dst="'$NAME'.m2t"}}' vlc:quit
echo "FFMPEG convert to DVD"
ffmpeg -i ${NAME}.m2t -target dvd ${NAME}.mpg
echo "FFMPEG convert to MOV"
ffmpeg -i ${NAME}.m2t -f mov -vcodec mpeg4 -qscale 7 -s 320x180 -r 29.97 -aspect 16:9 -acodec aac -ac 2 -ab 128 ${NAME}.mov
echo "Done"
If this post was useful to you..consider buying me a beer via PayPal!
Even a $1 Draft will keep the Mule happily working..and help pay for equipment upgrades!
Friday, February 09, 2007
backing up your HDV content with dual-layer DVD
I finally made the jump to dual DVDs. I successfully burned a dual layer dvd using growisofs! I am very excited! This means I can get that content OFF my hard drives..FINALLY! However, there is a 4.3GB file size limitation, so keep those MPEGTS's small. Or, if you have files you need to backup that are larger than 4.3GB, go ahead and split them using AVIDEMUX.
First, get and install the dvd+rw-tools from here:
http://fy.chalmers.se/~appro/linux/DVD+RW/tools/
The install requires you to:
1) untar/gunzip the source files
2) run "make"
3) run "make install"
After that, the tools should be installed. Once the tools are installed, load up a dual-layer disc and check your media:
dvd+rw-mediainfo /dev/hda
You'll get output similar to this:
[gagazote@computer hvirtual]# dvd+rw-mediainfo /dev/hda
INQUIRY: [_NEC ][DVD_RW ND-3500AG][2.16]
GET [CURRENT] CONFIGURATION:
Mounted Media: 2Bh, DVD+R Double Layer
Media ID: MKM/001
Current Write Speed: 6.1x1385=8467KB/s
Write Speed #0: 6.1x1385=8467KB/s
Write Speed #1: 5.1x1385=7056KB/s
Write Speed #2: 4.1x1385=5645KB/s
Write Speed #3: 3.1x1385=4234KB/s
Write Speed #4: 2.0x1385=2822KB/s
Write Speed #5: 1.0x1385=1411KB/s
GET [CURRENT] PERFORMANCE:
Write Performance: 4.0x1385=5540KB/s@[0 -> 4173824]
Speed Descriptor#0: 00/4173824 R@5.0x1385=6925KB/s W@4.0x1385=5540KB/s
Speed Descriptor#1: 00/4173824 R@5.0x1385=6925KB/s W@2.4x1385=3324KB/s
DVD+R DOUBLE LAYER BOUNDARY INFORMATION:
L0 Data Zone Capacity: 2086912*2KB, can still be set
READ DISC INFORMATION:
Disc status: blank
Number of Sessions: 1
State of Last Session: empty
Number of Tracks: 1
READ TRACK INFORMATION[#1]:
Track State: blank
Track Start Address: 0*2KB
Next Writable Address: 0*2KB
Free Blocks: 4173824*2KB
Track Size: 4173824*2KB
ROM Compatibility LBA: 262144
READ CAPACITY: 1*2048=2048
Then, burn your files:
growisofs -Z /dev/hda -R -J /mnt/videos/*
This command creates an ISO 9660 image of the directory "/mnt/videos" and writes it to a dual-layer DVD.
- -Z erases any previous contents
- -R include rockridge extensions
- -J include joliet extentions
If this post was useful to you..consider buying me a beer via PayPal!
Even a $1 Draft will keep the Mule happily working..and help pay for equipment upgrades!
Thursday, February 08, 2007
Cinelerra hanging after I move audio on the timeline
This is a bit off topic, but is related to troubleshooting Cinelerra. I have been having a problem with Cinelerra hanging for three or four minutes after I zoom in and slide audio tracks around on the timeline. To replicate the problem, I grabbed and moved the audio track (a wav file) around quite a bit, perhaps 10 times. In order to find the hanging thread, I started gdb ("gdb cinelerra pid").
[root@localhost ~]# ps -ef | grep cin
root 3671 3571 90 20:05 pts/2 00:17:55 cinelerra
root 4263 4178 0 20:25 pts/4 00:00:00 grep cin
[root@localhost ~]# gdb cinelerra 3671
Scrolling through the thread list, I identified the offending thread:
> Thread 65 (Thread -1520473168 (LWP 5674)):
> #0 0x0813fceb in CacheBase::get_oldest (this=0x8c04068) at cachebase.C:106
> #1 0x081f00bb in MWindow::age_caches (this=0xbfc5a288) at
> mwindow.C:1569
> #2 0x081f5e7b in MWindow::move_edits (this=0xbfc5a288, edits=0x8539b70,
> track=0x920f238, position=49.724958333333333, behaviour=1) at
> mwindowedit.C:830
> #3 0x08289ed6 in TrackCanvas::drag_stop (this=0xa9e1e7e0) at
> trackcanvas.C:575
> #4 0x0828a13d in TrackCanvas::drag_stop_event (this=0xa9e1e7e0) at
> trackcanvas.C:325
> #5 0xb7b73029 in BC_WindowBase::dispatch_drag_stop (this=0xa9e1e7e0) at
> bcwindowbase.C:1316
> #6 0xb7b7300e in BC_WindowBase::dispatch_drag_stop (this=0x8c44da0) at
> bcwindowbase.C:1311
> #7 0xb7b73122 in BC_WindowBase::dispatch_button_release
> (this=0x8c44da0) at bcwindowbase.C:1162
> #8 0xb7b778b1 in BC_WindowBase::dispatch_event (this=0x8c44da0) at
> bcwindowbase.C:787
> #9 0xb7b78739 in BC_WindowBase::run_window (this=0x8c44da0) at
> bcwindowbase.C:614
> #10 0xb7b88bb8 in Thread::entrypoint (parameters=0xbfc5a288) at
> thread.C:48
> #11 0x00da0b80 in start_thread () from /lib/libpthread.so.0
> #12 0x00c11dee in clone () from /lib/libc.so.6
I then exited gdb and found that the process hang was still occurring.
In order to step through the program code, I use kdbg, a graphical debugger. I started up kdbg ("kdbg -p/usr/local/bin/cinelerra") and
selected "View -> Threads". I then used an alternating combination of
F8 and F10 to step in and out of the code. I found that kdbg hung at
this line of code: MWindow.C:1561. It took a while, maybe five minutes
for kdbg to free up. This indicates where the hang is occurring. After the release, I exited the debugger.
Here is the snippet of hvirtual/cinelerra/mwindow.C code starting at
line 1561:
> if(memory_usage > preferences->cache_size)
> {
> int target = 1;
> int oldest1 = audio_cache->get_oldest();
> int oldest2 = video_cache->get_oldest();
> if(oldest2 < target =" 2;"> int oldest3 = frame_cache->get_oldest();
> if(oldest3 <> target = 3;
> int oldest4 = wave_cache->get_oldest();
> if(oldest4 <> oldest4 < target =" 4;"> switch(target)
> {
> case 1: audio_cache->delete_oldest();
> break;
> case 2: video_cache->delete_oldest();
> break;
> case 3: frame_cache->delete_oldest();
> break;
> case 4: wave_cache->delete_oldest();
> break;
> }
> }
I'm not a very experienced C programmer, but inferring from the if statement, it looks like I only go into this control structure if cin's memory usage is
greater than the value stated in Preferences -> Cache Size. I have it
set to the default value of 10MB.
I have not yet found the cause of this particular hang, but I will update my blog once I have an answer.
[root@localhost ~]# ps -ef | grep cin
root 3671 3571 90 20:05 pts/2 00:17:55 cinelerra
root 4263 4178 0 20:25 pts/4 00:00:00 grep cin
[root@localhost ~]# gdb cinelerra 3671
Scrolling through the thread list, I identified the offending thread:
> Thread 65 (Thread -1520473168 (LWP 5674)):
> #0 0x0813fceb in CacheBase::get_oldest (this=0x8c04068) at cachebase.C:106
> #1 0x081f00bb in MWindow::age_caches (this=0xbfc5a288) at
> mwindow.C:1569
> #2 0x081f5e7b in MWindow::move_edits (this=0xbfc5a288, edits=0x8539b70,
> track=0x920f238, position=49.724958333333333, behaviour=1) at
> mwindowedit.C:830
> #3 0x08289ed6 in TrackCanvas::drag_stop (this=0xa9e1e7e0) at
> trackcanvas.C:575
> #4 0x0828a13d in TrackCanvas::drag_stop_event (this=0xa9e1e7e0) at
> trackcanvas.C:325
> #5 0xb7b73029 in BC_WindowBase::dispatch_drag_stop (this=0xa9e1e7e0) at
> bcwindowbase.C:1316
> #6 0xb7b7300e in BC_WindowBase::dispatch_drag_stop (this=0x8c44da0) at
> bcwindowbase.C:1311
> #7 0xb7b73122 in BC_WindowBase::dispatch_button_release
> (this=0x8c44da0) at bcwindowbase.C:1162
> #8 0xb7b778b1 in BC_WindowBase::dispatch_event (this=0x8c44da0) at
> bcwindowbase.C:787
> #9 0xb7b78739 in BC_WindowBase::run_window (this=0x8c44da0) at
> bcwindowbase.C:614
> #10 0xb7b88bb8 in Thread::entrypoint (parameters=0xbfc5a288) at
> thread.C:48
> #11 0x00da0b80 in start_thread () from /lib/libpthread.so.0
> #12 0x00c11dee in clone () from /lib/libc.so.6
I then exited gdb and found that the process hang was still occurring.
In order to step through the program code, I use kdbg, a graphical debugger. I started up kdbg ("kdbg -p
selected "View -> Threads". I then used an alternating combination of
F8 and F10 to step in and out of the code. I found that kdbg hung at
this line of code: MWindow.C:1561. It took a while, maybe five minutes
for kdbg to free up. This indicates where the hang is occurring. After the release, I exited the debugger.
Here is the snippet of hvirtual/cinelerra/mwindow.C code starting at
line 1561:
> if(memory_usage > preferences->cache_size)
> {
> int target = 1;
> int oldest1 = audio_cache->get_oldest();
> int oldest2 = video_cache->get_oldest();
> if(oldest2 < target =" 2;"> int oldest3 = frame_cache->get_oldest();
> if(oldest3 <> target = 3;
> int oldest4 = wave_cache->get_oldest();
> if(oldest4 <> oldest4 < target =" 4;"> switch(target)
> {
> case 1: audio_cache->delete_oldest();
> break;
> case 2: video_cache->delete_oldest();
> break;
> case 3: frame_cache->delete_oldest();
> break;
> case 4: wave_cache->delete_oldest();
> break;
> }
> }
I'm not a very experienced C programmer, but inferring from the if statement, it looks like I only go into this control structure if cin's memory usage is
greater than the value stated in Preferences -> Cache Size. I have it
set to the default value of 10MB.
I have not yet found the cause of this particular hang, but I will update my blog once I have an answer.
If this post was useful to you..consider buying me a beer via PayPal!
Even a $1 Draft will keep the Mule happily working..and help pay for equipment upgrades!
Sunday, February 04, 2007
AVIDEMUX is an excellent little program..
Rough cuts video of any format and saves to any format rapidly. I used it to chop up a 7GB MPEGTS HDV file and it took one minute to render out a 2.7GB! This is much better than using Cinelerra to reduce it via a re-render via Quicktime. Sweet! I don't see any loss in the image, but that will need more investigation. Still, initial impressions are very good!
If this post was useful to you..consider buying me a beer via PayPal!
Even a $1 Draft will keep the Mule happily working..and help pay for equipment upgrades!
Wednesday, January 31, 2007
using the histogram function to turn on the light
Wow. I used the histogram function to lighten up a dark video. It really did wonders. I simply changed the Value parameter as in the graphic below:

Here are the results. Before applying histogram:

After applying histogram:

Test videos:
Before
(3Mb)
After
(4Mb)
Reference
Here are two articles on histograms and their purpose. The second taught me a great deal:
http://en.wikipedia.org/wiki/Image_histogram
http://www.illustratedphotography.com/photography-tips/basic/contrast
If this post was useful to you..consider buying me a beer via PayPal!
Even a $1 Draft will keep the Mule happily working..and help pay for equipment upgrades!
Wednesday, January 03, 2007
MediaGate MG-350HD review
Happy New Year folks! I thought I'd take a break from the usual Cinelerra-HDV talk to discuss a new toy I got for Christmas: the MediaGate MG-350HD.
Since I am in a band and am its archivist, I have a lot of audio and video files that I've created over the years. So I wanted to get a device that would playback the high-definition videos and audio I've recorded on my home theater. The MediaGate MG-350HD seemed to fit the bill as an all-in-one media player: it plays video and audio files of almost any type (no Quicktimes, though) streamed from one or more network shares via wired or wireless ethernet connection. It also plays files from an attached USB drive or hard drive you supply and can act as a network storage device. In practice, the device works well enough with its bare bones setup and media selection/playback interfaces, but needs more setup and careful installation than the shiny brochure would have you believe.
I will tailor the following discussion to technically inclined individuals who will read the MGs' manual or search google for reviews and information that has already been discussed. You can get the manual and firmware upgrades online from http://www.airlinktek.com/ in the Support section. I will highlight the time consuming points for me or information about the device that is lacking in the online resources. It is best if one reads the manual first. Though the supplied manual has enough information to get the device setup and working, it is poorly written by a non-native english speaker.
For those who don't like reading manuals, my suggestion would be to simply hook it up to your TV using any of the provided composite, svideo, component or DVI connections, turn it on and press "setup" on the remote. If you don't have a picture on the TV immediately, select an alternate video mode by pressing the "TV out" button multiple times to cycle through the different options. With the remote, you control all the device configuration and media playback functions of the MediaGate.
After opening the box, I decided to configure the device in logical fashion by trying out the simpler functions and then advance to the more complicated setups:
- attach a USB drive and play files from it
* USB setup was easy and playback worked using my Corsair Voyager 2GB USB drive, though you cannot copy files to the USB drive.
- install a hard drive into the unit and play files from it
* Drive setup was also easy using an 80GB drive I had lying around and playback worked using the provided USB cable.
- connect it to my network via wired LAN connection
* Wired setup worked using DHCP after some fiddling.
- copy files to the internal hard drive using its network attached storage drivers
* works over a proprietary network protocol (NDAS) from Ximeta (http://www.ximeta.com).
* NDAS drivers only work on Windows 98/2000/XP, but there are experimental Linux drivers on their website that I haven't yet tried.
- connect it to my wireless network
* Wireless setup worked using DHCP and access point scan (ad hoc access point attachment is also available)
* laborious WEP key input using the remote
- stream files from my main server to the MediaGate
* tricky Windows share setup was the source of a couple hours of frustration
* streaming high def content only worked using internal disk or wired connection
* dvd and lower resolution content can be streamed using wireless
Speaking of playback, here are the file formats that the MG 350HD played for me:
- DVD format MPEGs (720x480 MPEG2s with 16 bit, 48Khz stereo or MPEG1 audio) and their individual, demuxed audio/video streams
- VOB files
- DIVX
- MPEG2 TS (transport stream) HD files (720p)
- AVIs
- PNGs/JPGs
- MP3s/WAVs/WMAs/OGGs
- MPEG4s created by iTunes
It doesn't play:
- Quicktime videos
- WMVs (I need to test this more)
- Ogg/Theora videos
This is not an exhaustive list, but at least will give you an idea of file compatibility. Playlists of videos and music can be created from any of the attached devices and played back in order or shuffled. The interface to sort through your media and create playlists is basic at best and no where near as slick or as easy as an iPod. Since the interface is where you will be spending quite a bit of time, it is also unfortunate to note that it is not customizable or skinnable. Firmware updates come once per quarter or less frequently, so there will be a long wait for any enhancements to the interface.
SMB shares from Windows 2000 were easily recognized. For XP, you need an account named "guest", "media" or "administrator" with a blank password. This obviously creates a security hole. Also, I needed to assign Read privileges to the XP Guest account for the directories I wanted to share.
The most pain I experienced in the share setup was getting the device to recognize the SMB share I created on my Fedora Linux box. Lots of issues with this one:
- proper user authentication
* you need to use either an account named "guest", "media" or "administrator" with a blank password. Security hole on the systems with the shares
- lowering SELinux lockdowns for SAMBA
* select all options under SAMBA in the SELinux config utility
- appropriate file privileges
* chmod 755 on any files you want to play
- change the default SMB security level
* use a security level of "share" in the /etc/samba/smb.conf file
I had no trouble streaming high definition content from a network share using a wired connection. Using wireless I was only able to stream DVD resolution files (including MPGs and DIVx) as well as any music files without dropouts. Over wireless, strong signal strength is a must for playing back DVD resolution files without dropouts. If you're not playing back any files, the "info" button on the remote will show you the wireless signal strength. While playing back files, "info" will show you the specifications of the file being played back. Many of the buttons on the remote serve double duty depending on if you are in setup versus playback mode.
In sum, the MediaGate MG-350HD met my expectations and can playback an impressive array of video and audio files. The interface needs a -face lift, but the unit does a yeoman's job of serving up content. Definetly, you will need a wired connection or copy any high def media you have to an internal hard drive in order to view those on your HDTV via the MediaGate. Nice product.
If this post was useful to you..consider buying me a beer via PayPal!
Even a $1 Draft will keep the Mule happily working..and help pay for equipment upgrades!
Wednesday, November 29, 2006
very simple interpolate effect experiment
I wanted to use the interpolate effect to mimic motion, or at least generate a smooth flow between static images. I thought I might be able to use this effect for video overlays and such.
For the experiment, I used four png images, each with a green dot near the center of each image. For each image, I moved the dot a bit so that the arrangement of the four images on the Cinelerra timeline would show a circle of green dots when played back. First, I imported each still frame into a Cinelerra project formatted to 30fps and 320x180. Then, I stretched each png to the length of 30 frames using the "align cursor on frames" option and then re-added the first png image to the end of the timeline in order to complete the circle of dots. Finally, I added the interpolate effect with an "input frames per second" value of 1.
Here is the resultant video with no interpolate effect (17Kb).
Here is the video with the interpolate effect applied (38Kb).
It does mimic movement, but is not very interesting just yet. I will try to add motion blurs to enhance this.
If this post was useful to you..consider buying me a beer via PayPal!
Even a $1 Draft will keep the Mule happily working..and help pay for equipment upgrades!
Friday, November 10, 2006
cam compatible HDV edit chain, part II (short)
I posted a more detailed version of this two posts ago (http://crazedmuleproductions.blogspot.com/2006_10_01_archive.html), but I thought I'd reiterate it in a shorter format:
1) from Cinelerra, export video using YUV4MPEG using mpeg2enc (.m2v) compression scheme with special params:
mpeg2enc --verbose 0 --aspect 3 --format 3 --frame-rate 4 --video-bitrate 18300 --nonvideo-bitrate 384 --interlace-mode 0 --force-b-b-p --video-buffer 448 --video-norm n --keep-hf --no-constraints --sequence-header-every-gop --min-gop-size 6 --max-gop-size 6 -o %
2) from Cinelerra, export audio using mpeg audio, layer II (384Kbps)
3) multiplex audio and video streams to MPEGPS (Program Stream) format using mplex:
mplex -f 3 -b 2000 video.m2v audio.m2a -o output.ps
4) convert .ps to .ts, MPEGTS (Transport Stream) format using VLC
5) export to cam, consider using 10sec blank leader
Update 5/17/2009
Note that if you bring the video into Cinelerra and the thumbnail is green, this means that the first frame of the video is not a keyframe. This is a problem with VLC. You can avoid this problem by using this ffmpeg command in place of Step 4 above:
ffmpeg -y -i OUTPUT.ps -acodec copy -f mpegts -qscale 1 OUTPUT.m2t
*** end update ***
Update 3/14/2008
Once the video is converted, you may then output to the camera using test-mpeg2 from libiec61883:
/2006/10/success-and-failure-in-land-of-dvhdv.html
Also, take note of a possible 2GB limit in libiec61883 uploading your content to the cam:
/2006/10/libiec61883-now-exports-files-greater.html
*** end update ***
Update 11/17/06
Last night, I found that doing performing other operations on your system like surfing the web or playing audio while running mplex or VLC convert may cause problems with the video as it uploads to the camera. So don't do anything while you convert your videos.
In my case, I was 28 minutes into an hour long video uploading to the cam when the import stopped. I no longer had uploading video displayed on the LCD screen of the cam. I only saw blue, the upload seemed to continue, but I got no final output. The solution was to remux the original streams using mplex and rebuild the MPEGTS using VLC. The important point being that one of these two processes is very sensitive to fluctuations in CPU or hard drive performance. So leave your PC alone while these processes are active.
*** end update ***
That's all she wrote for today. Enjoy!
the mule
If this post was useful to you..consider buying me a beer via PayPal!
Even a $1 Draft will keep the Mule happily working..and help pay for equipment upgrades!
Monday, October 30, 2006
motion experiment, part III
Update 2009/03/17
I finally put together a motion stabilization tutorial. Hopefully, it helps folks who are as confused as I using the thing.
*** end update ***
The motion stabilizer is one of the most difficult effects to use in Cinelerra, as it has so many knobs and switches to figure out. It is very frustrating.
I had more luck this time with the motion effect, but it was still very hard to get working correctly. I kept playing around with different settings, but ended up using these:
- translation block around 1/6 of entire screen
- translation block more wide than high (400x150)
- track single frame
- stabilize subpixel
- zoom set to auto in compositor
Once I did get it working, I thought I did have a better feel for how the different parts interact. But the motion effect seems to be is something you have to spend a LOT of time with to get working correctly. It is still frustrating, though.
Here is the fruit of my labor:
http://content.serveftp.net/video/cinlover.mpg
Here was the original:
http://content.serveftp.net/video/cinlover2.mpg
both about 3MB
I definetly think the motion is better stabilized.
I will try to post a more detailed description of the steps I went through. Perhaps even a video, as motion stabilization is a real art. I wish it could be simplified in the software.
the mule
If this post was useful to you..consider buying me a beer via PayPal!
Even a $1 Draft will keep the Mule happily working..and help pay for equipment upgrades!
Sunday, October 29, 2006
rendering cam-compatible HDV MPEGTS files
I have been successful in exporting HDV back out to my cam. I haven't posted detailed output from the individual steps before, so here it is:
General Steps
1) export video from Cinelerra as mpeg2 using mpeg2enc
2) export audio from Cinelerra as mp3
3) mux in mplex
4) open MPEGPS in VLC and convert to TS.
Detail
1) export video from Cinelerra as mpeg2 using mpeg2enc:
mpeg2enc --verbose 0 --aspect 3 --format 3 --frame-rate 4 --video-bitrate 18300 --nonvideo-bitrate 384 --interlace-mode 0 --force-b-b-p --video-buffer 448 --video-norm n --keep-hf --no-constraints --sequence-header-every-gop --min-gop-size 6 --max-gop-size 6 -o /mnt/videos/20050721/20050721.m2v
2) export audio from Cinelerra as mp3:
--------------------------------------------
Input File : 'stdin' 48.0 kHz
Output File: '/mnt/videos/20050721/test.mp3'
384 kbps MPEG-1 Layer II j-stereo Psy model 1
[De-emph:Off Copyright:No Original:No CRC:Off]
[Padding:Normal Byte-swap:Off Chanswap:Off DAB:Off]
ATH adjustment 0.000000
--------------------------------------------
encode_init: using tablenum 0 with sblimit 27
Hit end of audio data
Avg slots/frame = 1152.000; b/smp = 8.00; bitrate = 384.000 kbps
3) mux in mplex
[root@computer 20050721]# mplex -f 3 -b 2000 -o test.ps test.mp3 20050721.m2v
INFO: [mplex] mplex version 1.8.0 (2.2.4 $Date: 2005/08/28 17:50:54 $)
INFO: [mplex] File test.mp3 looks like an MPEG Audio stream.
INFO: [mplex] File 20050721.m2v looks like an MPEG Video stream.
INFO: [mplex] Found 1 audio streams and 1 video streams
INFO: [mplex] Selecting generic MPEG2 output profile
INFO: [mplex] Multiplexing video program stream!
INFO: [mplex] Scanning for header info: Audio stream c0 (test.mp3)
INFO: [mplex] MPEG AUDIO STREAM: c0
INFO: [mplex] Audio version : 1.0
INFO: [mplex] Layer : 2
INFO: [mplex] CRC checksums : no
INFO: [mplex] Bit rate : 49152 bytes/sec (384 kbit/sec)
INFO: [mplex] Frequency : 48000 Hz
INFO: [mplex] Mode : 0 stereo
INFO: [mplex] Mode extension : 0
INFO: [mplex] Copyright bit : 0 no copyright
INFO: [mplex] Original/Copy : 0 copy
INFO: [mplex] Emphasis : 0 none
INFO: [mplex] Scanning for header info: Video stream e0 (20050721.m2v)
INFO: [mplex] VIDEO STREAM: e0
INFO: [mplex] Frame width : 1280
INFO: [mplex] Frame height : 720
INFO: [mplex] Aspect ratio : 16:9 display
INFO: [mplex] Picture rate : 29.970 frames/sec
INFO: [mplex] Bit rate : 18300000 bits/sec
INFO: [mplex] Vbv buffer size : 229376 bytes
INFO: [mplex] CSPF : 0
INFO: [mplex] SYSTEMS/PROGRAM stream:
INFO: [mplex] rough-guess multiplexed stream data rate : 19077648
INFO: [mplex] Setting best-guess data rate.
INFO: [mplex] Run-in Sectors = 752 Video delay = 58123 Audio delay = 61126
INFO: [mplex] New sequence commences...
INFO: [mplex] Audio c0: buf= 0 frame=000000 sector=00000000
INFO: [mplex] Video e0: buf= 0 frame=000000 sector=00000000
INFO: [mplex] Scanned to end AU 39469
INFO: [mplex] STREAM e0 completed @ frame 39469.
INFO: [mplex] STREAM c0 completed @ frame 54874.
INFO: [mplex] Multiplex completion at SCR=118584775.
INFO: [mplex] Audio c0: buf= 2304 frame=054874 sector=00031342
INFO: [mplex] Video e0: buf= 0 frame=054843 sector=00509538
INFO: [mplex] AUDIO_STATISTICS: c0
INFO: [mplex] Audio stream length 63216000 bytes.
INFO: [mplex] Syncwords : 54875
INFO: [mplex] Frames : 54875 padded
INFO: [mplex] Frames : 0 unpadded
INFO: [mplex] BUFFERING min 18 Buf max 1169
INFO: [mplex] VIDEO_STATISTICS: e0
INFO: [mplex] Video Stream length: 1031417371 bytes
INFO: [mplex] Sequence headers: 6579
INFO: [mplex] Sequence ends : 1
INFO: [mplex] No. Pictures : 39470
INFO: [mplex] No. Groups : 6579
INFO: [mplex] No. I Frames : 6579 avg. size 58215 bytes
INFO: [mplex] No. P Frames : 32891 avg. size 19714 bytes
INFO: [mplex] No. B Frames : 0 avg. size 0 bytes
INFO: [mplex] Average bit-rate : 6264800 bits/sec
INFO: [mplex] Peak bit-rate : 9203600 bits/sec
INFO: [mplex] BUFFERING min 943996 Buf max 1944874
INFO: [mplex] MUX STATUS: no under-runs detected.
[root@computer 20050721]#
4) open MPEGPS in VLC and convert to MPEGTS.
Update 3/14/2008
Once the video is converted, you may then output to the camera using test-mpeg2 from libiec61883:
/2006/10/success-and-failure-in-land-of-dvhdv.html
Also, take note of a possible 2GB limit in libiec61883 uploading your content to the cam:
/2006/10/libiec61883-now-exports-files-greater.html
If this post was useful to you..consider buying me a beer via PayPal!
Even a $1 Draft will keep the Mule happily working..and help pay for equipment upgrades!
Saturday, October 28, 2006
libiec61883 now exports files greater than 2GB to cam!
As you may know, I've been successful in rendering HDV MPEGTS that works being output back to my cam. However, I stumbled upon the fact that libiec61883 cannot output files greater than 2GB. Well, I rolled back my operating system to an earlier image, rebuild libiec61883 with the -D_FILE_OFFSET_BITS=64 DEPS param in examples/Makefile and now I can send data greater than 2GB using the command
[scf@localhost ~]# test-mpeg2 -t 0 file.m2t
where 0 is the physical id of the cam as specified by gscanbus
I have found that using the incorrect physical id will result in the following error message:
[scf@localhost ~]# test-mpeg2 -t 1 file.m2t libiec61883 warning: No plugs exist on either node; using default broadcast channel 63.
However, the camera will still display the incoming video. If the physical id is correctly specified, you should see no errors and the "Starting to transmit.." message only:
[scf@localhost ~]# test-mpeg2 -t 0 file.m2t
Starting to transmit
I have no idea why this fixed the problem, because I used the same steps as before. Just glad it works.
[scf@localhost ~]# test-mpeg2 -t 0 file.m2t
where 0 is the physical id of the cam as specified by gscanbus
I have found that using the incorrect physical id will result in the following error message:
[scf@localhost ~]# test-mpeg2 -t 1 file.m2t libiec61883 warning: No plugs exist on either node; using default broadcast channel 63.
However, the camera will still display the incoming video. If the physical id is correctly specified, you should see no errors and the "Starting to transmit.." message only:
[scf@localhost ~]# test-mpeg2 -t 0 file.m2t
Starting to transmit
I have no idea why this fixed the problem, because I used the same steps as before. Just glad it works.
If this post was useful to you..consider buying me a beer via PayPal!
Even a $1 Draft will keep the Mule happily working..and help pay for equipment upgrades!
Saturday, October 21, 2006
basic OpenGL vs XV performance stats
Thought I'd share some Cinelerra performance stats using OpenGL versus non-OpenGL (XV) display drivers. I used two tracks of identical length (32s), but different content.
OpenGL
one 32s 720P track: 20fps
two 32s 720P tracks, both play enabled, no fade on top track: 2.97fps
two 32s 720P tracks, both play enabled, 50% fade on top track: 3.04fps
Stopped then restarted Cinelerra and performed next test.
XV
one 32s 720P track: 10.6fps
two 32s 720P tracks, both play enabled, no fade on top track: 2.2fps
two 32s 720P tracks, both play enabled, 50% fade on top track: 2.18fps
Not fabulous performance for using > 1 track, but still slight improvement over XV.
If this post was useful to you..consider buying me a beer via PayPal!
Even a $1 Draft will keep the Mule happily working..and help pay for equipment upgrades!
Thursday, October 19, 2006
motion experiment, part II
Update 2009/03/17
I finally put together a motion stabilization tutorial. Hopefully, it helps folks who are as confused as I using the thing.
*** end update ***
I was able to get a better result from the video I made a while back. I realized I did not use the "Previous Frame Same Block" option originally. This made a huge difference. As I didn't have much time to fuss with it, I lowered the translation search steps to 128 as you suggest.
Here are my results with comparison of before, after and zoom. The video is very compressed, but you can see that the zoom doesn't degrade too badly, as my source is HDV, which is something you'd be interested in seeing:
http://content.serveftp.net/video/motionexercise.m2v
7MB
Here's the next in the series:
/2006/10/motion-experiment-part-iii.html
If this post was useful to you..consider buying me a beer via PayPal!
Even a $1 Draft will keep the Mule happily working..and help pay for equipment upgrades!
HDV MPEG2 transport stream file sizes/render rates
The data rate of the 720P MPEG2-TS files output from my cam is about 108.95MB/min or 1.82MB/s. Here is a table of video length-to-size conversions.
12m 1.32GB
15m 1.65GB
18m35s 2.07GB
19m12s 2.12GB
20m01s 2.18GB
34m 3.70GB
Exporting 720P HDV from Cinelerra takes two processes:
1) render the video
2) render the audio
Here are some rendering times using mpeg2enc and mpeg layer 2 audio compression:
duration mpeg2enc render rate
63m 310m 4.92min per min of video
duration mp2 render rate
63m 6m 0.09min per min of audio
Mplex takes about 7 minutes to mux about an hour of audio and video.
duration size
12m 1.32GB
15m 1.65GB
18m35s 2.07GB
19m12s 2.12GB
20m01s 2.18GB
34m 3.70GB
Exporting 720P HDV from Cinelerra takes two processes:
1) render the video
2) render the audio
Here are some rendering times using mpeg2enc and mpeg layer 2 audio compression:
duration mpeg2enc render rate
63m 310m 4.92min per min of video
duration mp2 render rate
63m 6m 0.09min per min of audio
Mplex takes about 7 minutes to mux about an hour of audio and video.
If this post was useful to you..consider buying me a beer via PayPal!
Even a $1 Draft will keep the Mule happily working..and help pay for equipment upgrades!
Monday, October 16, 2006
hard work is paying off / HDV workflow
OK! I've got the latest video up on iTunes and now I just need to edit the XML for it. Editing the damn XML always takes too long. And of course, I want to get the track list right with the correct track times and witty comments. Ufff. OK! So the track list is done and now to send the boys the email for the latest video! Hurrah!
More for my benefit than anyone elses, here is my HDV workflow using Cinelerra:
1) import video
2) edit video
3) for multiple segments, make sure you set "align to frames" and audio and video segments end at the exact same time.
4) for HD output, render using mpeg2enc settings
5) for DVD output, render using ffmpeg -target DVD from Cinelerra, something like this:
ffmpeg -f yuv4mpegpipe -i - -y -i /mnt/videos/20050721/20050721.wav -target dvd %
6) for iPod output, render using ffmpeg -target DVD, then output to mpeg4 video/aac audio mov container:
ffmpeg -i inputdvd.mpg -f mov -vcodec mpeg4 -qscale 7 -s 320x180 -r 29.97 -aspect 16:9 -acodec aac -ac 2 -ab 128 output.mov
7) import .mov to XP iTunes
8) upload .mov to website
9) edit RSS XML
10) final test in iTunes
If this post was useful to you..consider buying me a beer via PayPal!
Even a $1 Draft will keep the Mule happily working..and help pay for equipment upgrades!
Subscribe to:
Posts (Atom)

